INTRODUCTION
Welcome to the Organic Modeling lab!
Organic Modeling is the branch of modeling that deals with naturally-made objects: people, animals, plants, landscapes, etc. The most important aspect of organic modeling is maintaining good edge flow and a resilient topology, because most organic objects will deform in some way. This lab will use box modeling and contour modeling to define rough shapes, and primarily use Sculpt Geometry and Soft Select to fine tune areas. While there is debate over the exact line separating Hard Surface Modeling and Organic Modeling, the distinction is not important, because most models have some organic aspects and some hard surface aspects (as you will see in this lab).
Note: Most organic modelers are also proficient figure drawers with a good knowledge of anatomy. As you model, feel free to use any reference images you can find and import them as image planes if necessary. Be creative! In this lab, you will be modeling a dragon, which will force you to maintain a balance of realistic anatomical proportions while giving you the freedom to experiment with a variety of styles. As a result of this experimentation, this lab is quite open ended and we do not expect your dragon to look exactly like the one at the end, as long as the end result contains the same components.
Note 2: If you are already proficient at Mudbox or Zbrush, you may ignore parts of this lab and do them in your sculpting software of choice. However, the final mesh must be brought into Maya and the topology MUST BE equivalently good.
Outline
- Modeling half a torso + tail
- Roughly modeling a front leg
- Roughly modeling a rear leg
- Roughly modeling a wing arm (without the membrane)
- Sewing the three components into the torso
- Modeling a foot onto the rear leg
- Hacking a hand onto the front leg
- Adding wing membrane
- Mirroring the body
- Modeling the head
- Sculpting musculature
- Adding details and spikes
MODELING HALF THE TORSO + TAIL
An image plane is helpful here. You may use any photo or drawing of a dragon (although I couldn’t find any photos of dragons for some reason), or any four-legged animal (like a wolf, lion, alligator, or horse), depending on what you want your dragon to resemble. The only requirement is that it is a profile (side) view of an animal in a neutral pose. Four legs are not necessary, but you will have to skip or repeat certain sections of this lab if you choose an ostrich, a kangaroo, or a scorpion.
Note: Starting an organic model from a flat profile view can easily be done with contour modeling. If you are more comfortable matching the silhouette of your image plane the way you modeled the Cello Bridge in the last lab, by all means, do so. That method will be more precise, but significantly slower. If you decide to use contour modeling, then skip to step 3.
Switch to the front orthographic view and make a plane with the rough proportions of your torso, neck, and tail. If you have a reference image, you might still have to eyeball the neck and tail, but keep the torso roughly the same. Mine looks a bit like this (subdivided 20 units horizontally and 5 units vertically):

Go to Deform -> Lattice and select the option box. I set the divisions to 5 3 2.
Note: You should see 5 divisions horizontally and 3 divisions vertically. If you do not, check the axis marker in the bottom left corner. If yours shows Z where mine shows X, use 2 3 5. Or just switch to a different orthographic plane.
Now switch to vertex mode, make sure your ffd1Lattice is selected in the outliner, and warp your plane to match the desired torso/neck/tail outline. Again, try and follow the parts of your image plane where reasonable, and eyeball the rest. When you’re done, use Alt + Shift + D (delete by type -> history) to kill the lattice deformer. Repeat if necessary, or use soft select to fine tune. (Note: My dragon’s head will be to the left).

Don’t worry if it doesn’t look great. Nothing will look great until the end of the lab. We’re just getting the mesh down first.
Switch back to perspective view, highlight all the faces, Ctrl + E (extrude), and pull them out a little. WARNING: if you do not pull the faces out immediately, undo until you are sure the extrude has been undone. Once your faces are out, shrink them in the vertical direction a bit, and repeat the process a few times.
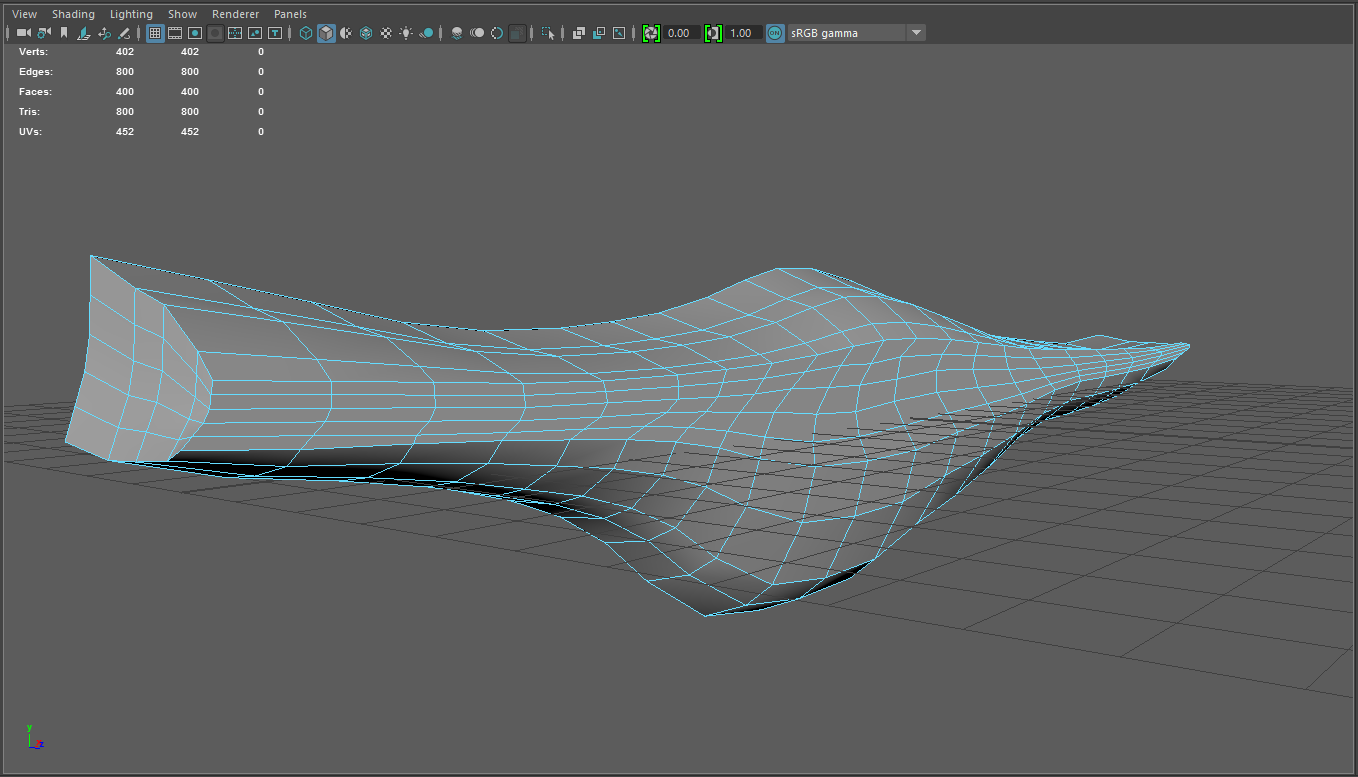
Delete the faces at the end of the neck and the faces on the x-y plane. You can leave the end of the tail.

Now for my favorite tool: Sculpt Geometry! Go to Mesh Tools -> Sculpting Tools -> Smooth Tool. Make sure your brush size is reasonable, and smooth out the flat part of the body. Push the sides of the neck and tail in a little with soft select or other Sculpting Tools, but don’t spend too much time. We’ll be doing this more throughout the lab.

The last thing we need to do is to prepare the Torso/Tail for the Arms, Legs, and Wings that will eventually be sewn in. Use your reference image to select three areas of the mesh, and delete a RECTANGULAR region for each hole. This means that each hole you delete should be a normal square or rectangle with no funky shapes. This is to make sure we don’t have triangles when we sew the parts in.
Note: Keep anatomy in mind. Fantastical models are grounded by believable anatomy - make sure you keep the shoulders and hips where the bones would connect in a real animal, not where the legs may appear to start in your image plane.

The mesh resolution might restrict exactly where you can place holes, but we can always fine tune it later as long as they are roughly in the right area.
ROUGHLY MODELING A FRONT LEG
This section uses box modeling (well, technically a cylinder, but close enough to a box) to cut, warp, and refine a primitive into the rough shape of a front leg (or arm).
Double click on an edge in the front leg hole to select the hole loop. Use Display -> Heads Up Display -> Poly Count to count the number of edges selected. Create a new primitive cylinder and make sure the Subdivisions Axis matches this number. This step is crucial to ensure that when you Frankenstein the front leg into the hole, they match one to one. For instance, my front leg hole has 8 edges. I also made the Subdivisions Height 6 just to have something to work with initially, but I will probably add edge loops later. Here is my cylinder:
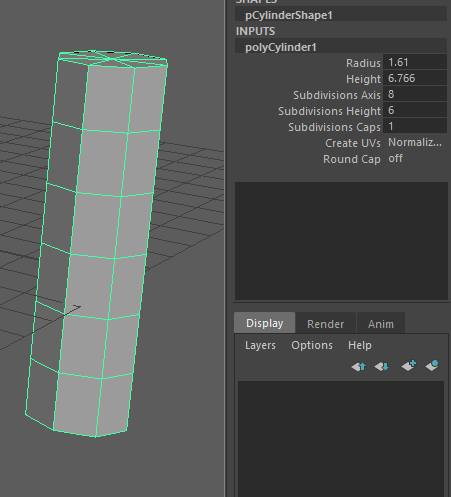
Delete the caps. Insert an edge loop near the shoulder (top) and 2 more near the elbow. Select the elbow loop, turn on soft select, and shrink it a little. Select the wrist loop (at the bottom), and shrink it a little narrower than the elbow. Select the forearm loop (with soft select) and shrink it so it’s still bigger than the elbow joint, but thinner than the upper arm. (I’m using a human arm as reference, but if your ideal arm is different, stick to that. Just make sure it makes sense).

Select the elbow loop again. Flatten it and pull it back (to suggest a slight bend in the arm). Grab the bicep edge (with soft select) and pull it forward. Grab a tricep edge and pull it back.This is just to give you an idea where the muscles are for later, when we sculpt them in more carefully.

Go to Deform -> Nonlinear -> Bend to apply a Bend deformer to your arm. Open the deformer in the channel box. Make the curvature very negative, play with the high and low bounds, rotate the deformer, and translate it upwards a bit to get the shoulder bend. Mine looks like this. Your numbers may vary.
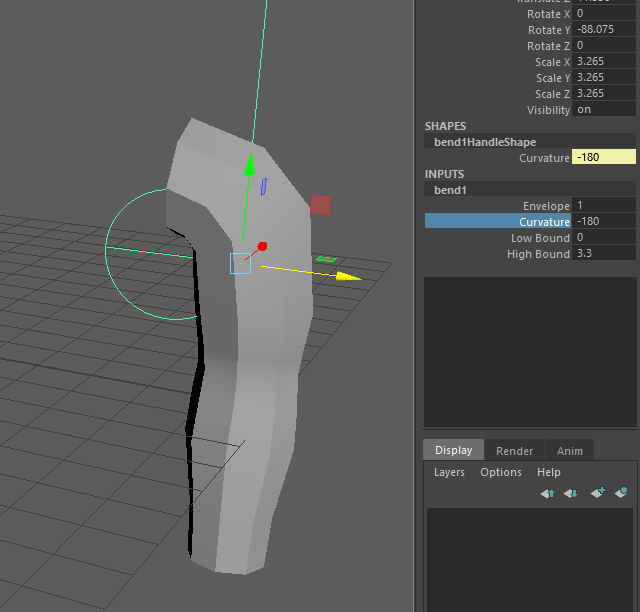
When you like your arm, don’t forget to select the arm and do Alt + Shift + D to kill the deformer.
ROUGHLY MODELING A REAR LEG
I won’t go into as much detail, since the process is largely the same, but the bends will probably be different.
Again, do not forget to match the subdivisions in your cylinder to the edges in the rear leg hole. Here is the leg after:
- adding knee loops
- shrinking the knee loops
- pulling out some quadriceps, hamstrings, calves
- shrinking the ankle
- thinning the shin

Use our trusty nonlinear -> bend deformer and roughly place the leg near the leg socket
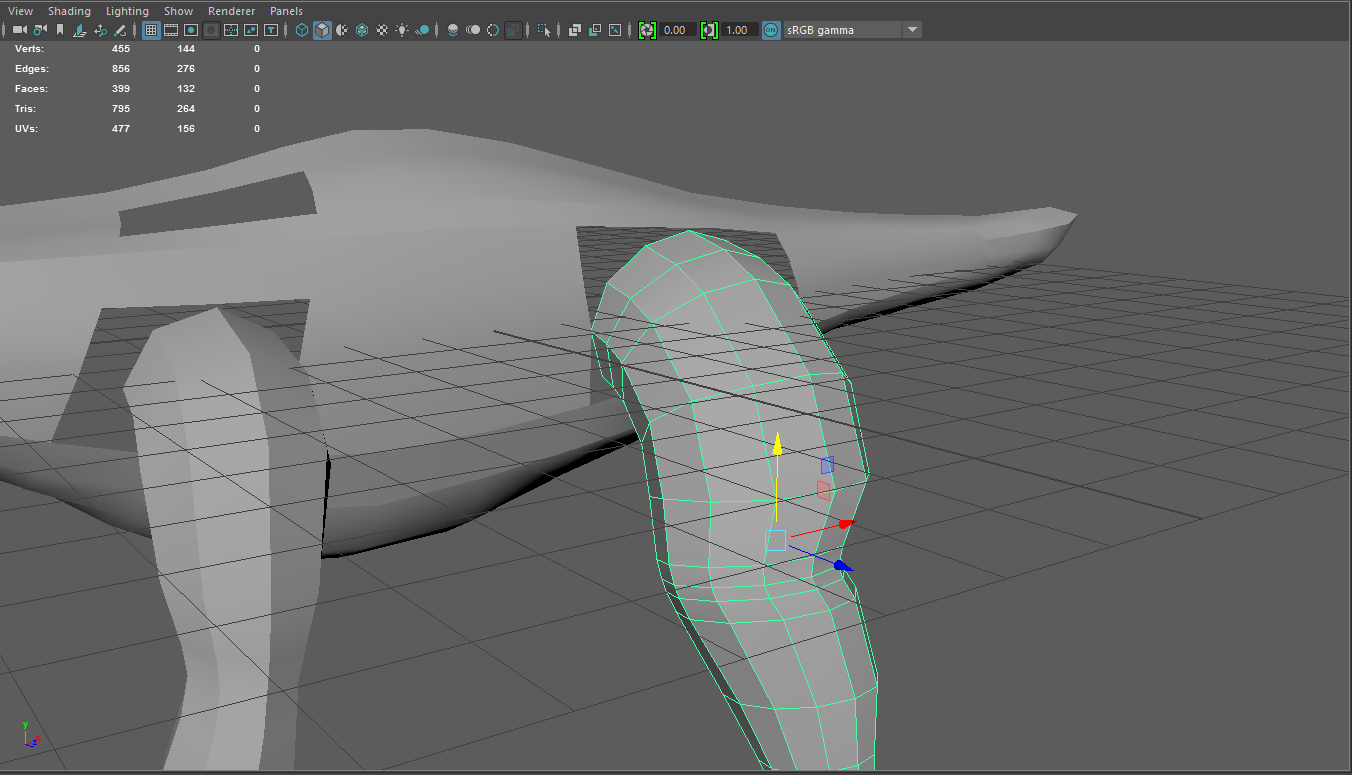
This looks quite silly. I hope it looks less silly when I’m done.
ROUGHLY MODELING A WING ARM (NO MEMBRANE YET)
The only thing that’s different about the wing arm from the front leg is that I’m going to add weird bones jutting out of the elbow and the tip to support the wing membrane. This is sort of inspired by a bat wing, which is the closest real life thing I can think of to a dragon wing. So here is my plain wing (pun intended) without the extra bones:

Extrude 1 face near the elbow and 2 faces near the hand, but this time, set the extrude options so that Division says “4” and Keep Faces Together says “Off” (I do this a lot later on).

Pull the 3 spindles apart, narrow out the faces, and curve the spindles. Since there are only 4 divisions, you can probably get away with manipulating vertices manually, but I used soft select and a combination of rotates/translates. (If you can’t tell, I’m a huge fan of soft select).
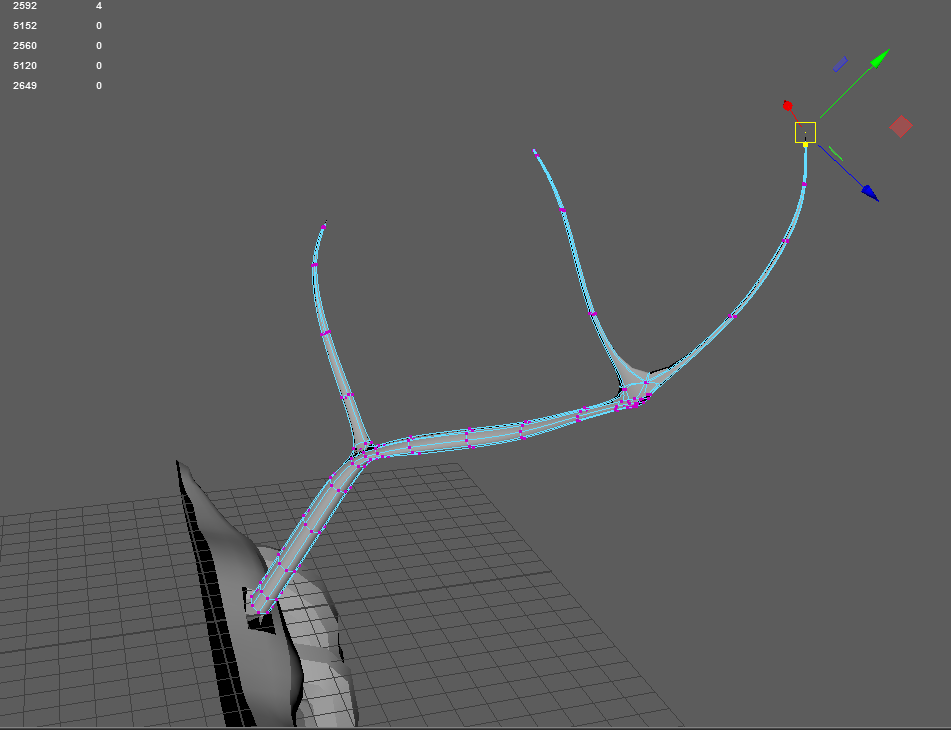
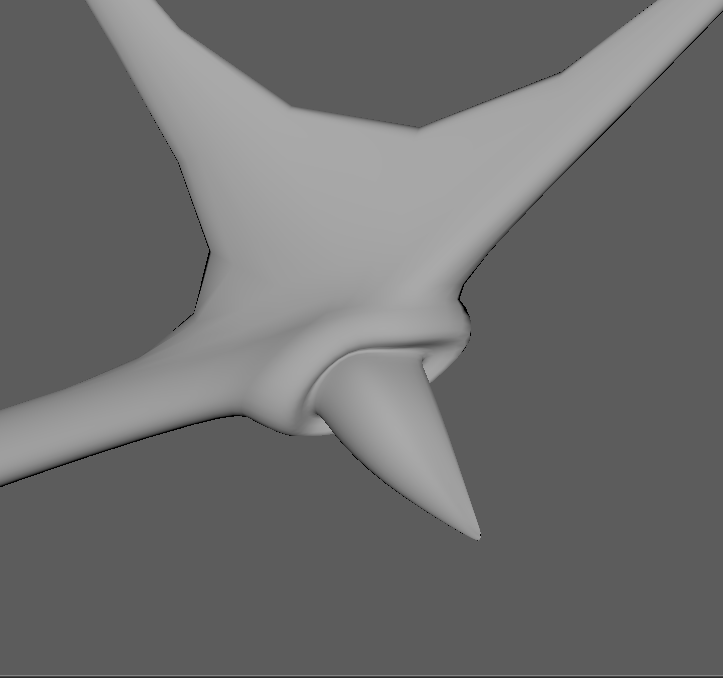
I know I saved the foot and hand for later steps, but let’s add the bat thumb in just to finish the wing. It won’t take long. Select the loop around the hole at the end of the wing arm and do Mesh -> Fill Hole
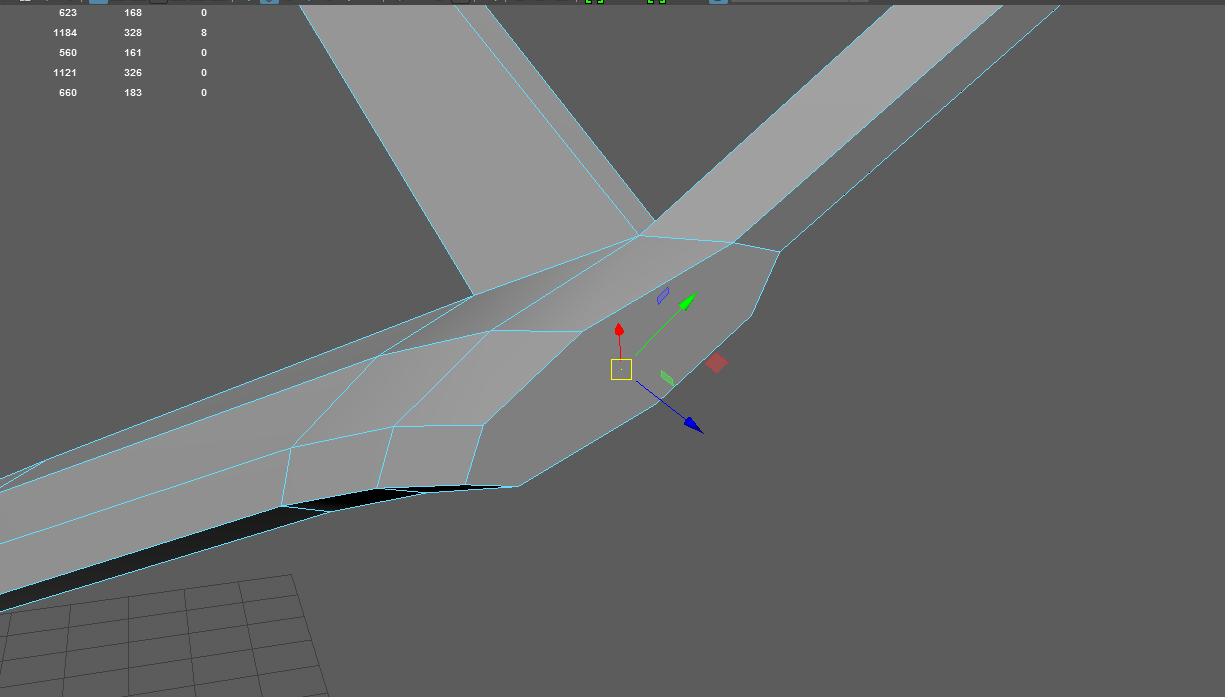
This is BAD. The face has more than 4 sides, which is arguably worse than a triangle. Use the multicut tool to slice it into quads. I made 2 diagonal cuts in this case.
This part is tricky. Select a few faces near the thumb and extrude. Use the scale tool to shrink it a bit and the translate tool to pull it out a bit. Then use the Extrude tool again. Shrink it a bit, and push it IN.
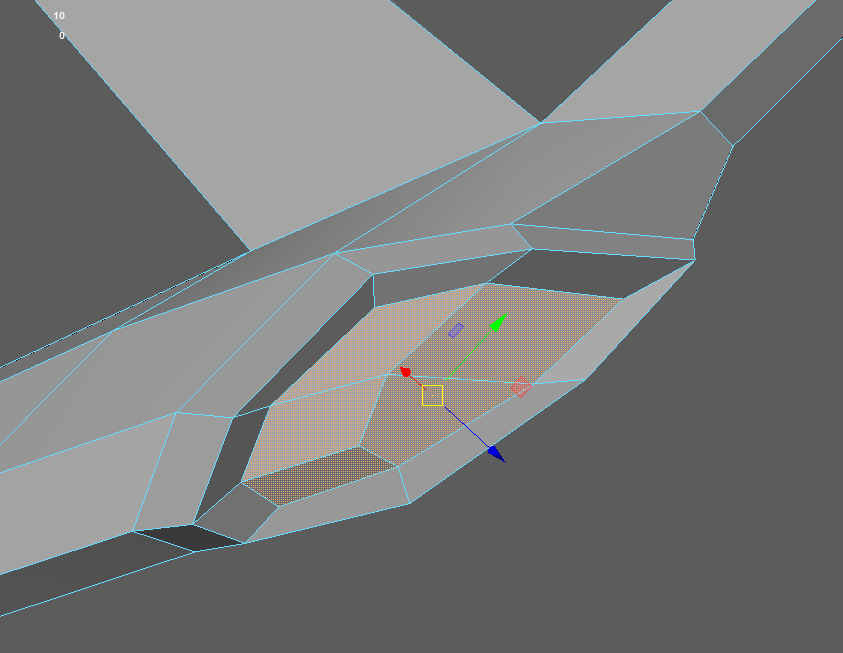
This will help create a ridge around the thumb claw
Extrude, set the divisions to 4, and pull out to the desired length of nail.
SEWING THE THREE THINGIES INTO THE TORSO
Now is as good a time as any to Frankenstein the body together. Move the pieces into the holes, select all the pieces, and do Mesh -> Combine. Get into a view like this (you might have to soft-select tweak the holes).
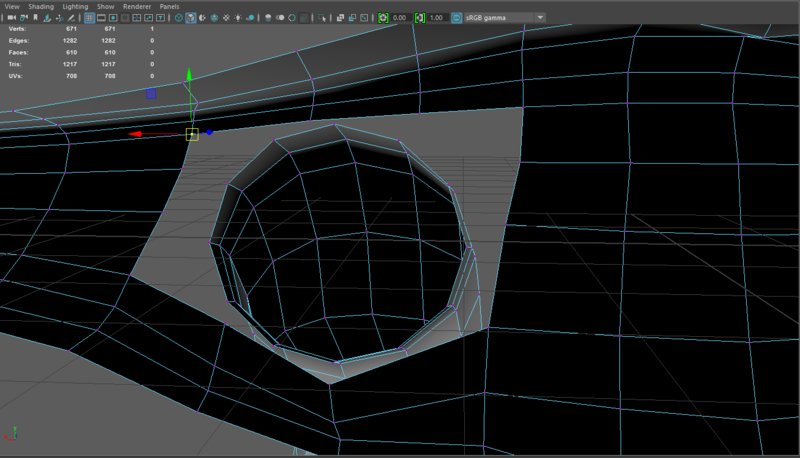
Select the vertices in the hole one at a time. Switch to move tool with “W”. Hold “V”. Drag the vertex (from the yellow circle in the middle of the move tool) and snap it directly to the corresponding vertex in the limb one. Repeat for all vertices. Do this for all 3 limbs. This should take no more than a minute or 2. Also, it’s easier if you do it from the inside.
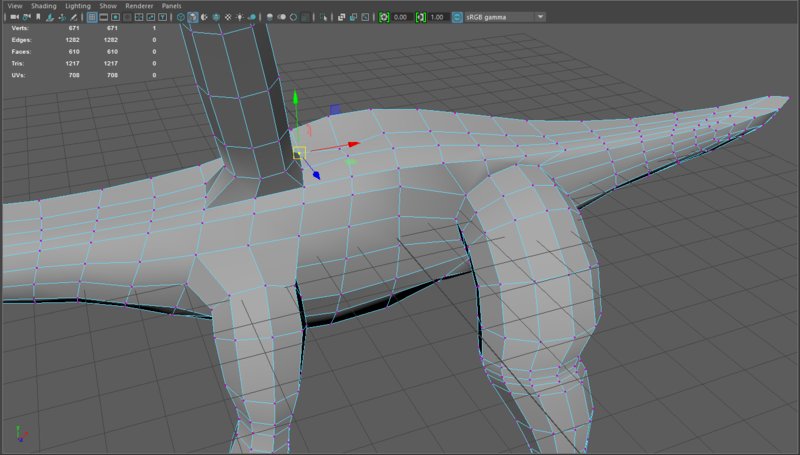
Highlight all the vertices in the whole mesh and do Edit Mesh -> Merge. Click on a vertex in one of the newly joined seams (just click, do not marquee select), and move it to make sure the meshes don’t separate. Take a quick look over the whole mesh to make sure the merge didn’t merge anything unwanted.
Take the Sculpt Smooth tool and fix the obviously weird parts. Sculpt a little more if you’d like. Feel free to experiment with the other Sculpt tools, but we’ll finalize everything later after adding more edge loops. The geometry is not yet hi-resolution enough.
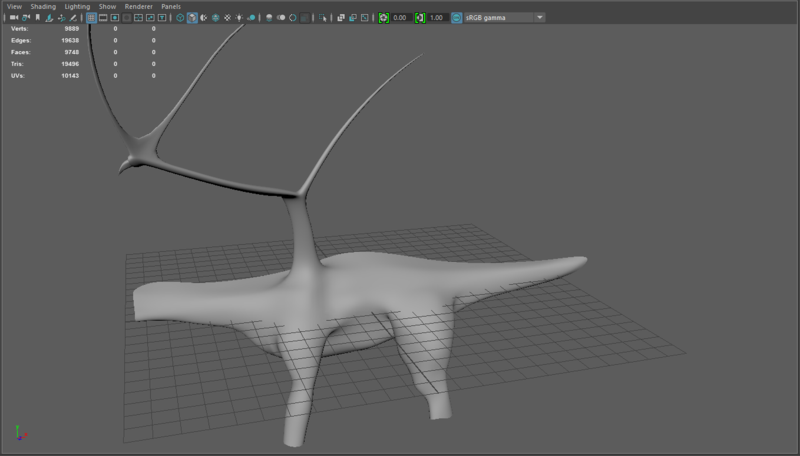
Now I’d like to remind you to do something you should be doing automatically: checking for non 4-sided faces.
Go to Mesh -> Cleanup and make sure “Operation” is set to “SELECT matching polygons”. You don’t want it to actually clean anything automatically.
Under “Fix by Tesselation”, pick “4 sided faces”. It should highlight most (if not all) of your model’s faces.
Hold Shift and marquee select your entire model, and it will invert the selection. Any faces that are now selected are not quadrilaterals. Fix them.
Fix a pentagon by using the multi cut tool to cut from one vertex to the opposite edge, and continue cutting until you reach the edge of your mesh or another pentagon.
Fix triangles by deleting an edge to merge them with the nearest quadrilateral, and then follow the pentagon fix.
MODELING A FOOT ONTO THE REAR LEG
Start by extruding the bottom loop of the rear leg ankle. Make it slightly larger.
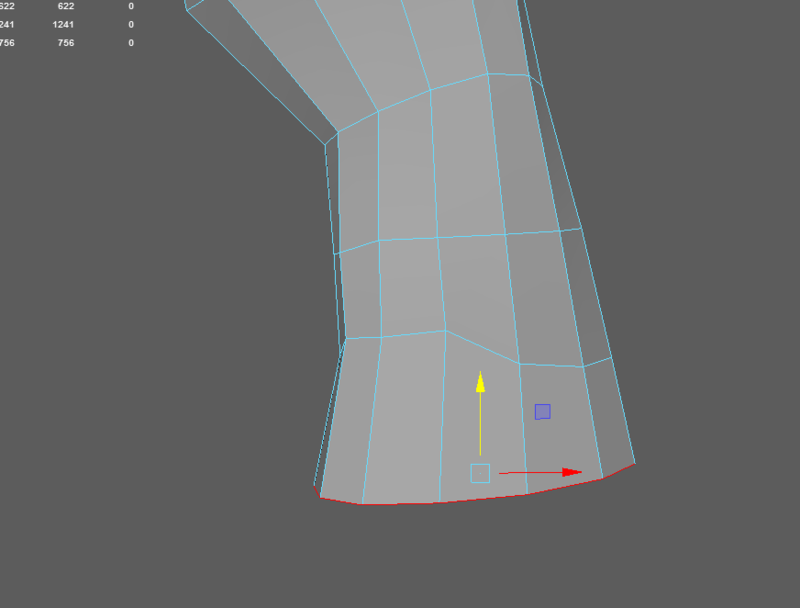
Select the faces around the bottom foot. Extrude, expand slightly (this will create an inner lip of faces that we’ll deal with later), and move forward slightly. This will form the base of the foot and the heel area.
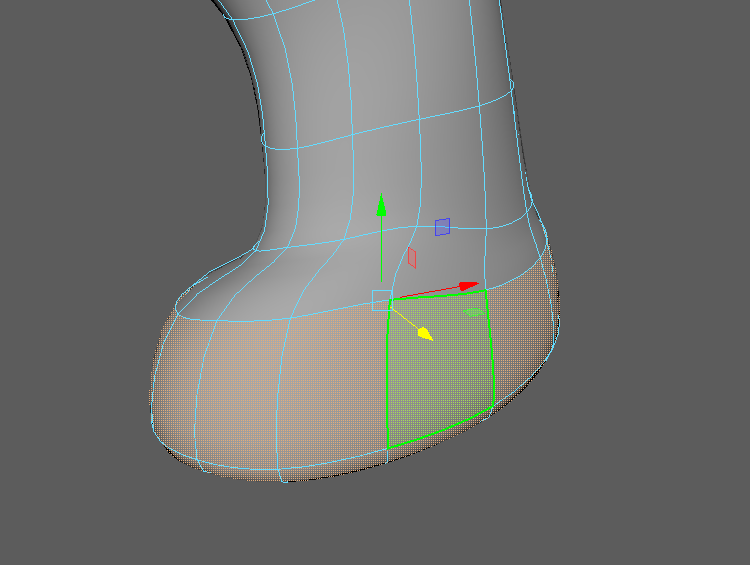
I conveniently had 4 faces on the front of the foot as a result of the way I initially made the leg. Try to find 3 or 4 areas on the front of the foot (to act as toe stubs) and extrude them all separately. If those areas are 1 face each, you can just extrude once and keep the faces separate.
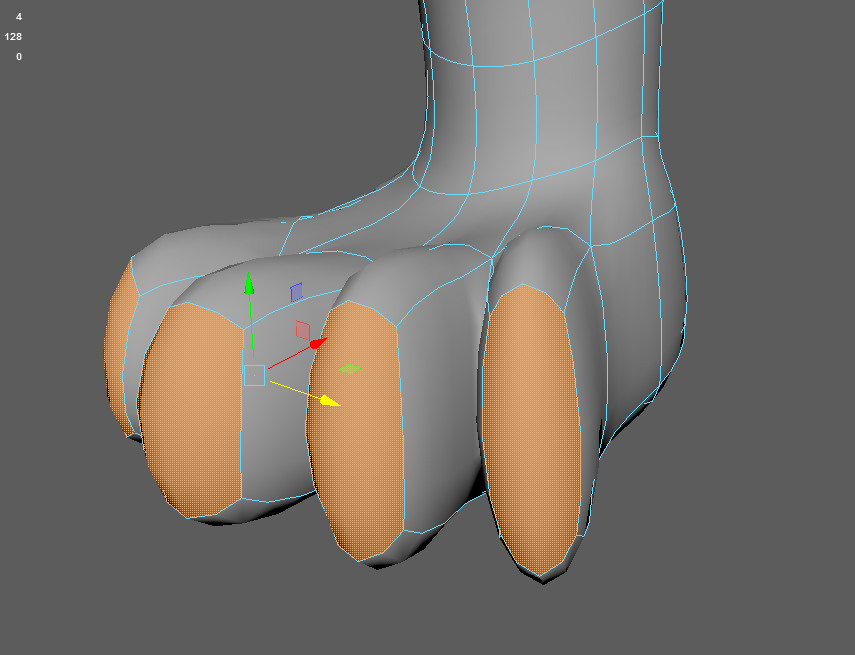
Select and Extrude each individual “toe” (I used all 5 faces on each toe).. This will significantly bulk up those toes.
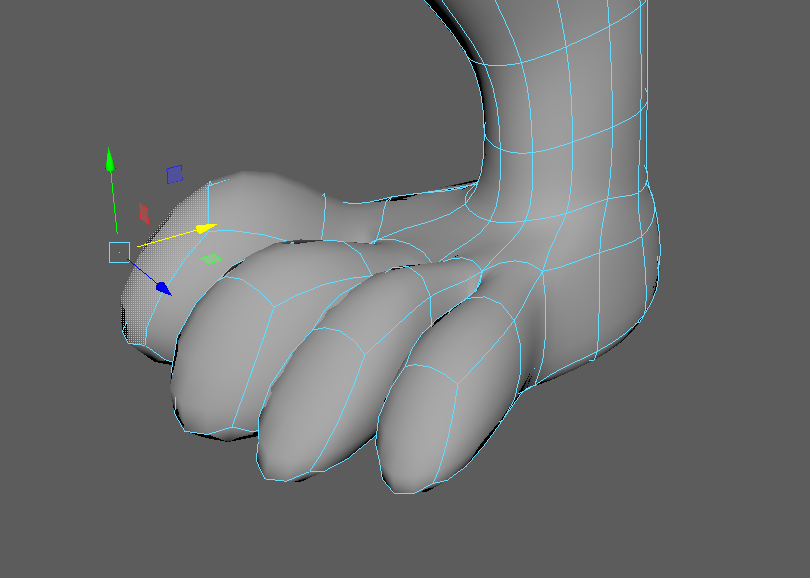
I added 4 edge loops to cut across the top of each toe and pulled them up near the ankle to show ridges. I also did some minor manipulations to thin out the toes (soft select edge loops + shrink). Then I shrunk the whole foot a bit (it was getting too big), softly pulled the toes down, and angled them. Those were all personal touches and depend entirely on what style of dragon you’re going for. Be creative!
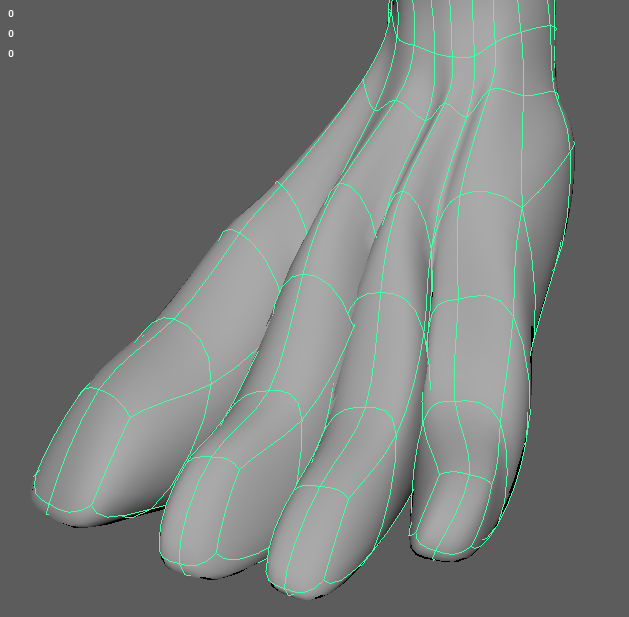
Notice there is still a gaping hole at the bottom of the foot
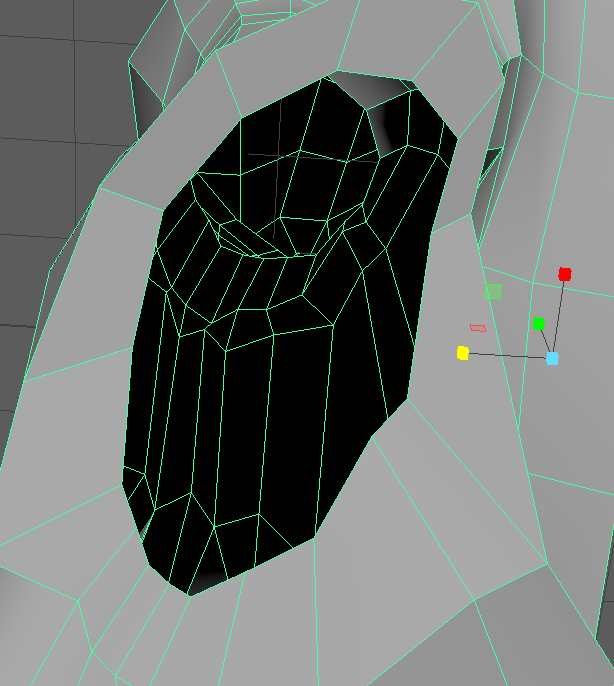
Fill it up with Mesh -> Fill Hole and use the multicut tool to cut it up into Quads. They don’t have to be perfect - nobody’s ever going to see the bottom of the foot.
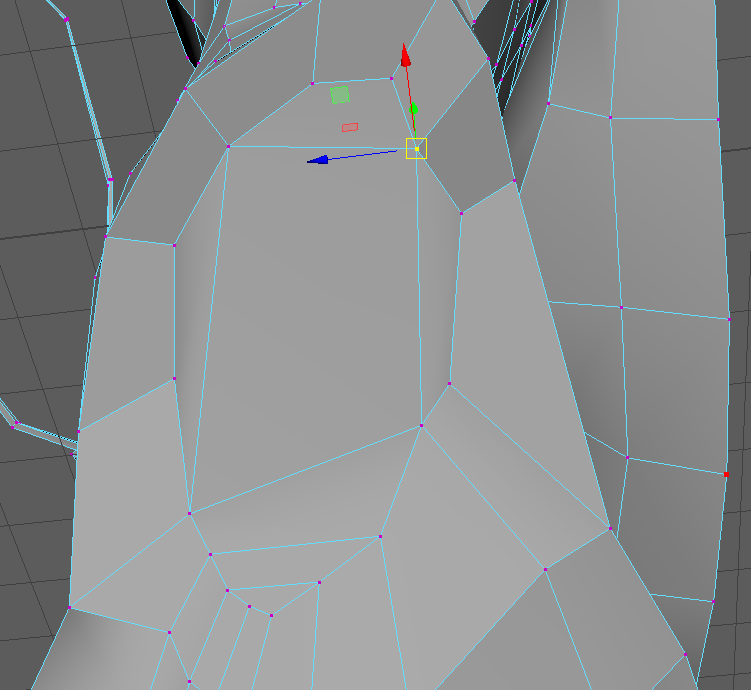
Now go back to the Toes and select areas in preparation for extruding Talons.
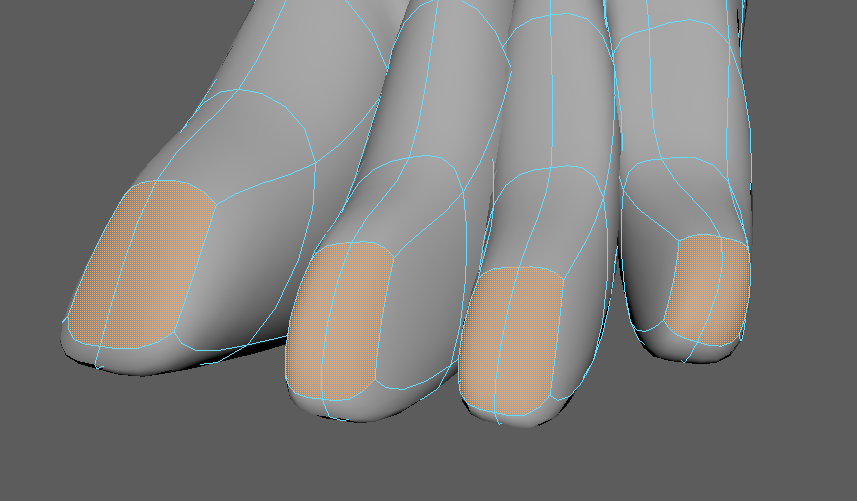
Extrude Talons exactly the same way we extruded the thumb claw in the wing (extrude, pull out, grow, extrude, pull in, shrink, extrude, shrink, pull out far, set division to 4, switch to move tool and curve the talons).
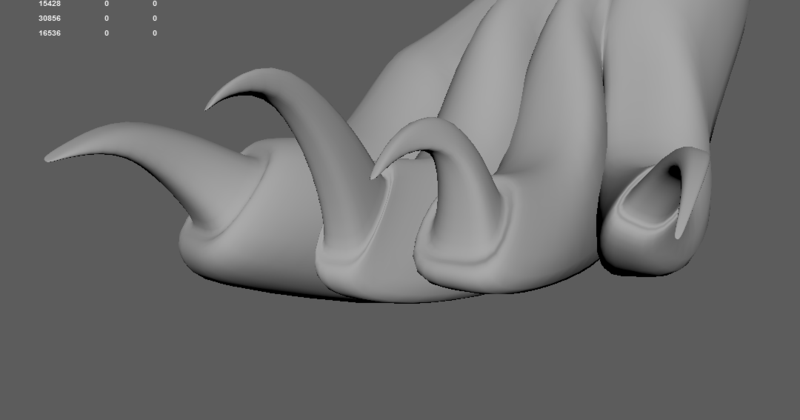
A note about the foot: The polygons are Intersecting in un-smooth preview. If the foot moves later as a piece, this should not be a problem because the topology is still good. Face intersections are not ideal, but they’re better than having the toes look separated.
MODELING A HAND ONTO THE FRONT LEG
This will be similar to the foot, but shaped slightly differently to have an opposable thumb (because why not?) Since there’s no fun in redoing Part 6 from scratch, we are going to copy the foot, amputate the big toe, reorient it so it’s like an opposable thumb, stitch up the hole, cut a new hole somewhere else, and reattach the big toe into that new hole. We’ll finish off by sculpting the Frankenfoot to look like a hand. Efficiently reusing pieces of your model is an important skill in modeling, both hard surface and organic.
Select the faces on the foot and go to Mesh Tools -> Duplicate. Drag the duplicate foot forward a bit and do Modify -> Center Pivot.
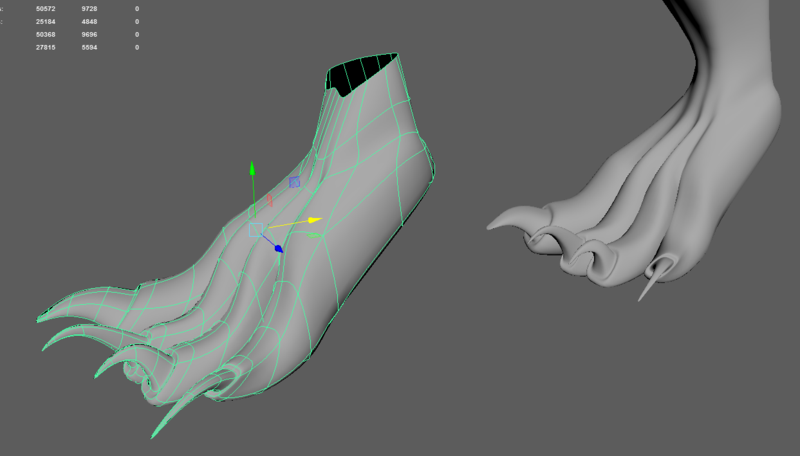
Select the faces of the big toe (inner toe). It’s quick if you use the “Shift + Click + Double Click on the next face” trick to select face loops.
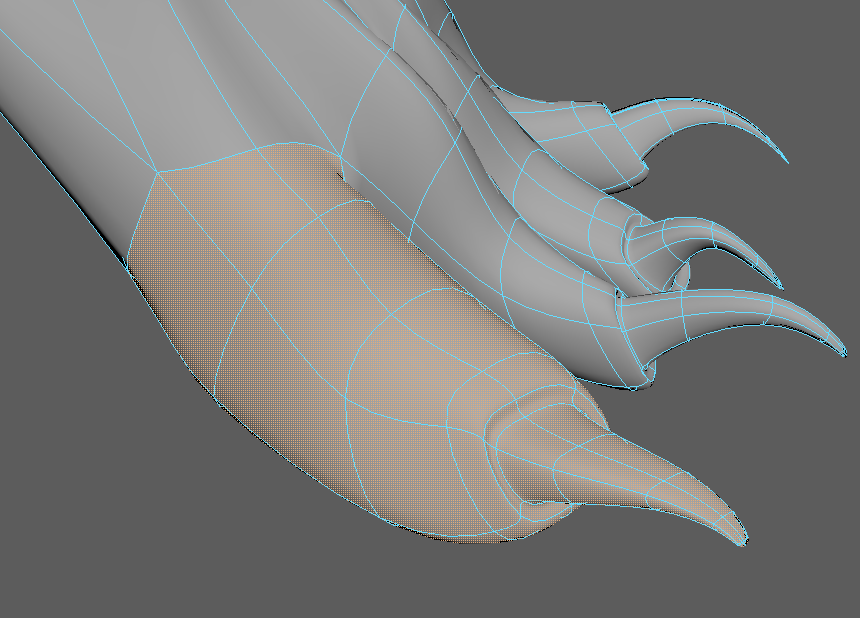
Do Edit Mesh -> Extract and Mesh -> Fill hole on the hole you just created
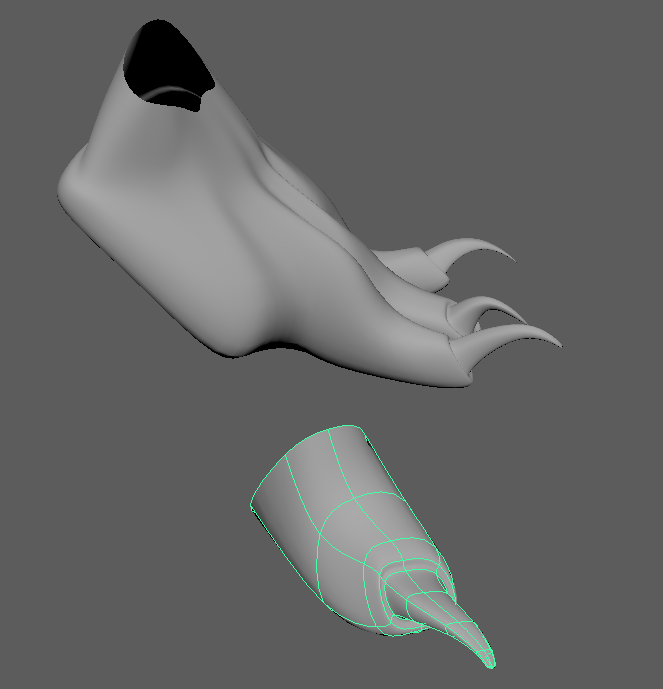
If necessary, use the multi cut tool to add a few edges behind the thumb stump to prepare for the new stump. Don’t create triangles or ngons.
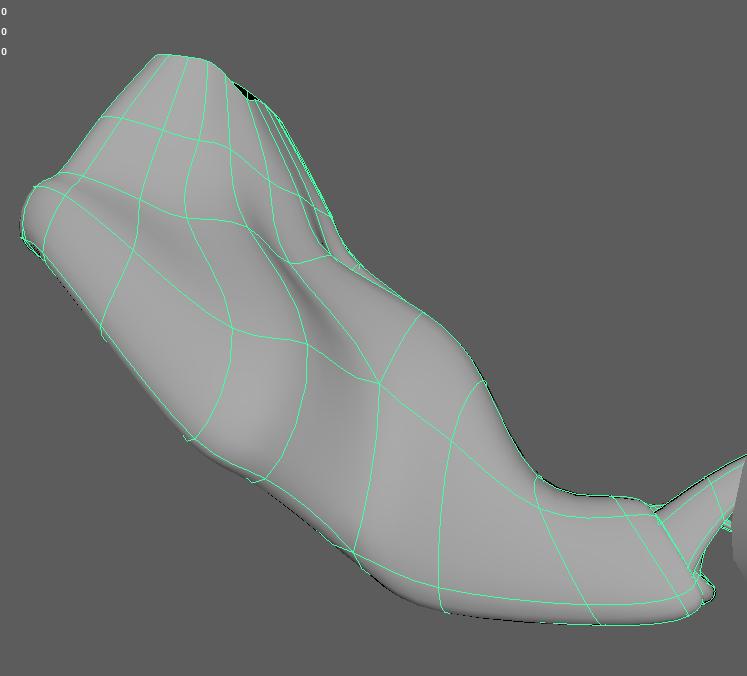
Turn your toe thumb sideways. Now look carefully at the edges at the base of the toe thumb and find a matching patch on the foot. For instance, my toe thumb base has 6 sides, with 2 edges on the front and back, and 1 edge on the top and bottom.
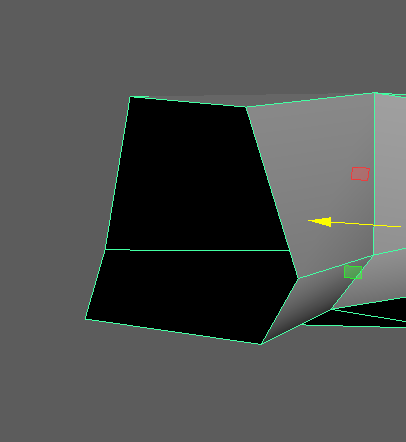
This will match with a hole created from 2 vertically stacked quads on the foot. Cut those quads out.
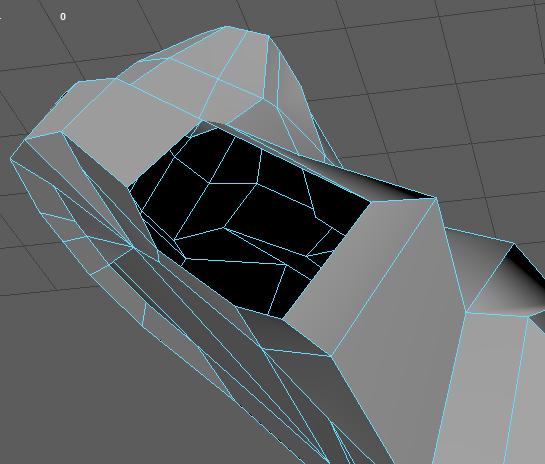
Now sew the thumb in place the way you sewed the legs into the torso.
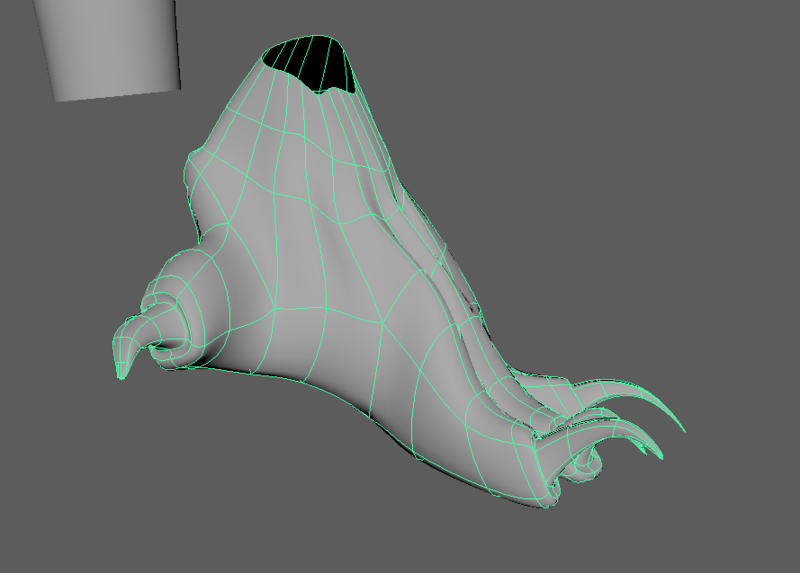
Use a combination of Soft Select and Sculpt geometry to shape the fingers however you like. I basically just inverted the curvature by selecting the fingertips and rotating them to bend the fingers the other way, and then smoothed out the ridges a bit.
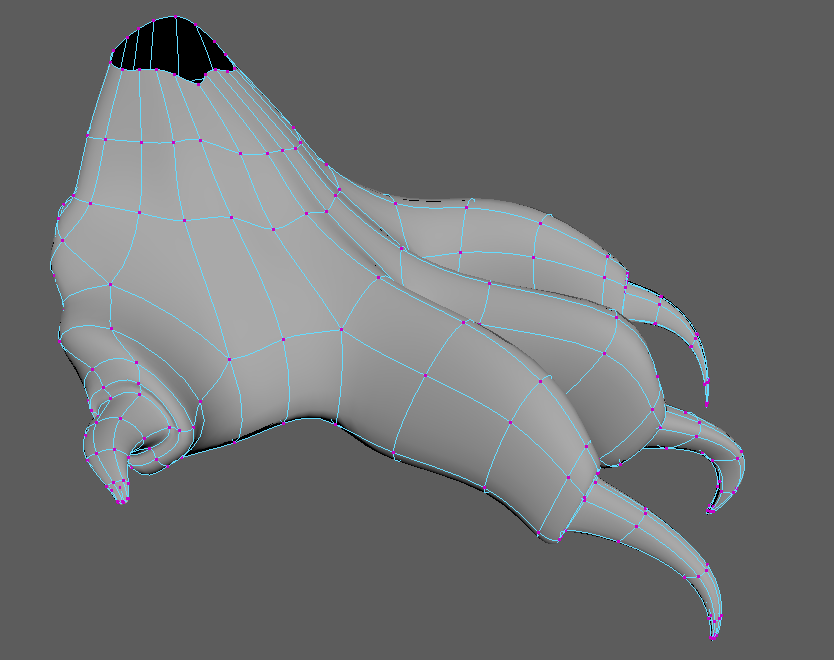
The last step is to sew the hand onto the wrist. This is a problem because the wrist connection in the hand will most likely have a different number of edges than the wrist connection in the arm. For example, my hand has 18 edges and my arm has 10 edges. Add edge loops wherever the arm’s edge loops are least dense to remedy this problem. This will probably add more edges to the neck, which will be useful later anyway. Sew when you are ready.
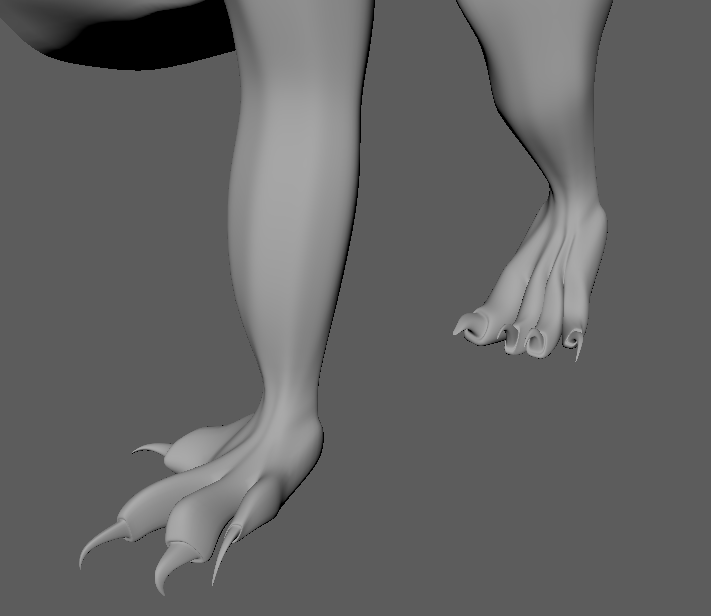
Check for non quads again.
ADDING THE WING MEMBRANE
The membrane is tricky because the front and back planes of the membrane need to be very close together, but not intersecting.
My wing bones are only about 8 edge loops around, and the membrane needs to be thinner than the bones. So thicken the bones a little and add an edge loop like this:
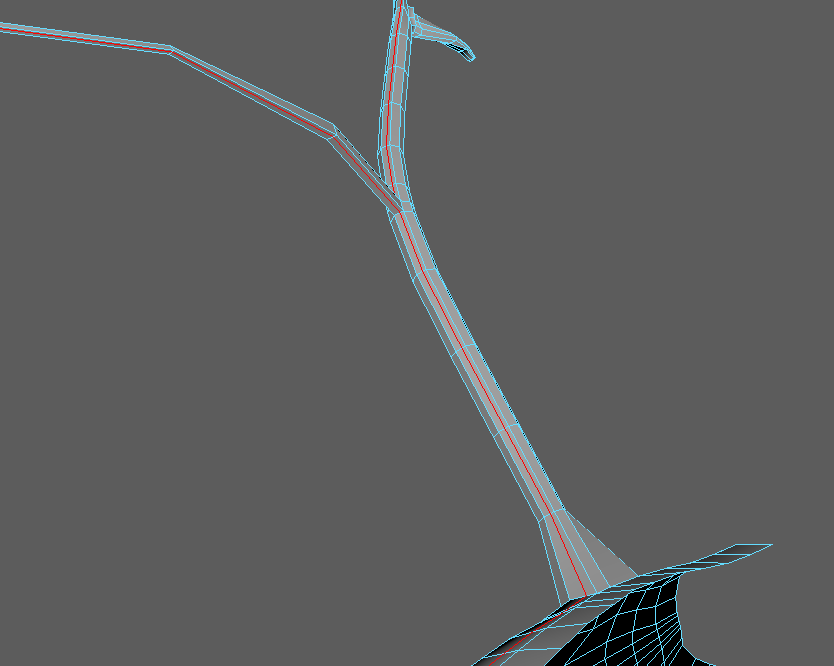
Delete the faces directly above the red line from the last image. In my case, for the segment closest to the torso, I cut out 4 faces from the torso, 5 from the wing arm, and 4 from the inner side of the spindle.
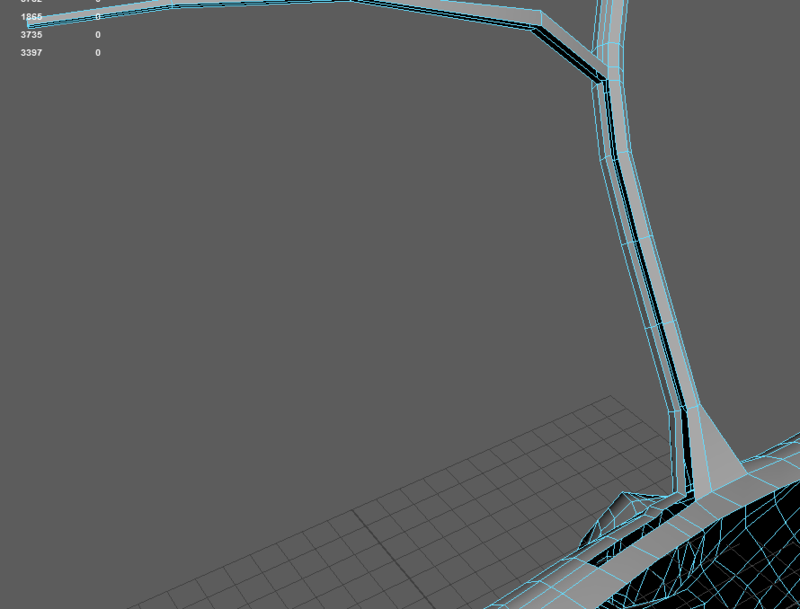
Select the 5 edges on the wing arm that are on the upper side of the hole and extrude them out.
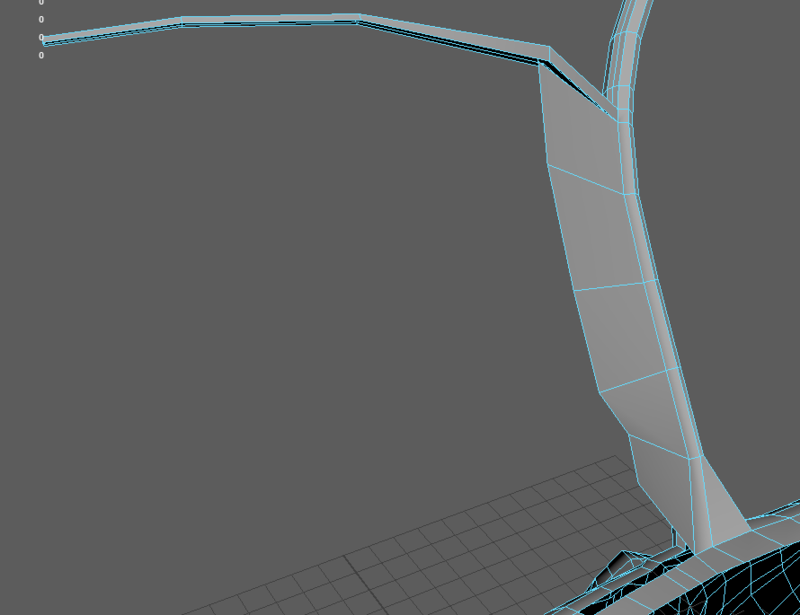
Hold V and snap the corners of the extruded flaps to the corresponding vertices on the spindle/torso. Then extrude the 5 edges on the edge of the flap and repeat the process.
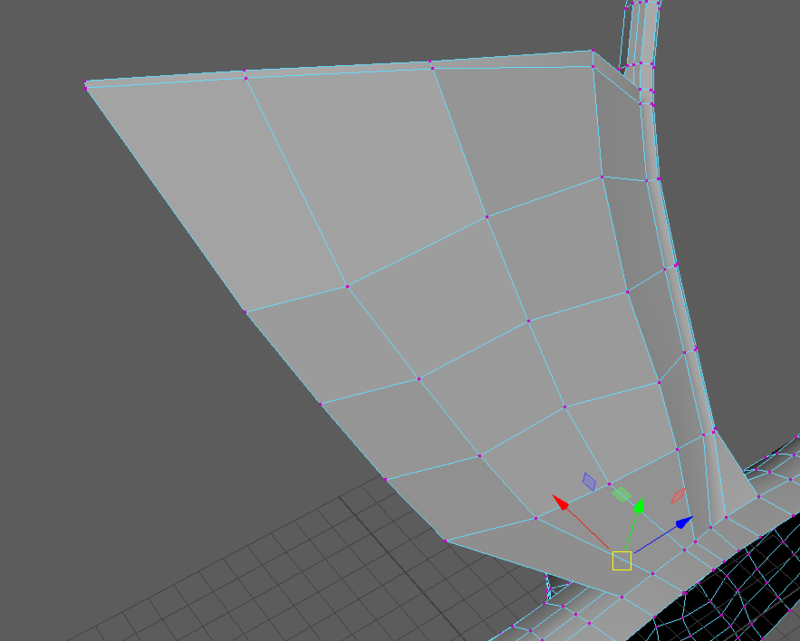
Use Sculpt and Soft select to shape the wing. Then select the membrane faces and do Edit Mesh -> Duplicate. While the Duplicate tool is still active, push the new face down from the previous one. This works just like the extrude tool, except the new faces are not connected to the old ones.
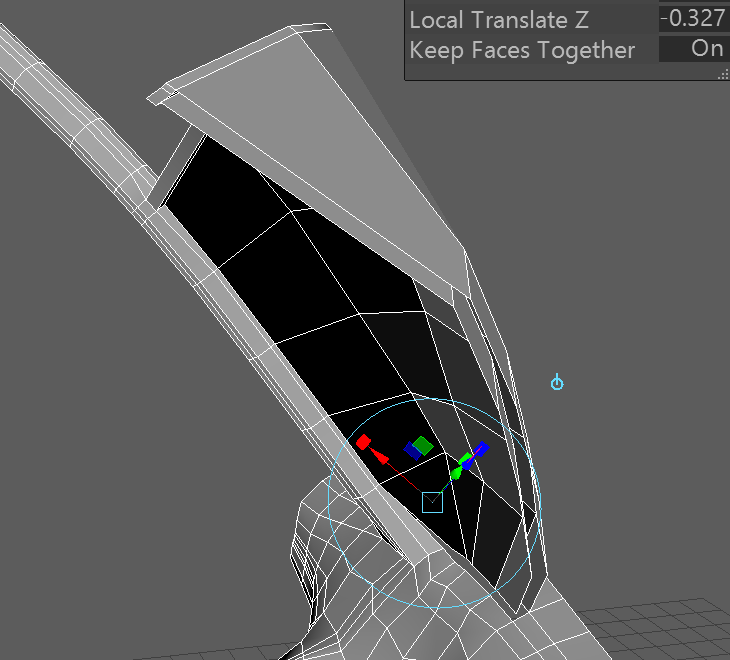
Reverse the normals on the lower flap of the wing. Make sure 2 sided lighting is off so you can check to make sure that both sides of the membrane face outwards. Merge all the vertices of the new bottom membrane with the vertices on the frame (the bottom edge of the hole you created in step 2).
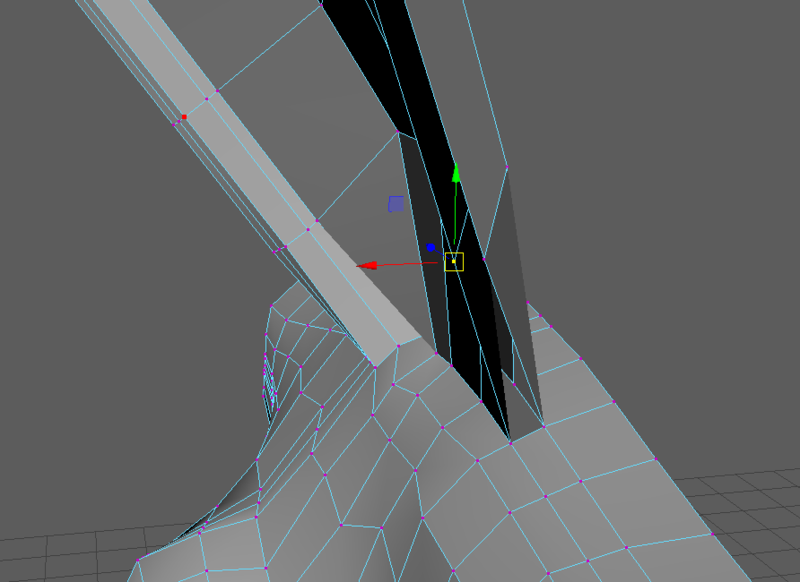
Fill up the remaining holes on the back with Mesh Tools -> Append to Polygon. The first segment of your wing should now be complete. Make sure the top and bottom of the wing don’t intersect.
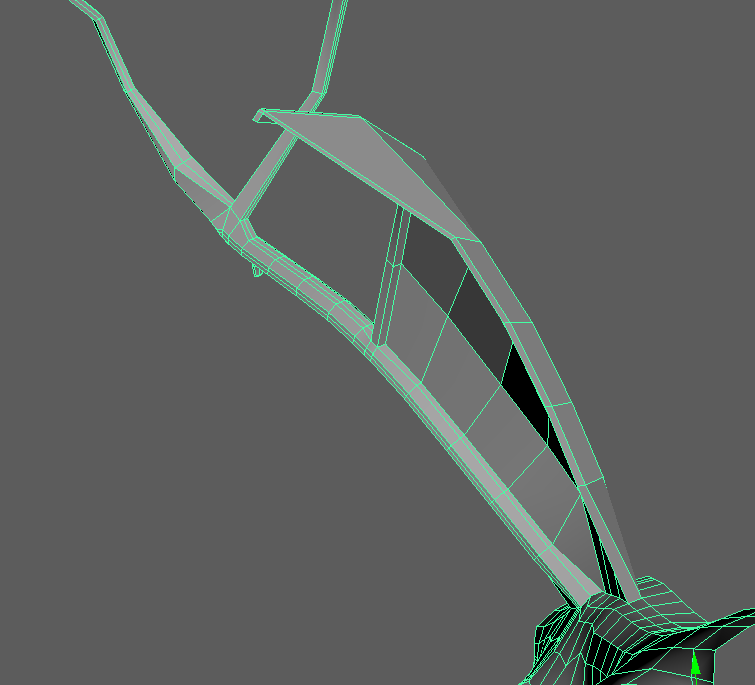
I’m not going to write out the next segment step by step. It’s exactly the same as the previous segment, except you connect to the first spindle instead of the torso. The third segment is triangular and spans directly between 2 spindles (with no wing arm in between). So I didn’t use any extrudes, I just did the whole thing with Append to Polygon.
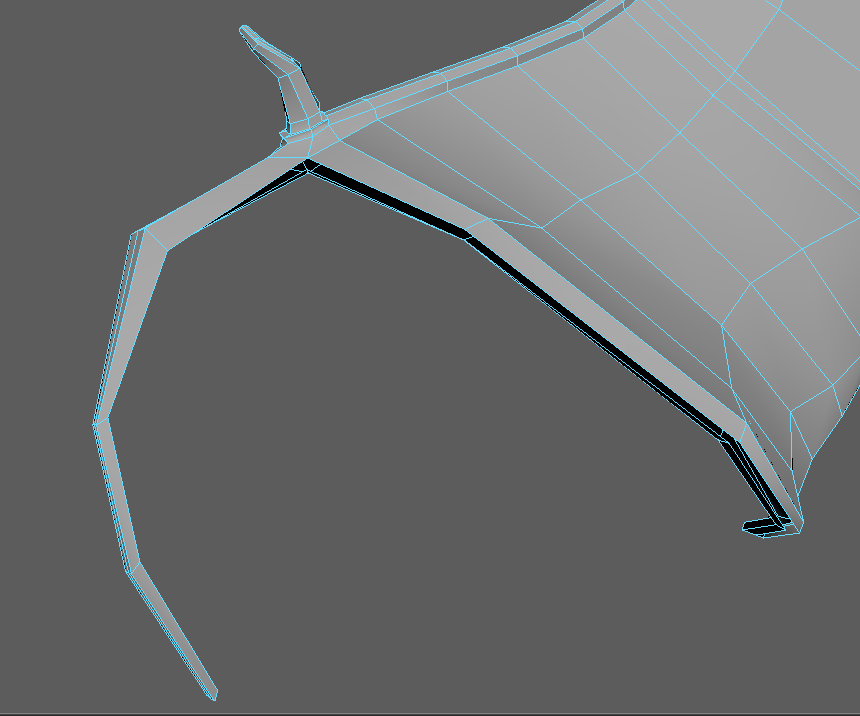
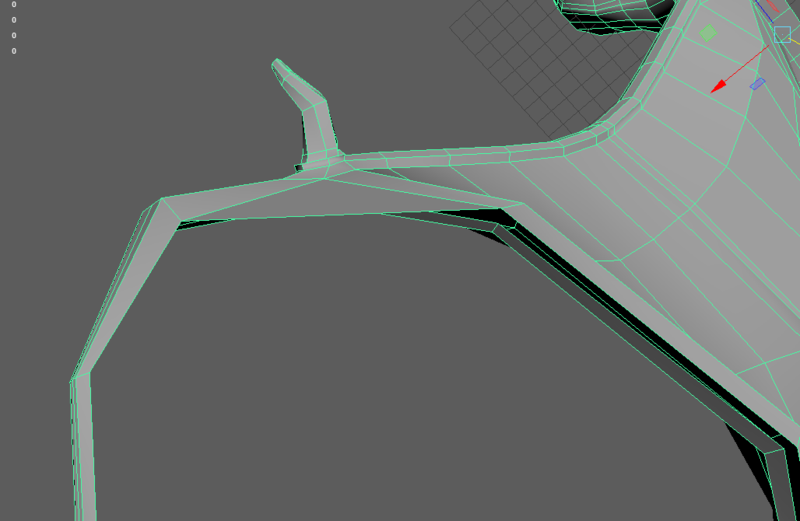
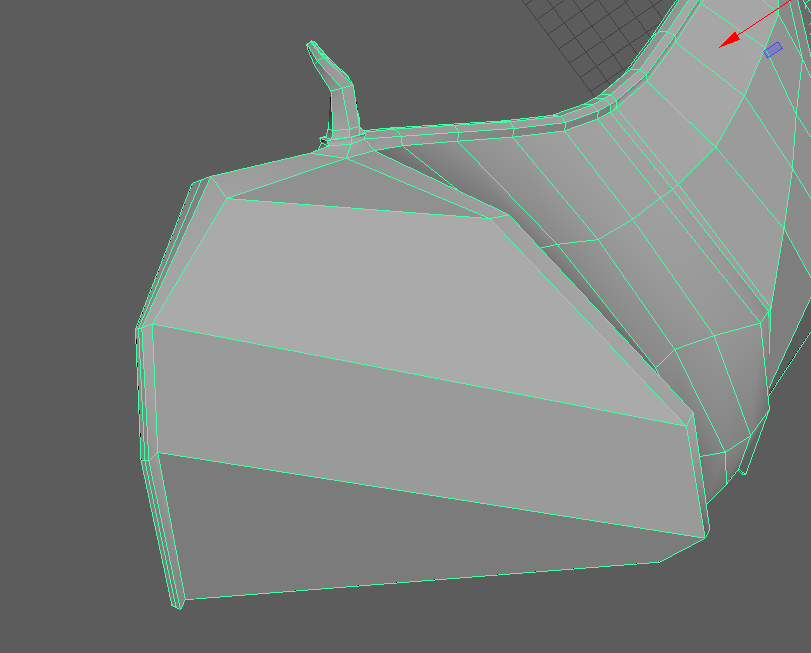
The one catch with this now is that there are triangles! (oh no!) Just delete the 2 triangular faces and create an edge loop through the 7 quads that are still in the membrane. Grab the vertices nearest the wing arm tip and merge them,
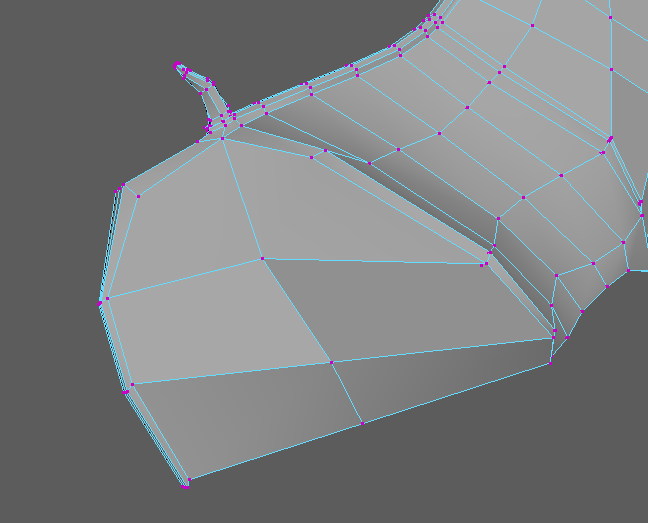
Your wings should now be complete.
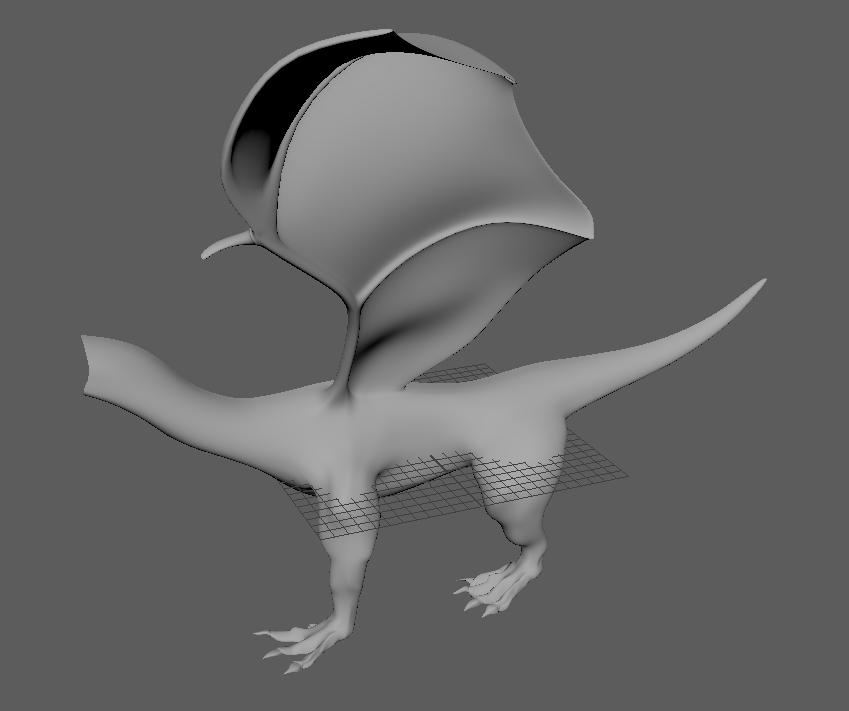
Hint: Smooth preview periodically to make sure your topology flows correctly.
MIRRORING THE BODY
By now, you’re probably itching to see the whole dragon body, instead of just half of it. There are a number of ways to achieve this in maya, and I’ll use Duplicate Special.
Before we can mirror the dragon’s left half, there’s a problem we need to fix.
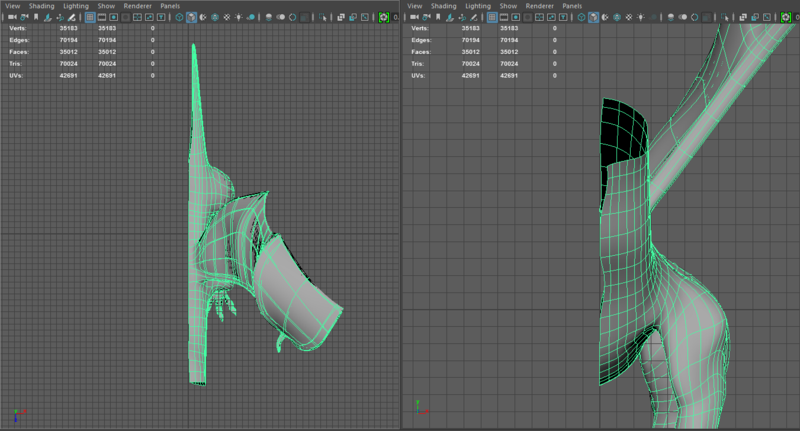
The midsection is not a straight line! There is no way to make this dragon symmetrical if the middle edge is not perfectly centered.
Fortunately, there’s an easy fix. Double click one of the center edges (to get the loop) and deselect anything that’s not supposed to be on the ZY plane (it’s ZY in my case, if you see my images. Yours might by XY).
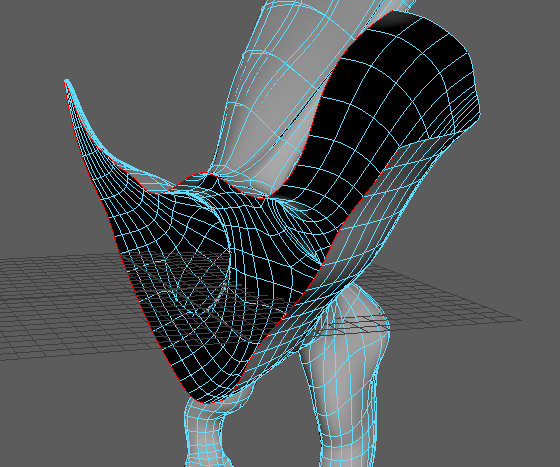
Use the scale tool. Make sure the the Axis Orientation in the Tool Settings is set to “World” and flatten all of these edges in the X direction (or Z in yours). Basically, you want all of these edges to be on the same plane. Flatten them to zero, let go of the scale tool, and flatten again. Do this 3 or 4 times or until the scale tool glitches and does not let you flatten anymore.
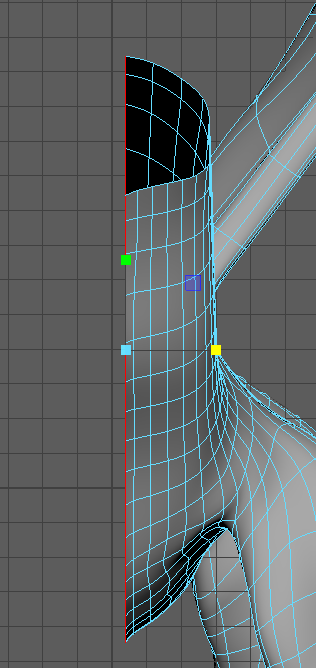
Now that the center edges are all in the same plane, switch to the move tool (make sure Axis Orientation is set to World), hold down X, and slide these edges until they snap to X = 0 (the YZ plane).
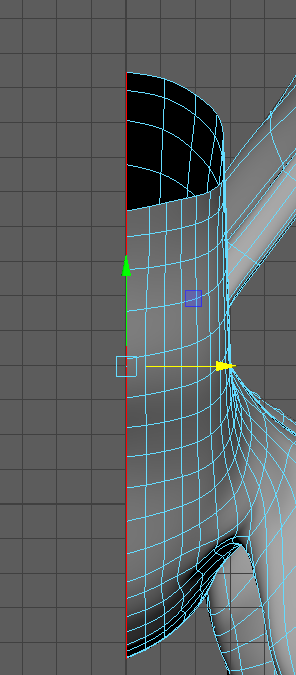
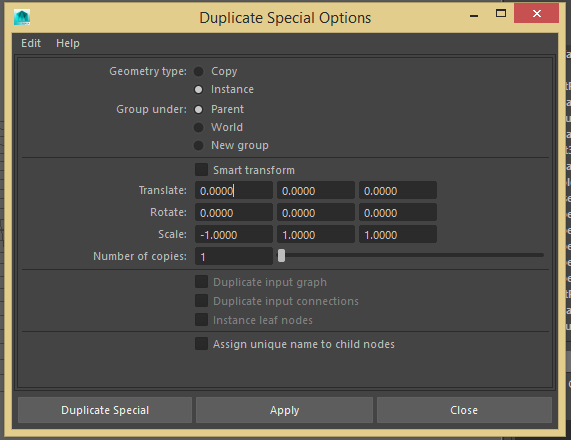
Your mesh is ready for Duplicate Special! Select your mesh in Object mode, go to Edit -> Duplicate Special, and click the option box. Make sure it matches mine (you may have to put the Scale -1 in the Z box instead of the X box if your dragon is sideways from mine). Geometry Type Instance makes sure that any edits you make happen to both sides simultaneously (including extrusions). This is slightly less tedious of a symmetric modeling technique than ensuring all your tools have symmetry on.
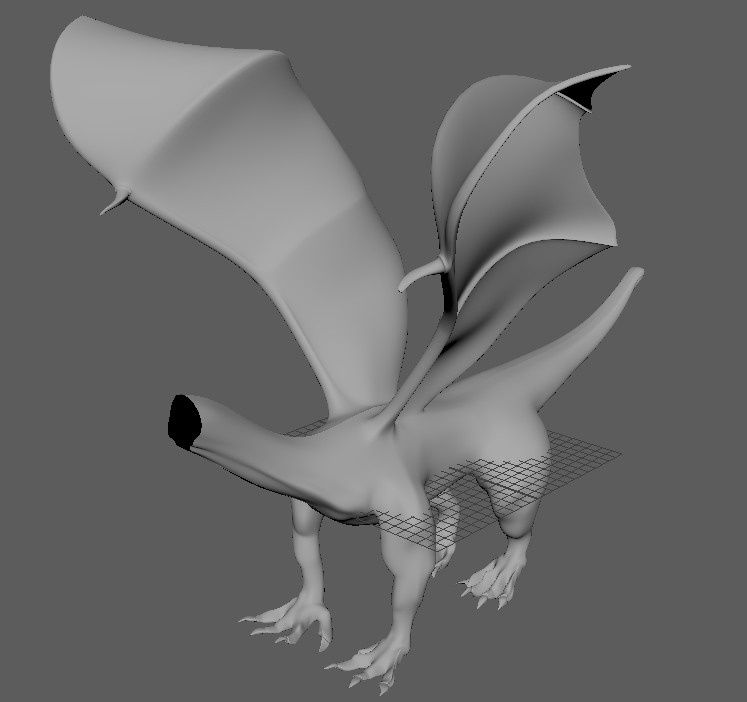
Now look at your headless dragon. Try out making some edits now that you can see proportions you couldn’t see before. I think my neck is too wide, so I’ll sculpt that.
MODELING THE HEAD
We’re going to take a break from the body and start making a head. Hide the body so it doesn’t distract you. The legs started with cylinders that were edge-count matched to their corresponding holes, but maintaining that stipulation with something as complex as a head is pointless.
Note: Your edge flow may vary, but keep the main points in mind.
We’re going to be box modeling. It’s trickier than contour modeling, but it’ll be faster, and you’ve probably spent at least 35 minutes on this lab already.
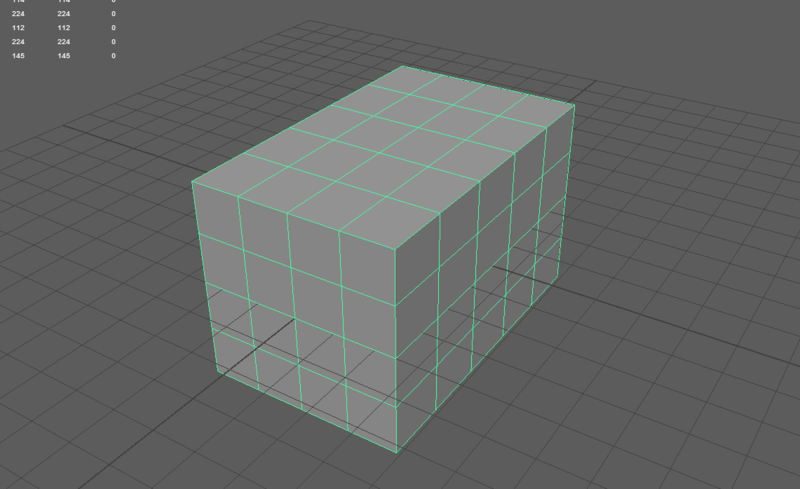
Round out the box a bit. You can also enable the duplicate special again if you’d like.
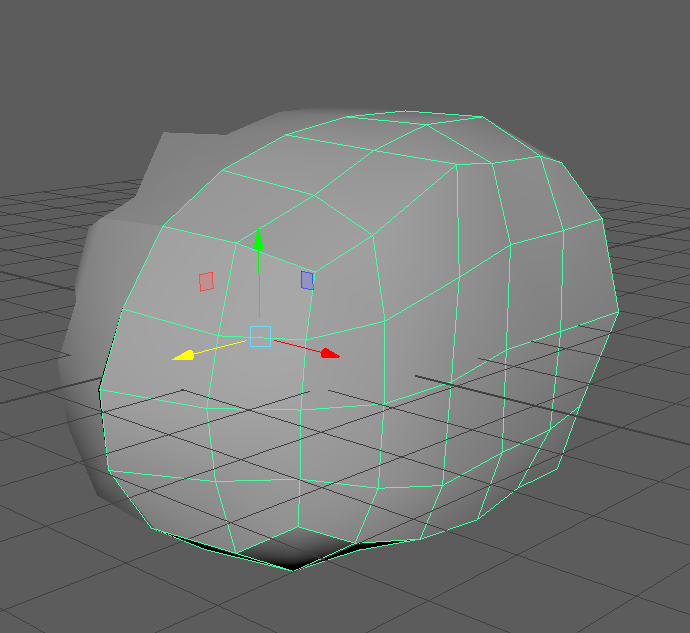
Grab a few faces from the front, Extrude, and push them in like this
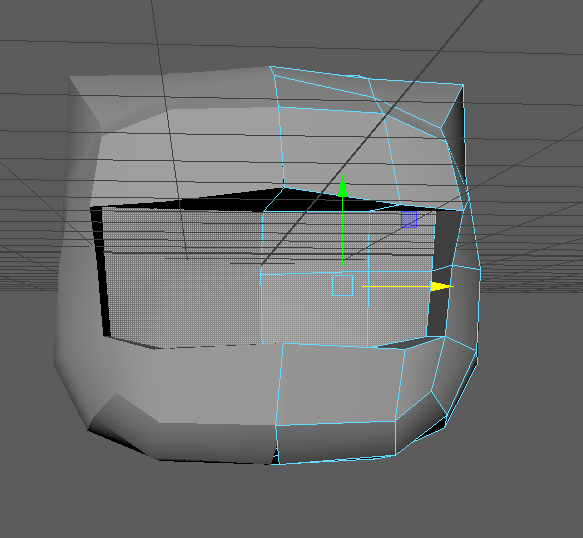
Grab a few faces on the top and bottom and extrude them forward to form the upper and lower jaws.
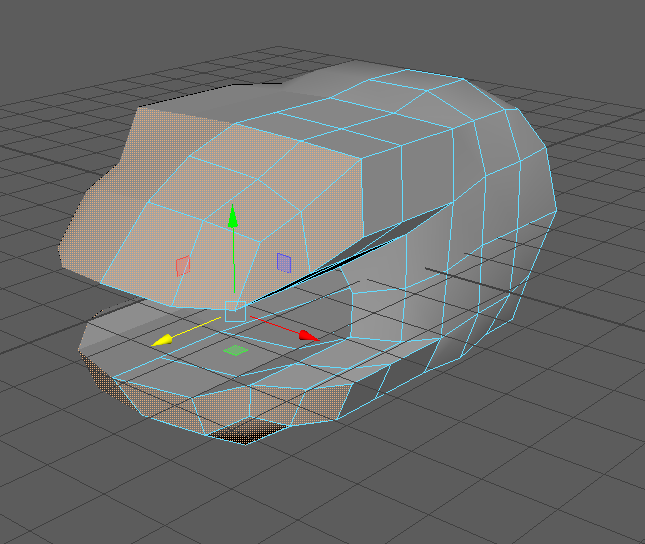
Highlight the faces on the lip/jaw area
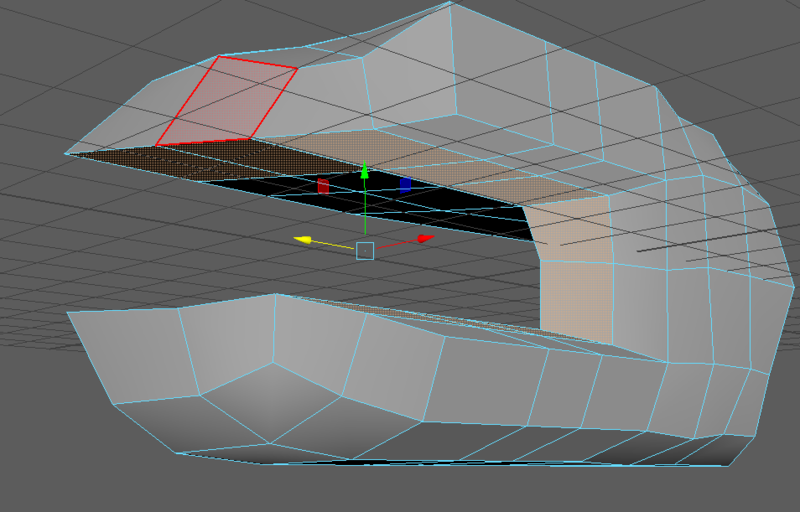
Extrude them inwards. Scale tool helps.
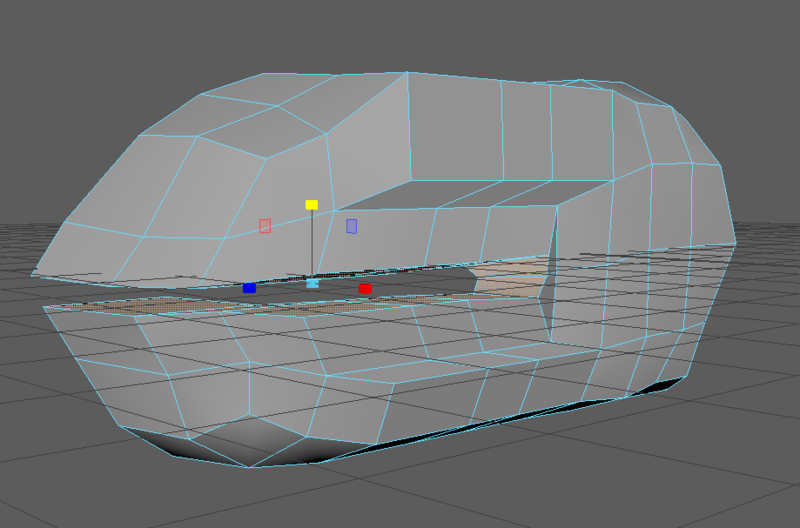
Grab a few faces near the back and extrude them sideways to protrude the cheekbone.
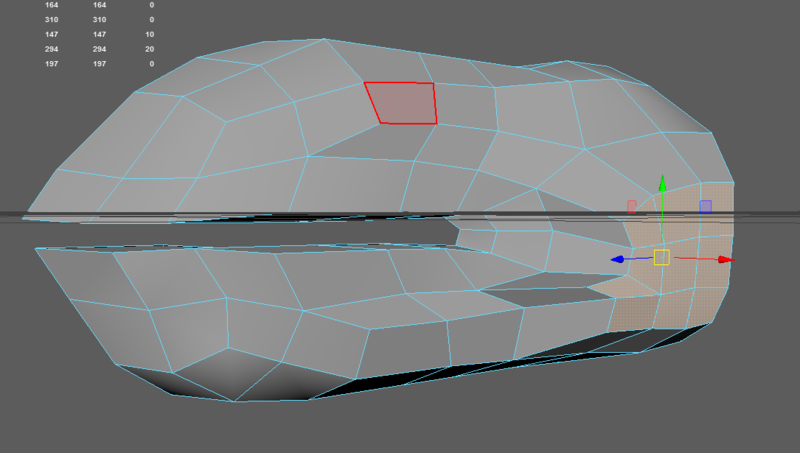
Grab an area on the top and extrude upwards to form a crest
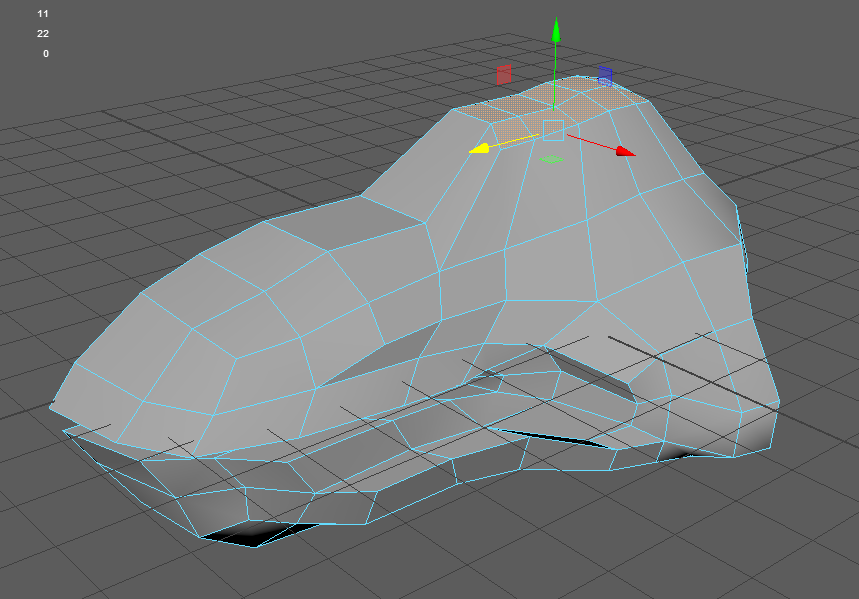
If you haven’t noticed, I got annoyed with the Special Duplicate and deleted it. Make sure there are no faces on the XY plane (or you’ll create internal faces later when you connect the 2 sides.)
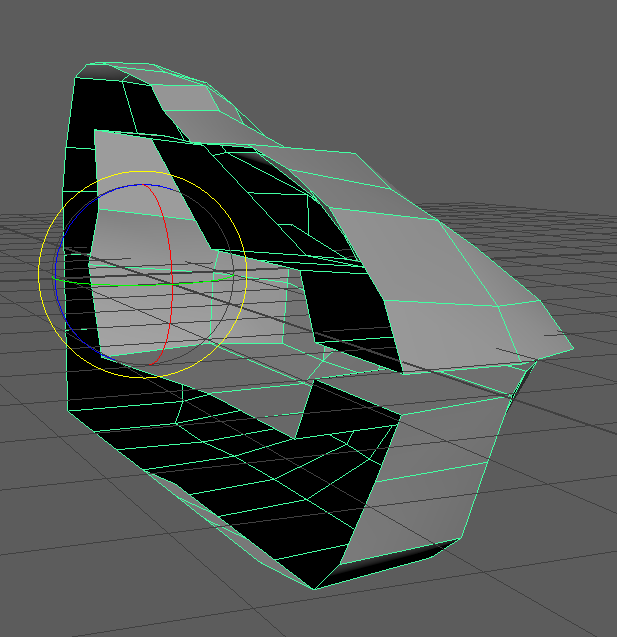
Cut a hole for the neck. We’ll adjust this later, but it’ll make it easier to extend loop cuts to the end of the head temporarily.
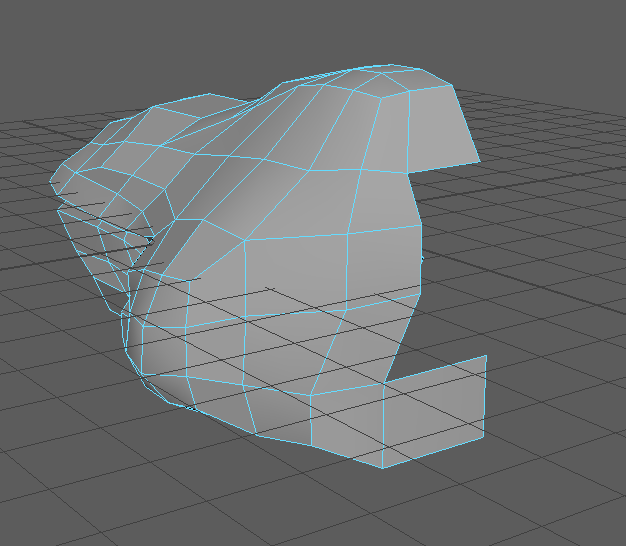
Grab a few vertices near the eyebrow area and move them up to make room for the eye
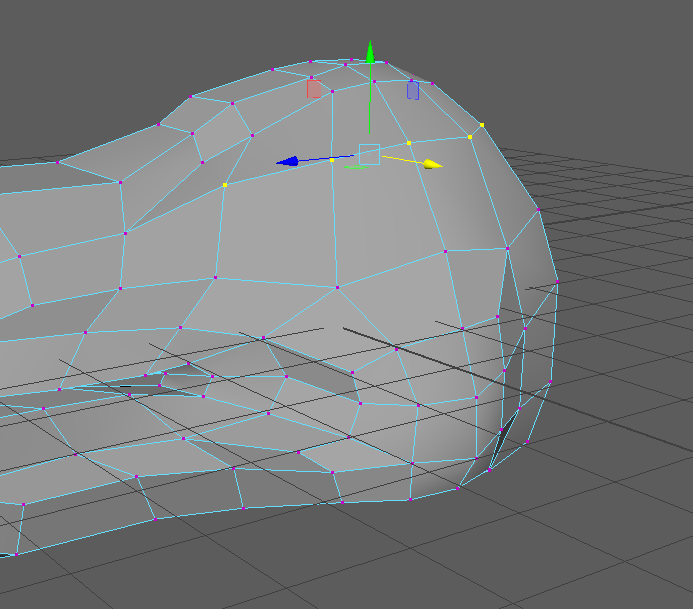
Extrude roughly 4 faces in the eyebrow area to make a eyebrow crest. Also extrude the beginning of a horn.
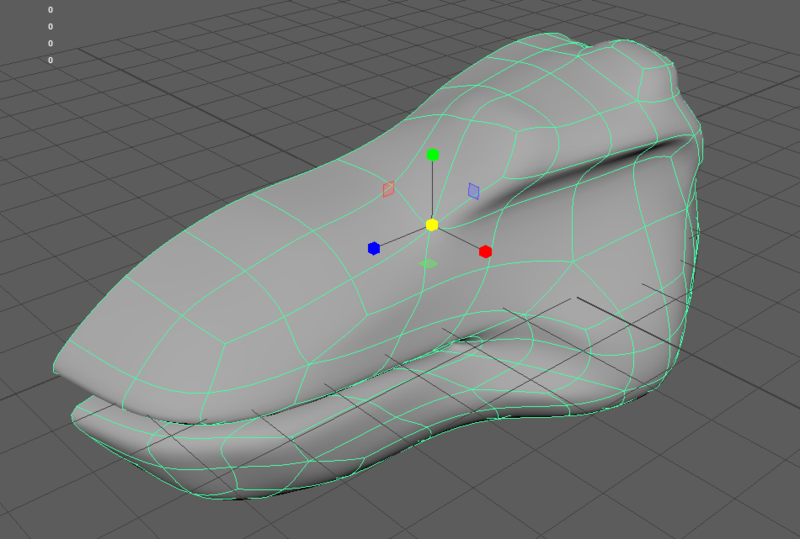
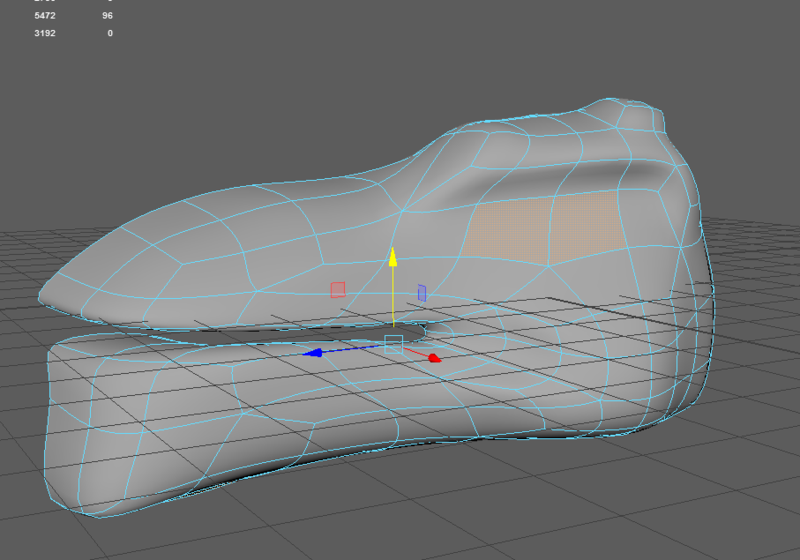
Select 2 faces for the eye. 4 or 6 faces work too. Just make sure it’s a rectangular region or you’ll end up with triangles. I also adjusted the jaw a bit. I’m not much of an artist so I keep messing with things until they don’t look horrible.
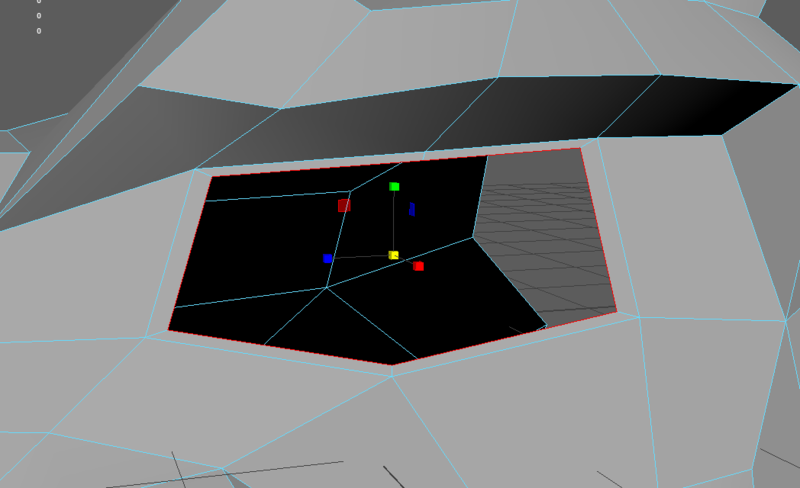
Delete the eye faces and select the edge loop of the hold you just created. Extrude those edges and pull them in slightly.
Keep doing this. Come out a bit, and then push in.
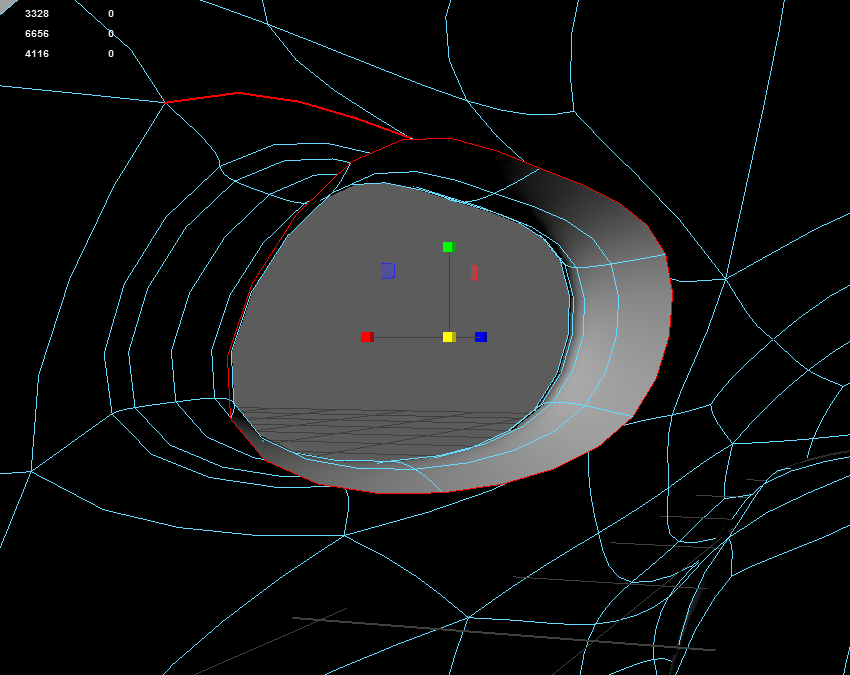
Keep extruding and pushing in. Then as you continue to extrude inwards, expand.
Finally, extrude inwards and close up the eye socket with mesh fill hole. Don’t forget to use Multi Cut to make it all quads!
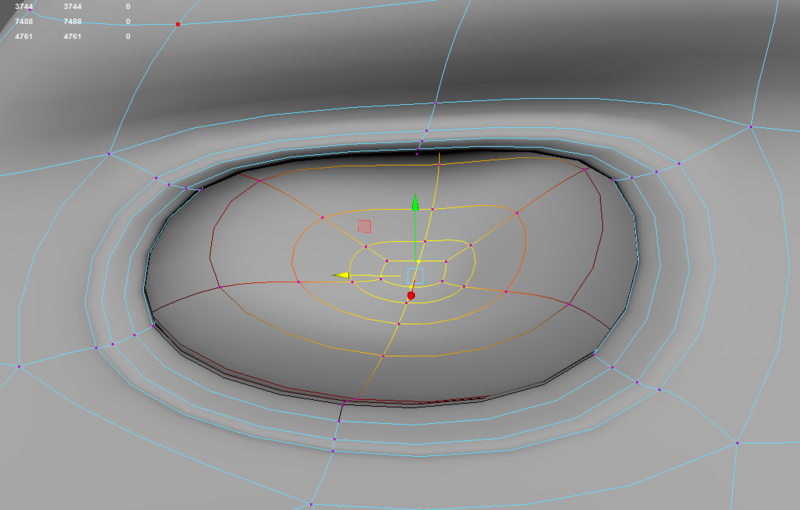
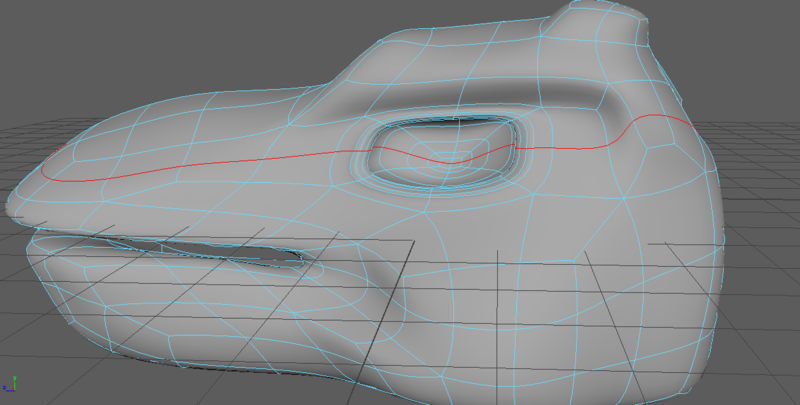
Add around 3 edge loops where the red line is shown here.
Select a rectangular region near where you think the upper eyelid will come down from and extrude it down.
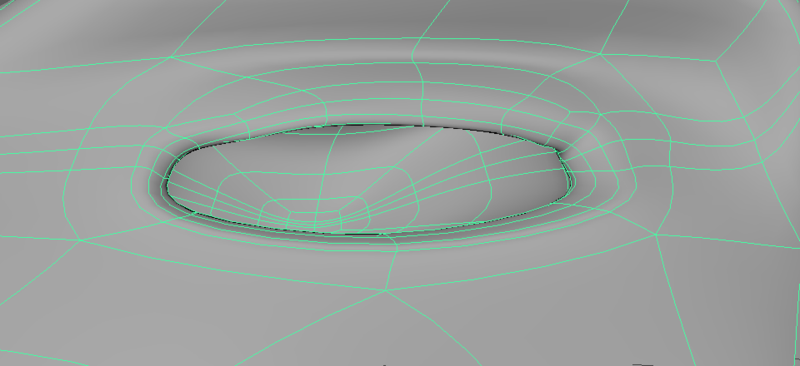
Do the same for the lower eyelid, and then use soft select/sculpt to pull the eyelids together. You’ll open them later when rigging.
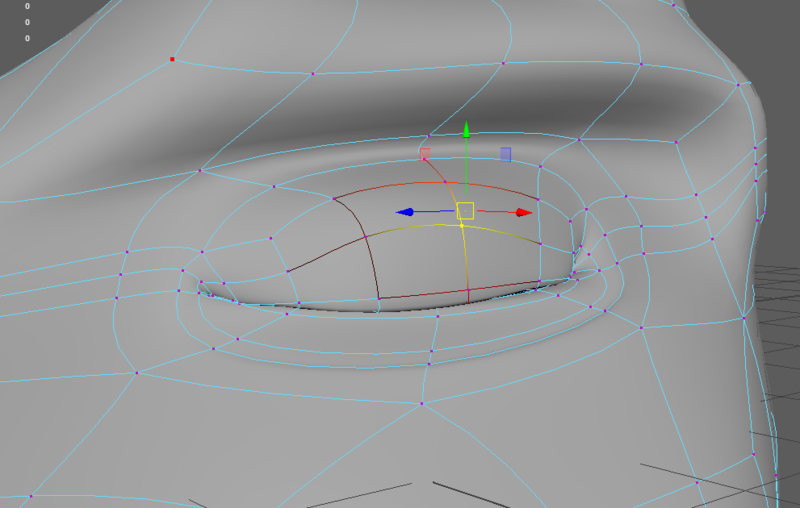
Shape out the overall head a bit if you’d like. I pushed the jaw up a bit and the snout down a bit. Again, your artistic eye is probably better than mine here.
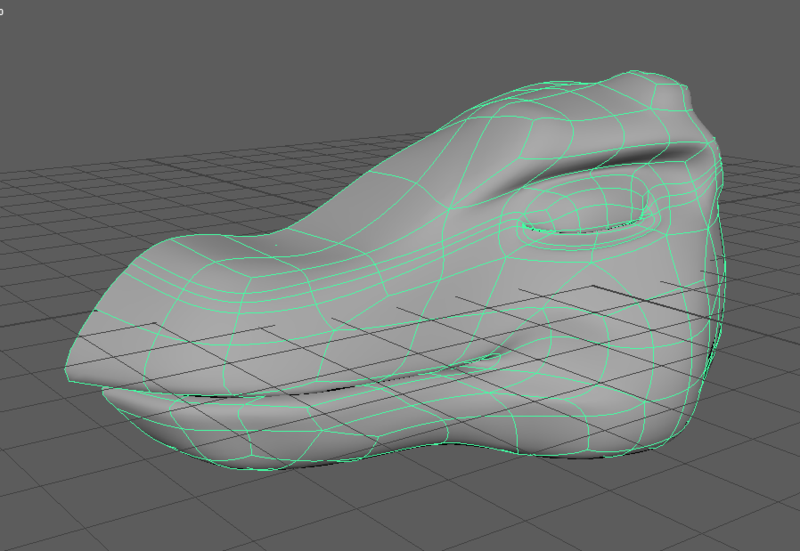
Select a few faces near the nostril area and do the exact same thing we did for talons, except instead of pulling the talon out, push a nostril in.
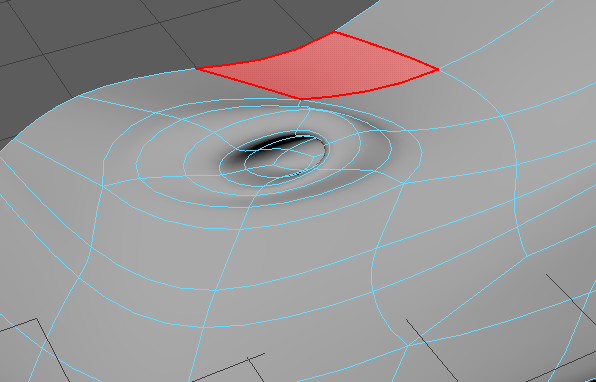
I multi-cut a few more edge loops so that the faces flow from the sides of the nostril downwards into the mouth. This help us sculpt later.
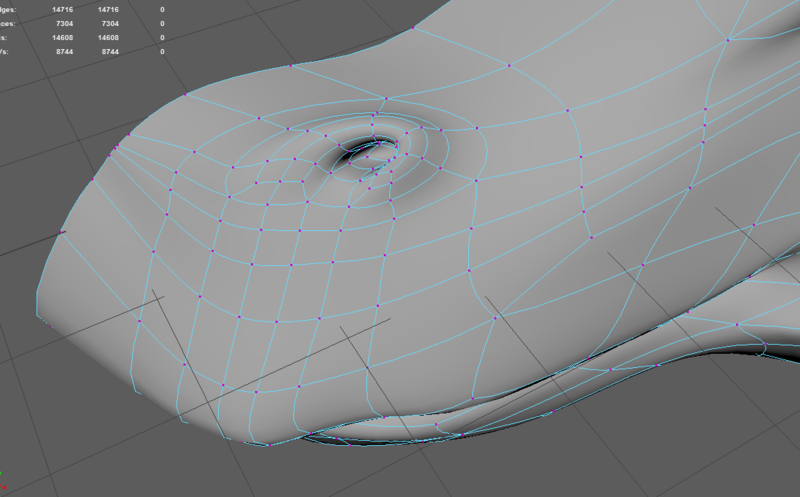
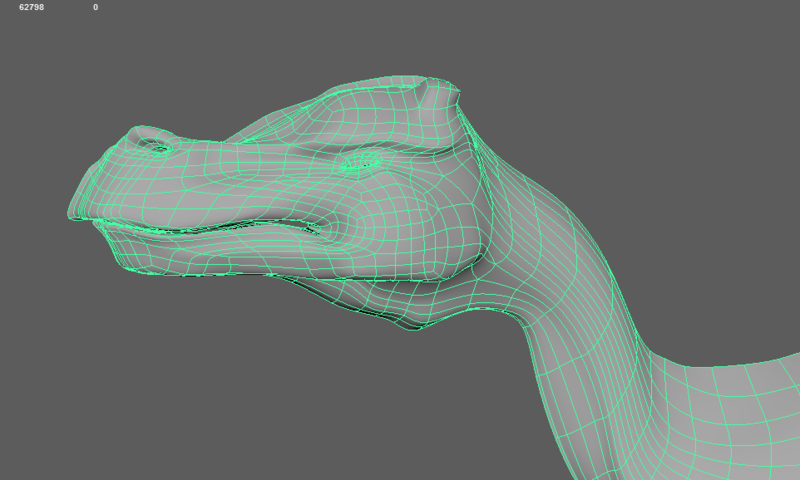
Add more edge loops wherever you see space and then sculpt away, but keep in mind that these edges will all have to connect to edges in the body. I also extruded a bit above the nostril to define it more and extruded a lower eye ridge. Notice that rings of edges flow around the mouth. This will help the head deform properly when we rig later and the mouth opens. Edge flow isn’t as important anywhere else on the head (except eye), but make sure you only have quads.
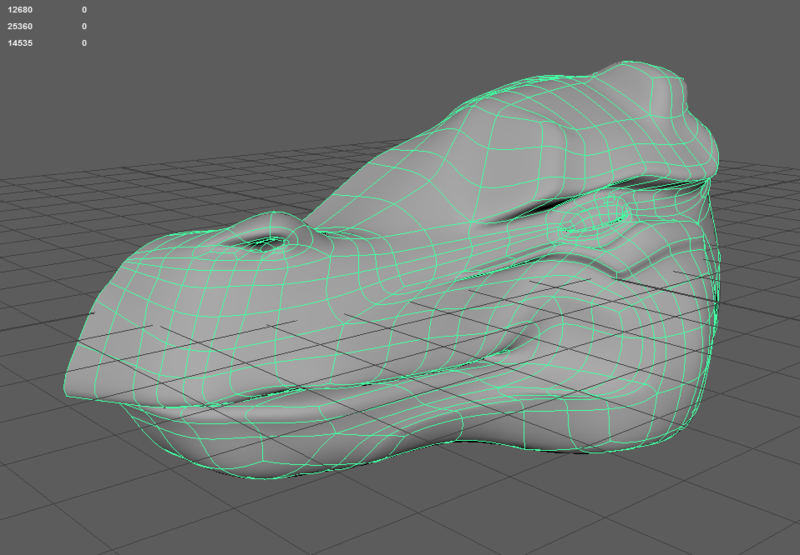
While the head isn’t quite done, it’s ready to be sewn back onto the body. Again, we have to match vertices.
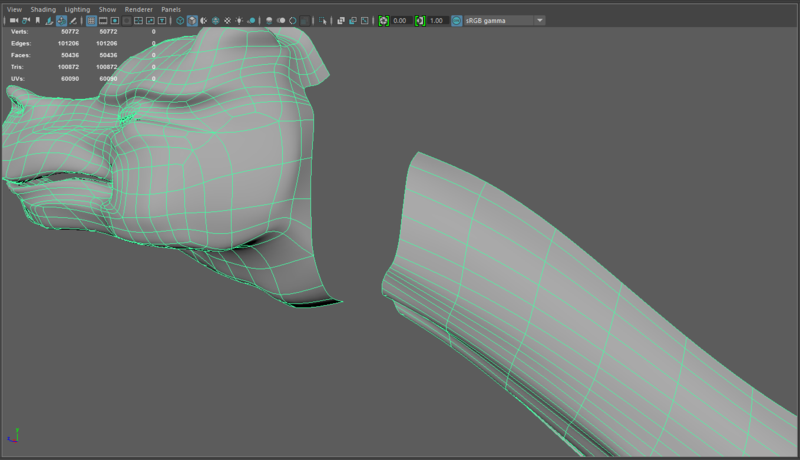
Like we did for the front leg/hand connection, count the number of edges in each piece and add edge loops where necessary. I added 3 edge loops to the head. Aaaaaand FRANKENSTEIN IT UP.
SCULPTING MUSCULATURE
The last 2 steps should be the most fun and the most artistic.
For sculpting, we want to merge the left and right halves. This is because we want to ensure the seam is properly sculpted as well as the remainder. Duplicate special again (don’t forget the trick about zeroing out the middle edge loop before doing duplicate special).
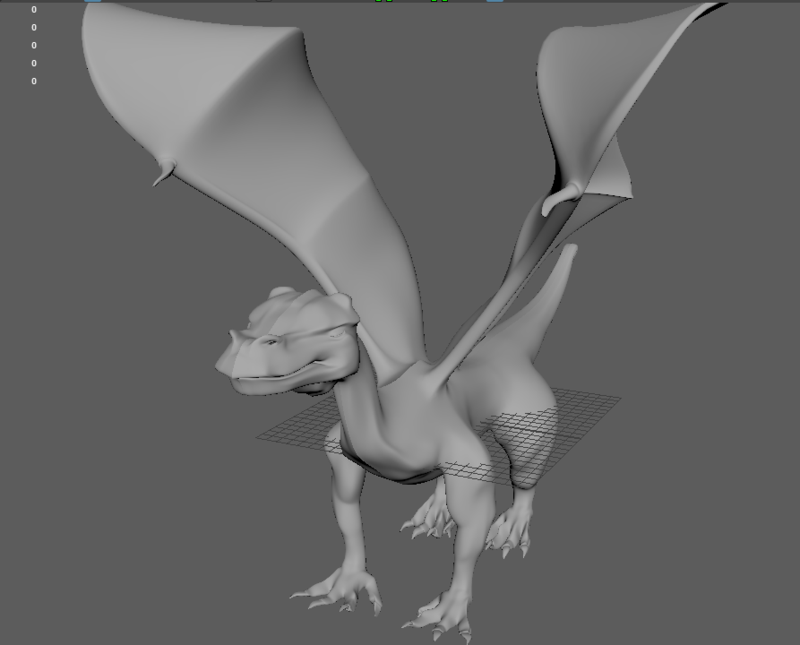
Select both halves and Mesh -> Combine them. Switch to Vertex Mode (F9) and highlight everything. Do Edit Mesh -> Merge. Your 2 halves should be perfectly combined. Poke around the middle seam and click on individual vertices to ensure there are no remaining holes AND that no unwanted vertices got merged.
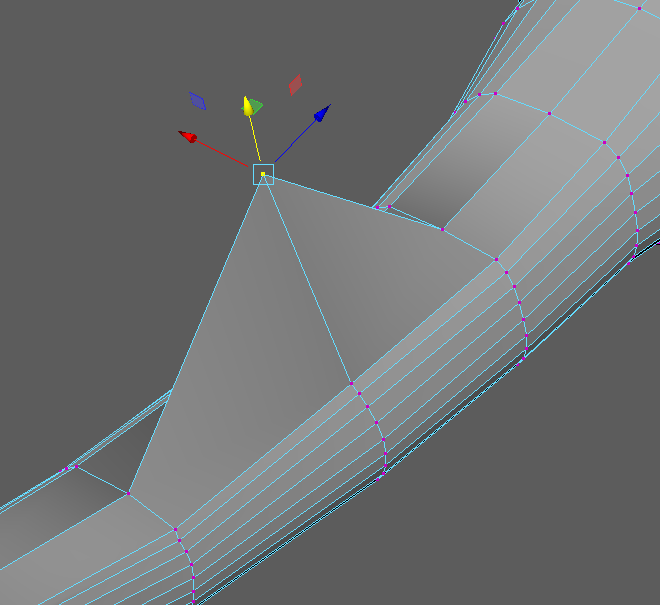
Use Soft Select and Sculpt geometry and go crazy (I like the Smooth tool and the Foamy tool). When you use the Sculpt tool, make sure “Mirror” is set in the tool settings. When you use Soft Select, make sure the symmetry settings in the selection tool are turned on.
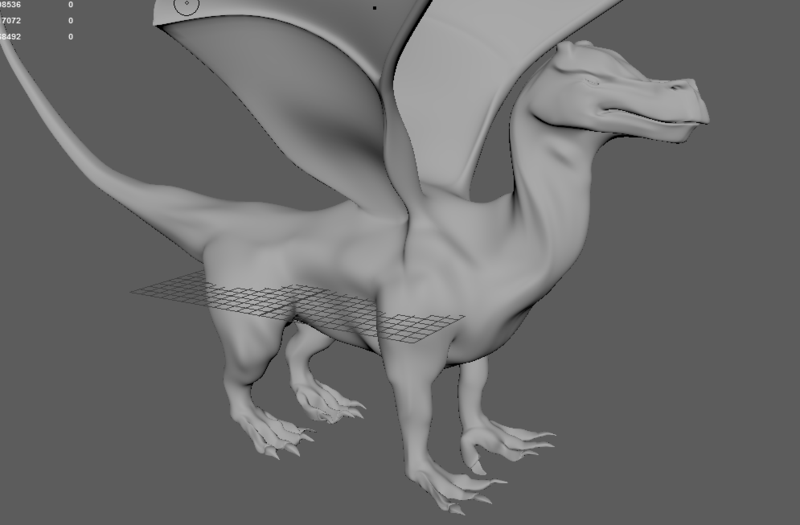
Part of this step is entirely up to artistic interpretation, but part of this is to ensure that your dragon is anatomically plausible. I won’t guide you artistically. Use any reference images you like (of real animals or drawn dragons), pull in image planes if necessary, and shape your dragon to the overall desired shape. I googled dragons for inspiration. Personally, with the 2 pieces merged, I feel like my dragon’s torso and neck are too skinny for its arms, legs, and wings. Here’s what my dragon looks like after proportion/style/artistic fixes.
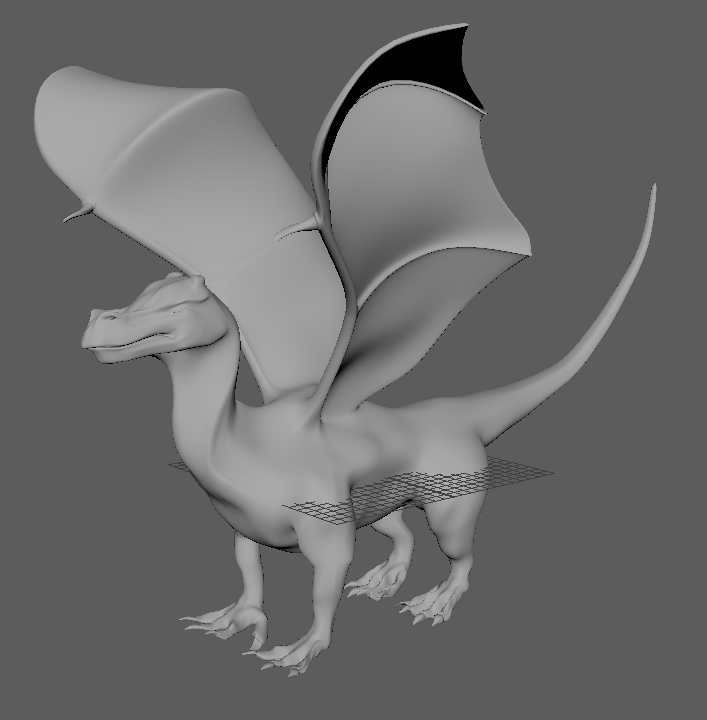
The next step is anatomical. The goal is to make the dragon’s muscles look like they could pull the bones in the direction they are supposed to. The main thing here is to make sure there are muscles on the sides of bones that pull the bone below them (for example, the front of the thigh and the sides of the wings). I’ve already been doing this a little as we’ve gone along, but I’ll revisit it formally.
Note*: Since no one has published a peer-reviewed anatomical study of the way dragon muscles are laid out, I’ll just use human muscles and try and be reasonable on the wings.
Note 2: I did this almost entirely with the Sculpt Foamy Tool.
FRONT LEG
Shoulder - Make sure to inflate the upper outer part near the shoulder (deltoids) and a little bit on the chest (pectorals)
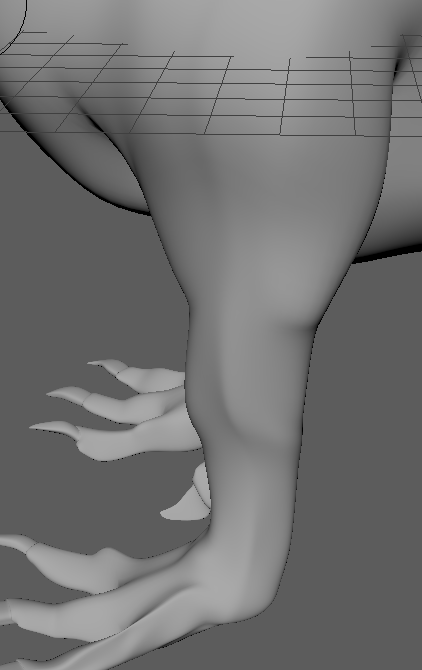
Upper leg - Make sure there is a bicep equivalent on the front, rotated slightly in, and a tricep equivalent on the back, rotated slightly out. Keep the direction of the elbow in mind. There doesn’t need to be much muscle on the sides.
Lower leg - Imagine the dragon pulling the hand forward and back, and bulge the forearm accordingly
REAR LEG
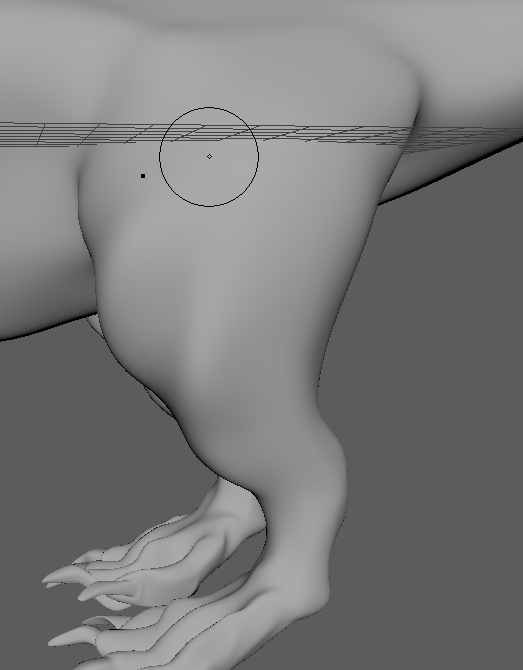
Hip - Make sure muscle flows from the lower middle of the torso to the upper leg. Same goes for the upper tail/gluteus area
Upper leg - Like the bicep, bulge out quadriceps in front of the thigh and hamstrings on the back of the thigh. Keep the direction of the knee in mind.
Lower leg - Sculpt the calf muscle out and push the area below it in to give it definition (There is an invert option in the tool settings).
WING
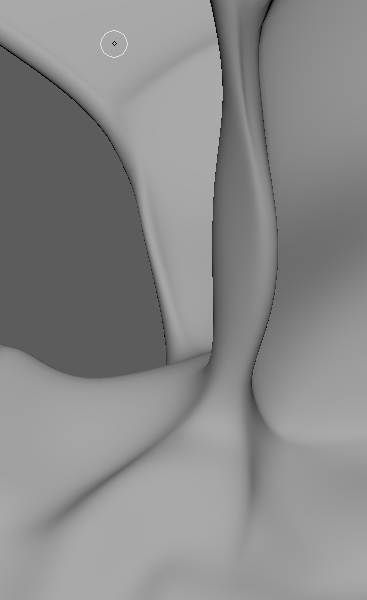
Torso connection - I made a bulge in the direction of the arm and another bulge at a 45 degree angle towards the neck. On birds and bats, the wings are connected to the pectoral muscles, but we have front legs in the way, so do your best to emulate that or go around.
First bone - Assuming the wings flap up and down, put bulges on the top and bottom of this spndle.
TORSO + NECK + TAIL
Make some ridges perpendicular to the spine for either ribs, pectorals, or abdominal muscles.
The neck and tail are quite ambiguous because they are snakelike and pull in all directions. Just mimic snake muscles or use your discretion.
Final Details
This step mostly consists of adding stylistic things to make your dragon cooler. Feel free to ignore this section entirely and do something completely personal. I mostly add spikes to things. If you’d rather have a cutesy looking dragon, add flowers or something bubbly (I don’t know). If you’d rather have a mechanical looking dragon, straighten limbs or add gears or whatever. Or just doing this is fine as well.
Note* If you do something that removes details from earlier parts, save a copy of your current dragon to show me as well as your final.
Extrude a few rectangles from either side of the tail to get tail wing flaps.
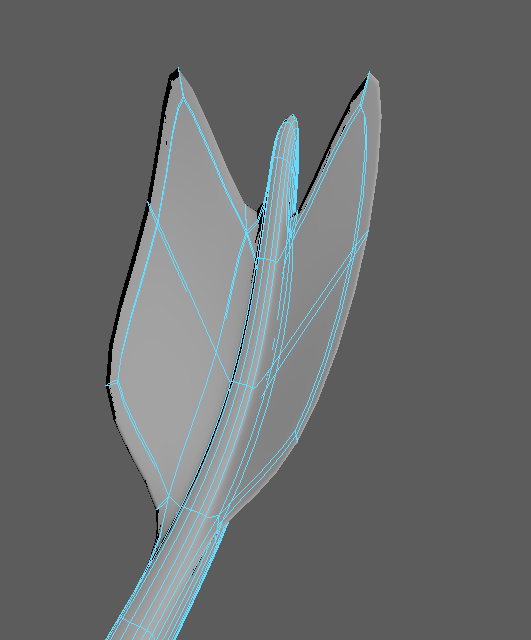
Remember the Spike Extruding thing you’ve done at least 6 times? Do it 6 more times to get barbs on the tail.
Hint: You can do all 6 at once as long as the faces don’t touch or you select “Keep Faces Together -> Off” while extruding. Just remember to set Divisions to 4 as you extrude so you don’t have to plug in edge loops.
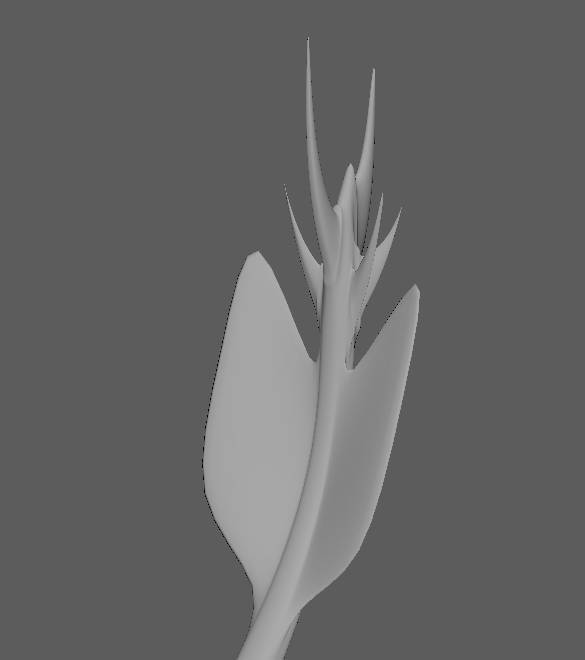
Remember the horn stubs on the head? You know what to do.
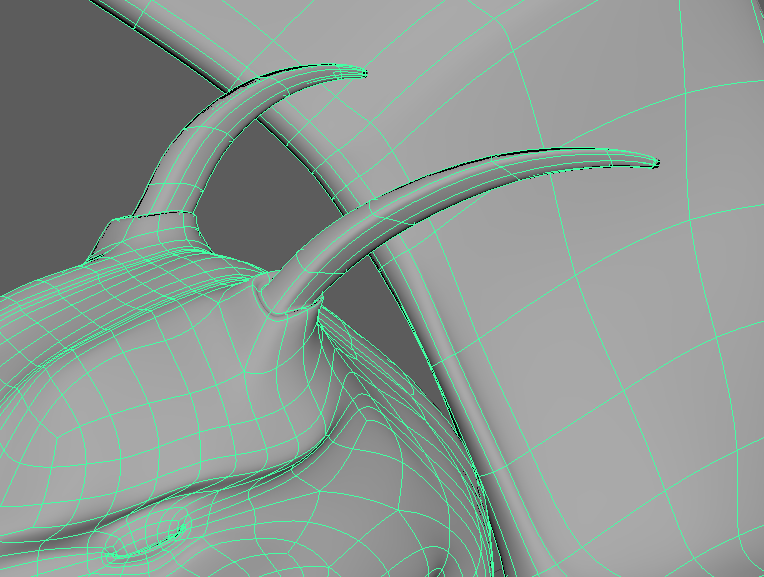
Add a nose horn if you want as well. Same procedure. Also, recall the way you pulled ridges for the toe bones in the feet. Extrude a ridge of spikes along the side of the face, and pull the center edge of each spike forward to give it the same look.
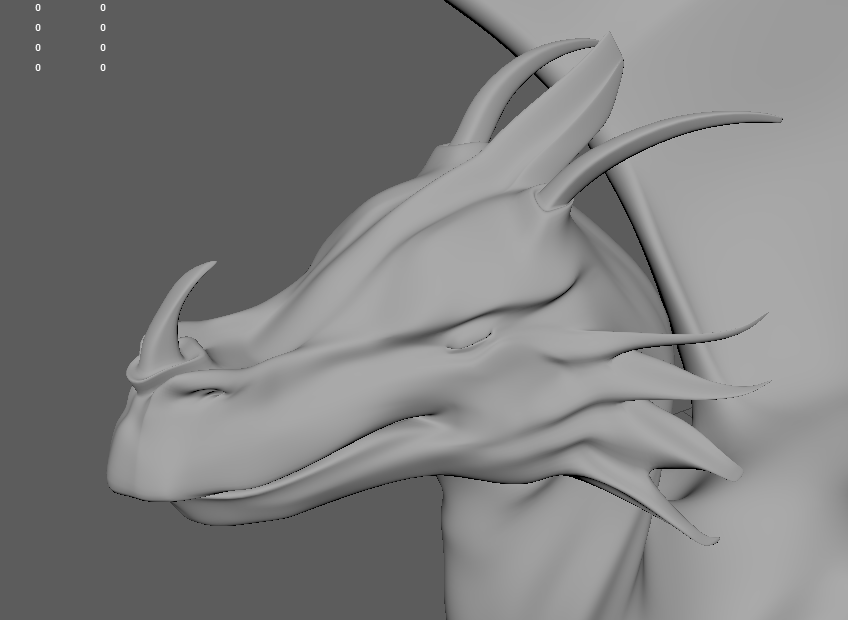
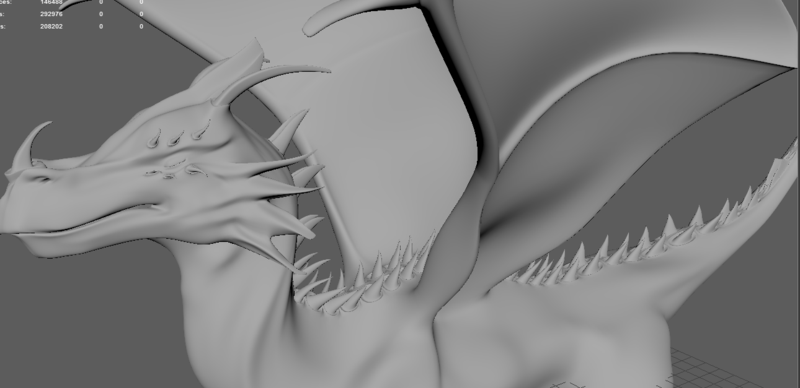
I added a few spikes around the eye just for fun. Now the last step is the trickiest: Spikes along the back. This can be ridiculously time consuming if you do them one at a time, but if you do them all at once, it’ll take less than a minute. Select a whole bunch of faces along the spine ridge, extrude out (Keep Faces Together -> Off), shrink, extrude in, shrink, extrude out (Divisions -> 4), pull to a good height for a spike, switch to move tool, soft select (radius = spike length), and pull backwards. This will give each individual spike a nice curve. If you don’t let go of the extrude tool until the last step, all the spikes should still point normal to the torso like this:
FINAL NOTE
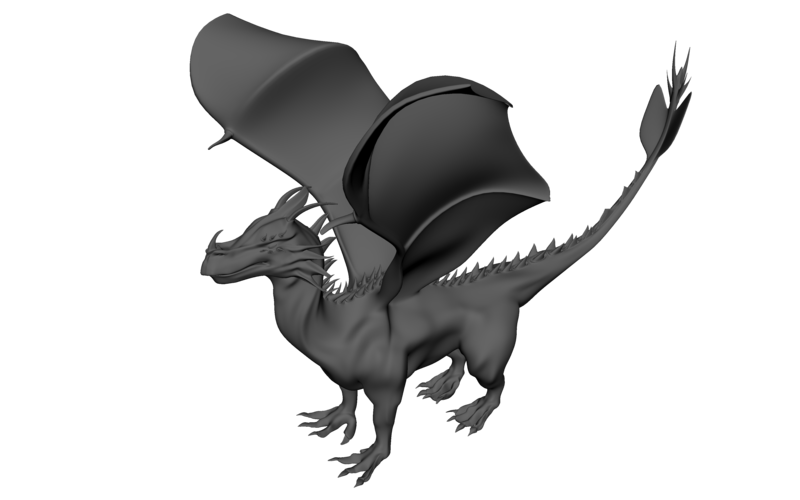
At this point, I decided to call it a day. Use the trick I mentioned earlier to find any non-quads and kill them. Add spikes until you’re blue in the face. Add a fire simulation for extra credit (don’t quote me on the “extra credit” part). Put in an eyeball (if you want). Dragons are scarier when their eyes aren’t closed.
Oh also, I didn’t add teeth because the mouth is closed and I’m too lazy, but just do the exact same thing as the spine spikes.
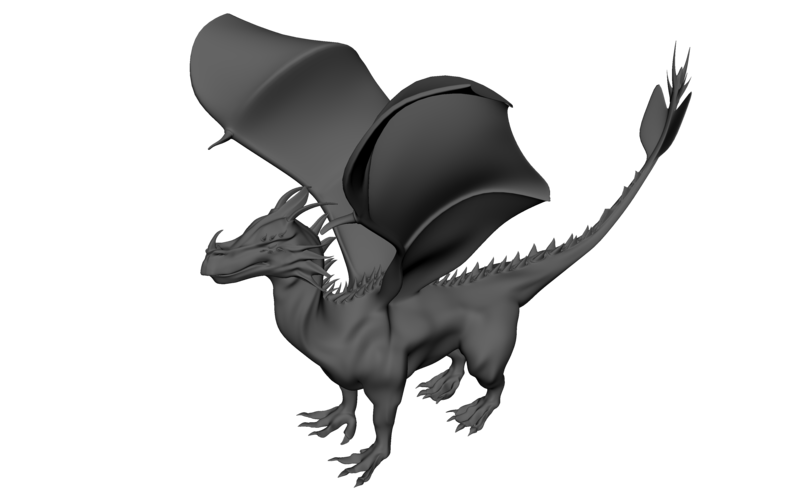
Here’s my final thingy
If you’re still alive at this point, congratulations. Good job. Hopefully the rest of the labs won’t be this bad.