Introduction
For UCBUGG, you will be working both individually on Lab Homework and as a team on your 30-60 second animated short. You’ll want to keep your individual project files separate from your group project files since you’ll be building assets for the labs that don’t belong in your short.
We’re going to walk through making those two separate file locations; one for your individual lab homework files and another for your group project files for your short.
A note before we continue: project management is challenging! You have a lot to keep track of and it’s all very abstract; so, if you find yourself confused or frustrated, remember that the course staff are more than happy to help you with any questions you have, and once you work through initial confusion, it will all make sense.
Individual Lab/Homework Directory Setup
All Group Members: You’ll be constantly collaborating and working with others for UCBUGG, so make sure your class files for UCBUGG are neatly organized and easy for you to access.
For Windows
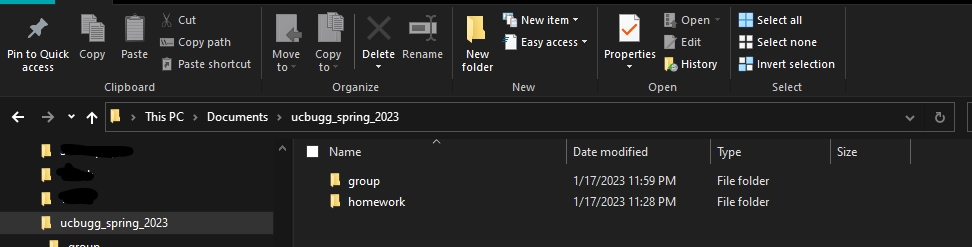
To start, open up your File Explorer. Look in the Navigation Pane, and expand This PC, and then expand Documents.
In here, create a new directory (another word for file in this case), and name it
ucbugg_spring_2023insert your semester and year in this format. Make sure not to leave any spaces in your file path! Maya will get mad at you if there are any spaces in your file path, and we need to keep Maya happy, kind of like an aging parent.Then, inside
ucbugg_spring_2023, create a new folder and name ithomework. Create a second folder calledgroupthat we’re going to use later. This is how you’ll keep your personal lab work separate from your group project work.
Open up Maya 2022 and create a new file. You are going to use this file to create your project directory, so this can just be an empty file.
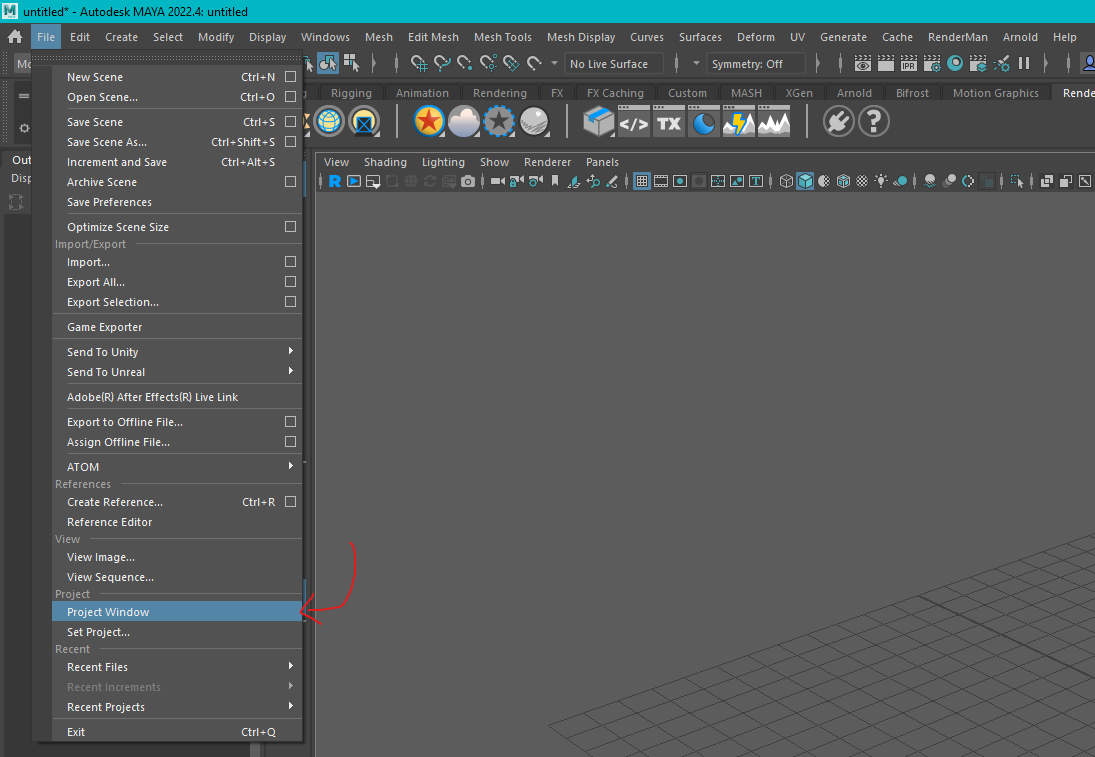
In your new Maya file, navigate to File → Project Window.
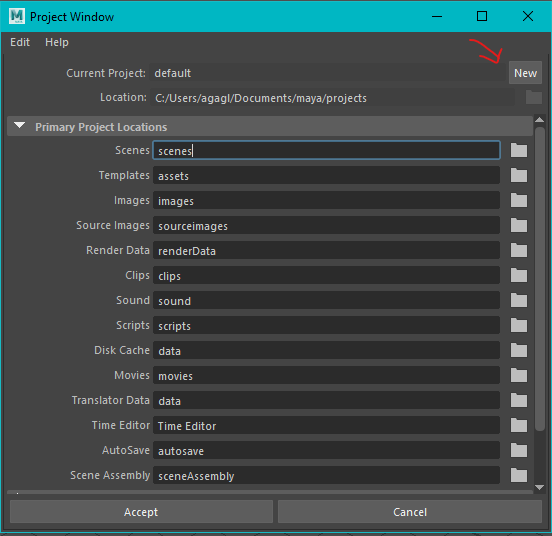
This will open up your Project Window. This generates your project directory, which is how Maya keeps track of all the data (including textures, simulations, referenced files, and more) needed for work in Maya.
Setting up your Project Window.
Click the New button
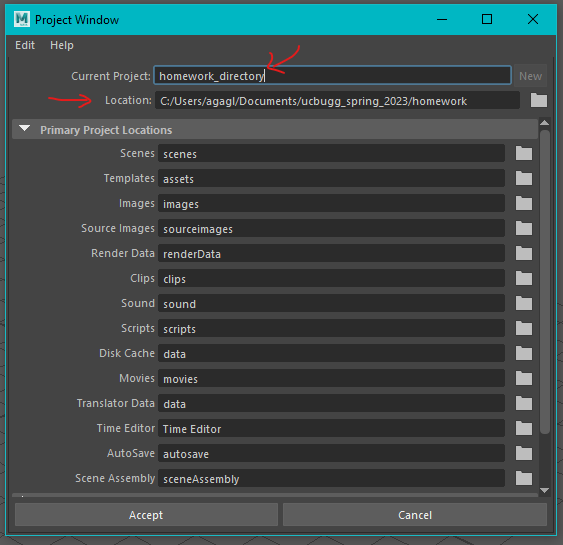
In the
Current Projectfield, change the name tohomework_directoryIn the
Locationfield, change the directory location to the file path we just set up. If you’re following along, it should be<your computer>/<username>/Documents/ucbugg_spring_2023/homework
Don’t change anything else in this window and click on Accept at the bottom.
For MAC
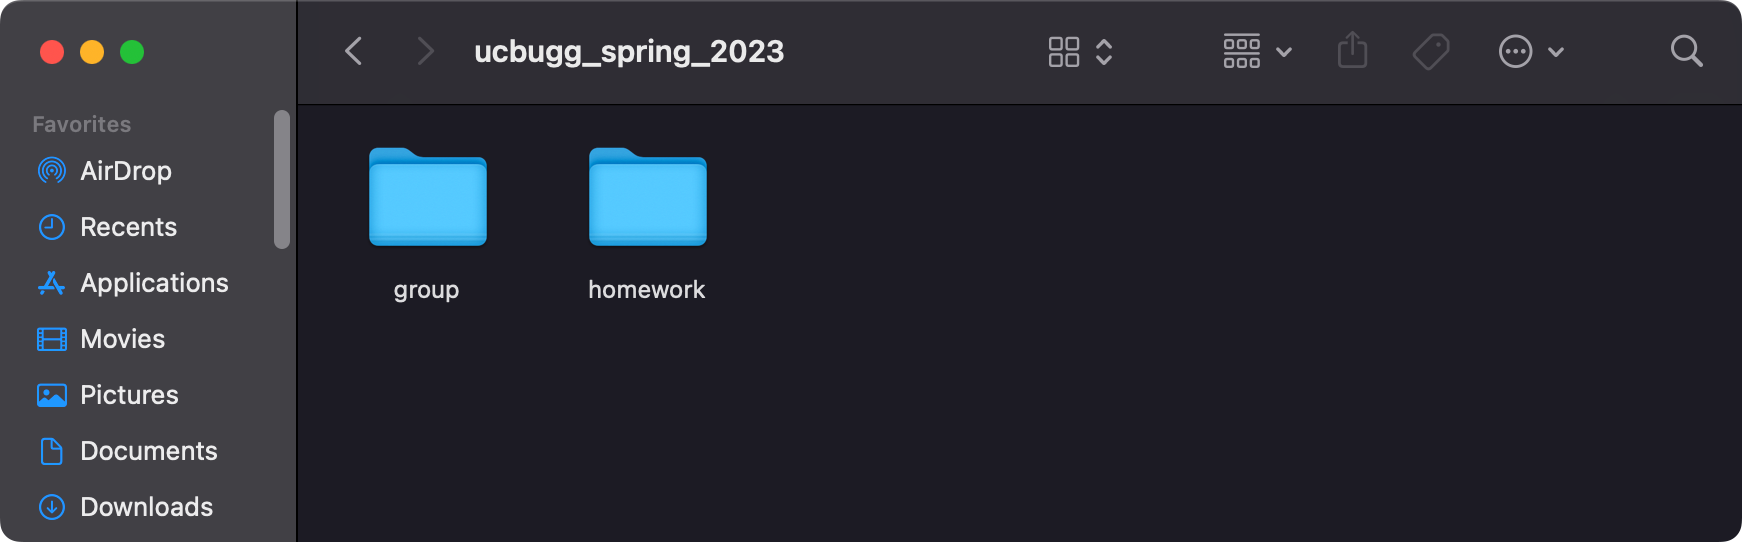
To start, open a new window in Finder. Navigate to your Documents folder by clicking Documents in the panel on the left.
In here, create a new folder, and name it
ucbugg_spring_2023(insert your semester and year in this format). Make sure not to leave any spaces in your file path! Maya will get mad at you if there are any spaces in your file path, and we need to keep Maya happy, kind of like an aging parent.Then, inside
ucbugg_spring_2023, create a new folder and name ithomework. Create a second folder calledgroupthat we’re going to use later. This is how you’ll keep your personal lab work separate from your group project work. You can organize the folders by right-clicking, then choosing Clean Up By → Name.
Open up Maya 2022 and create a new file. You are going to use this file to create your project directory, so this can just be an empty file.
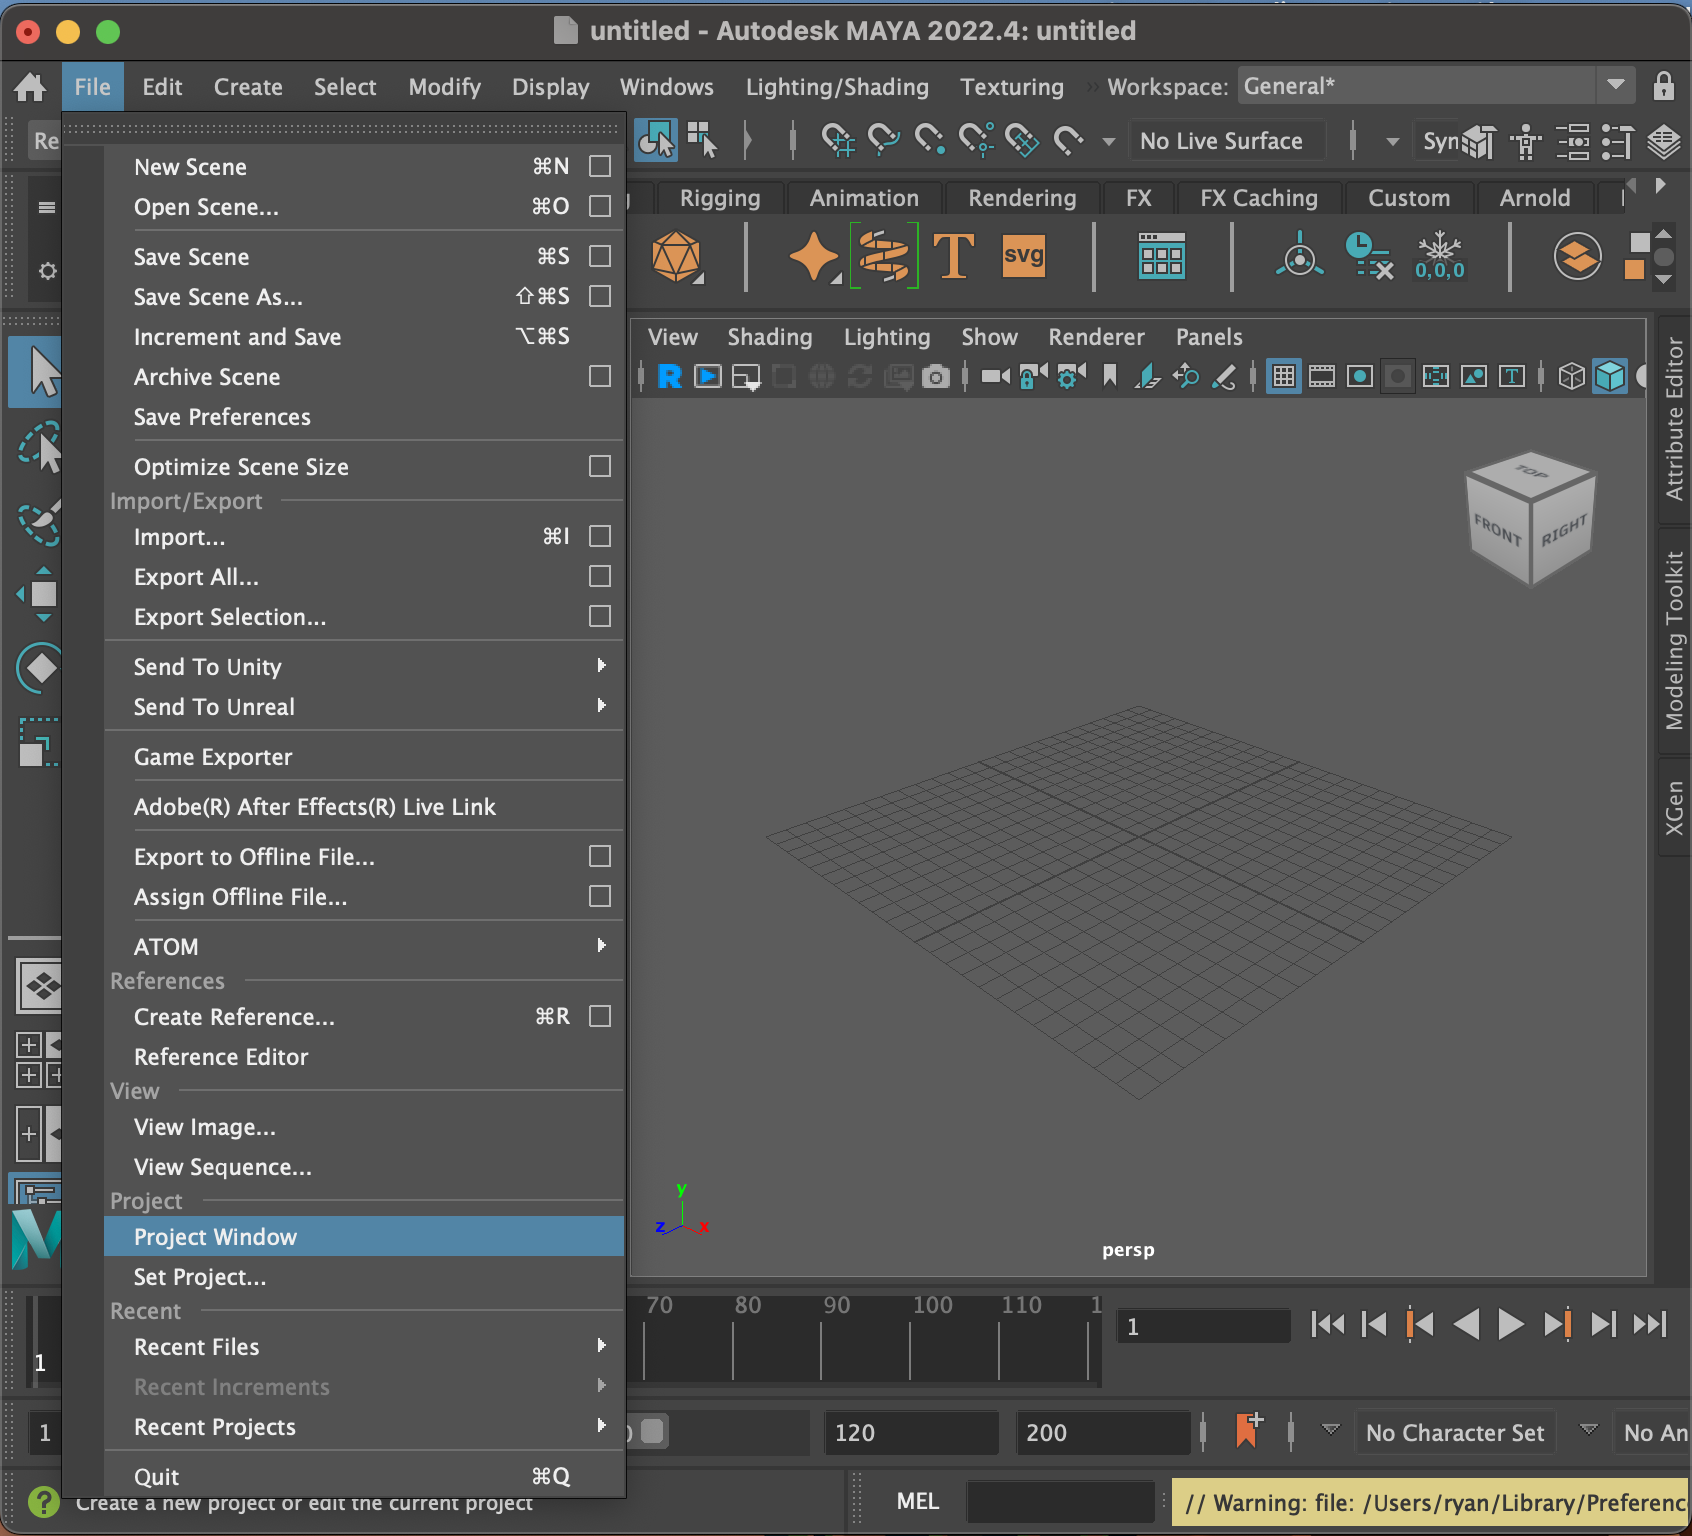
In your new Maya file, navigate to File → Project Window.
This will open up your Project Window. This generates your project directory, which is how Maya keeps track of all the data (including textures, simulations, referenced files, and more) needed for work in Maya.
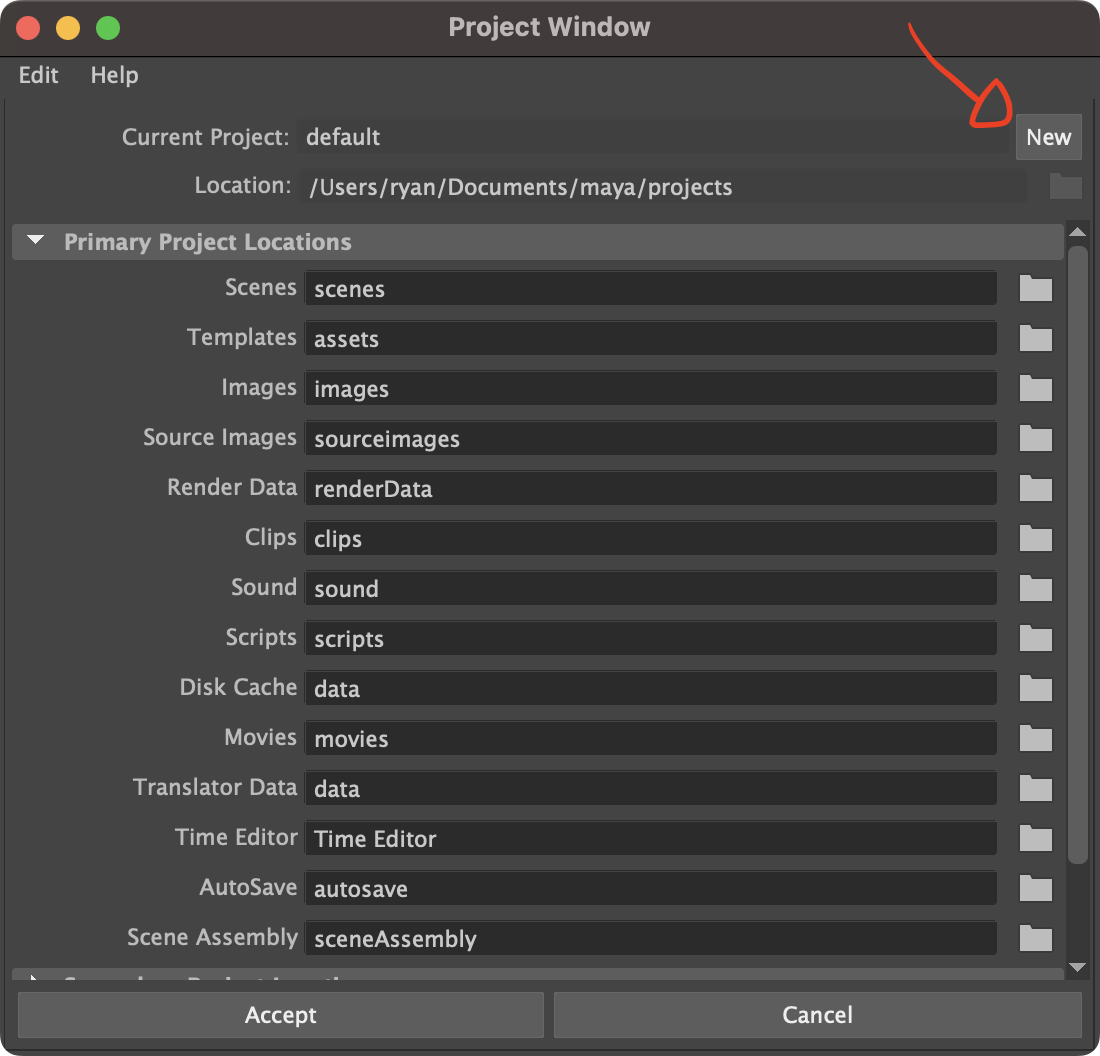
Setting up your Project Window.
Click the New button.
In the
Current Project field, change the name tohomework_directoryIn the
Locationfield, change the directory location to the file path we just set up. You can click the folder icon to the right to bring up a folder picker. If you’re following along, it should be/Users/<your computer username>/Documents/ucbugg_spring_2023/homeworkDon’t change anything else in this window and click on
Acceptat the bottom.
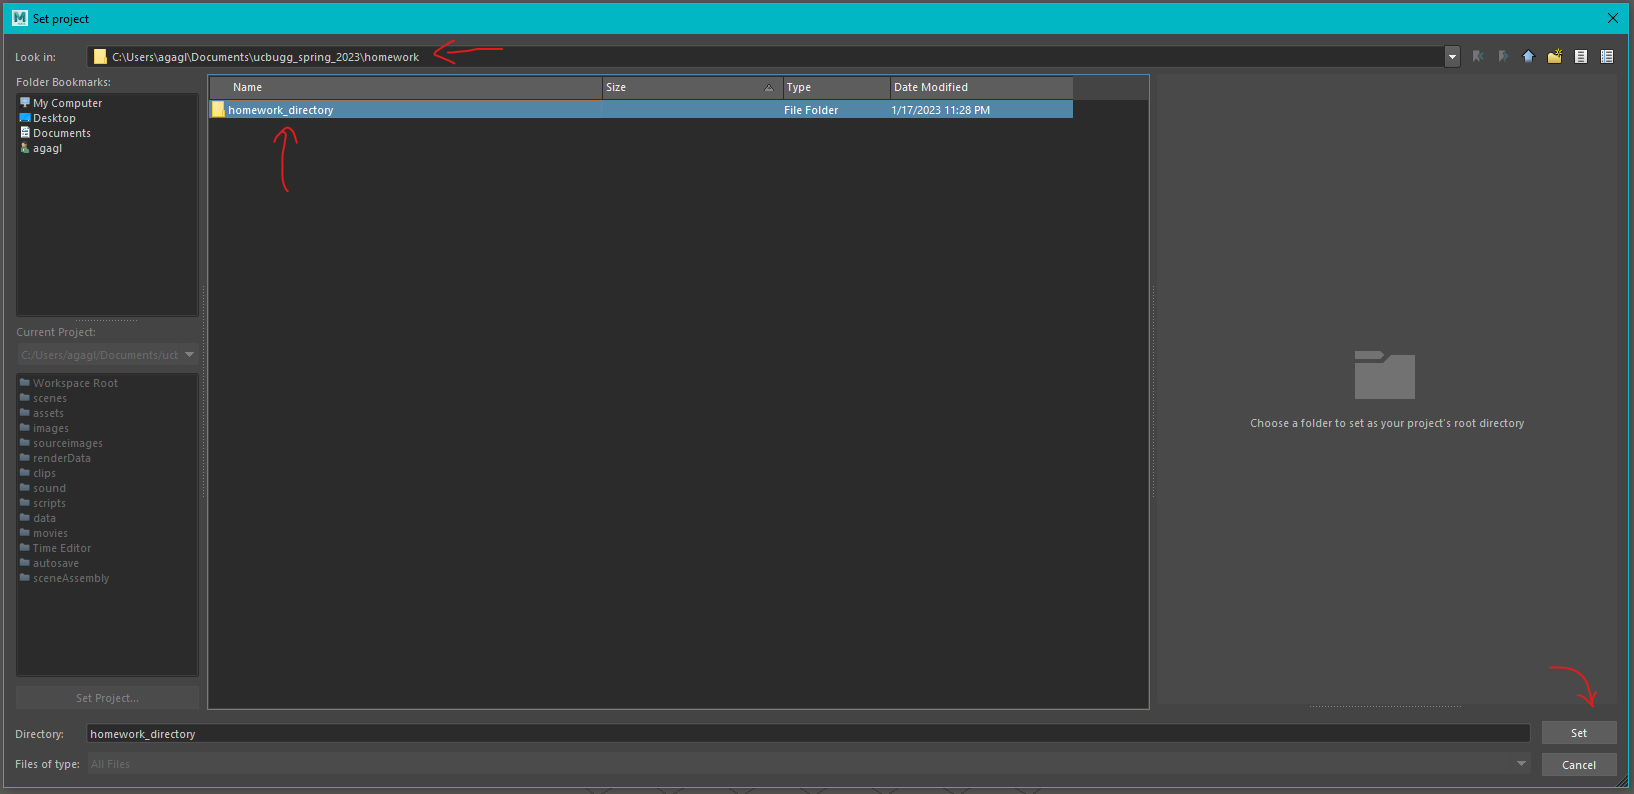
Now, whenever you’re going to do lab homework or make any Maya file not part of your team’s short, make sure to Set your project to homework_directory so that everything is nice and orderly.
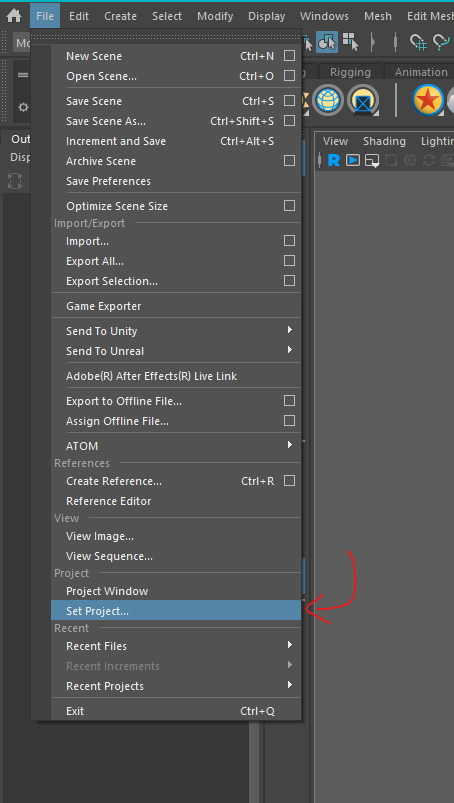
Setting your project is very easy! Just select File → Set Project, and then Navigate to the correct file path, and with the folder selected in blue, hit Set and you’re good to go!
Tip
You can copy + paste file paths, so if you have the file path open in another File Explorer tab on your desktop, you can just copy + paste and save yourself some time.
Group Project Directory + Version Control Setup
What is Version Control?
For those from outside of a Computer Science or technical background (like the author of this lab), Version Control may be a new concept, but it’s pretty straightforward and understandable! For UCBUGG shorts, we recommend hosting your group directory on Google Drive Desktop because they have a user-friendly version control system.
Version Control is a system that helps track and manage changes to a set of files. You can think about Version Control as an advanced file version history, just like how you can see previous versions of Google Docs by clicking on the
last edit was made x units of time agotext in the control bar of any Google Doc. This makes it easy to recover mistakenly deleted or otherwise lost work.
There are many systems and programs that perform Version Control. The most popular version control system is called Git, but unless you have experience with Git or GitHub (a popular web-based platform that uses Git to manage and store code), we recommend using Google Drive Desktop for your UCBUGG short’s Version Control. Git and GitHub are valuable professional skills, and the staff of UCBUGG are more than happy to help you learn those skills if you haven’t used GitHub before but know that it’s totally optional and you’ll be able to complete your UCBUGG short without it if you prefer.
Setup
All Group Members: Google Drive Desktop (Recommended)
- Download Google Drive Desktop
- First, you’ll head to this link or just search for “google drive for desktop” and follow the first link.
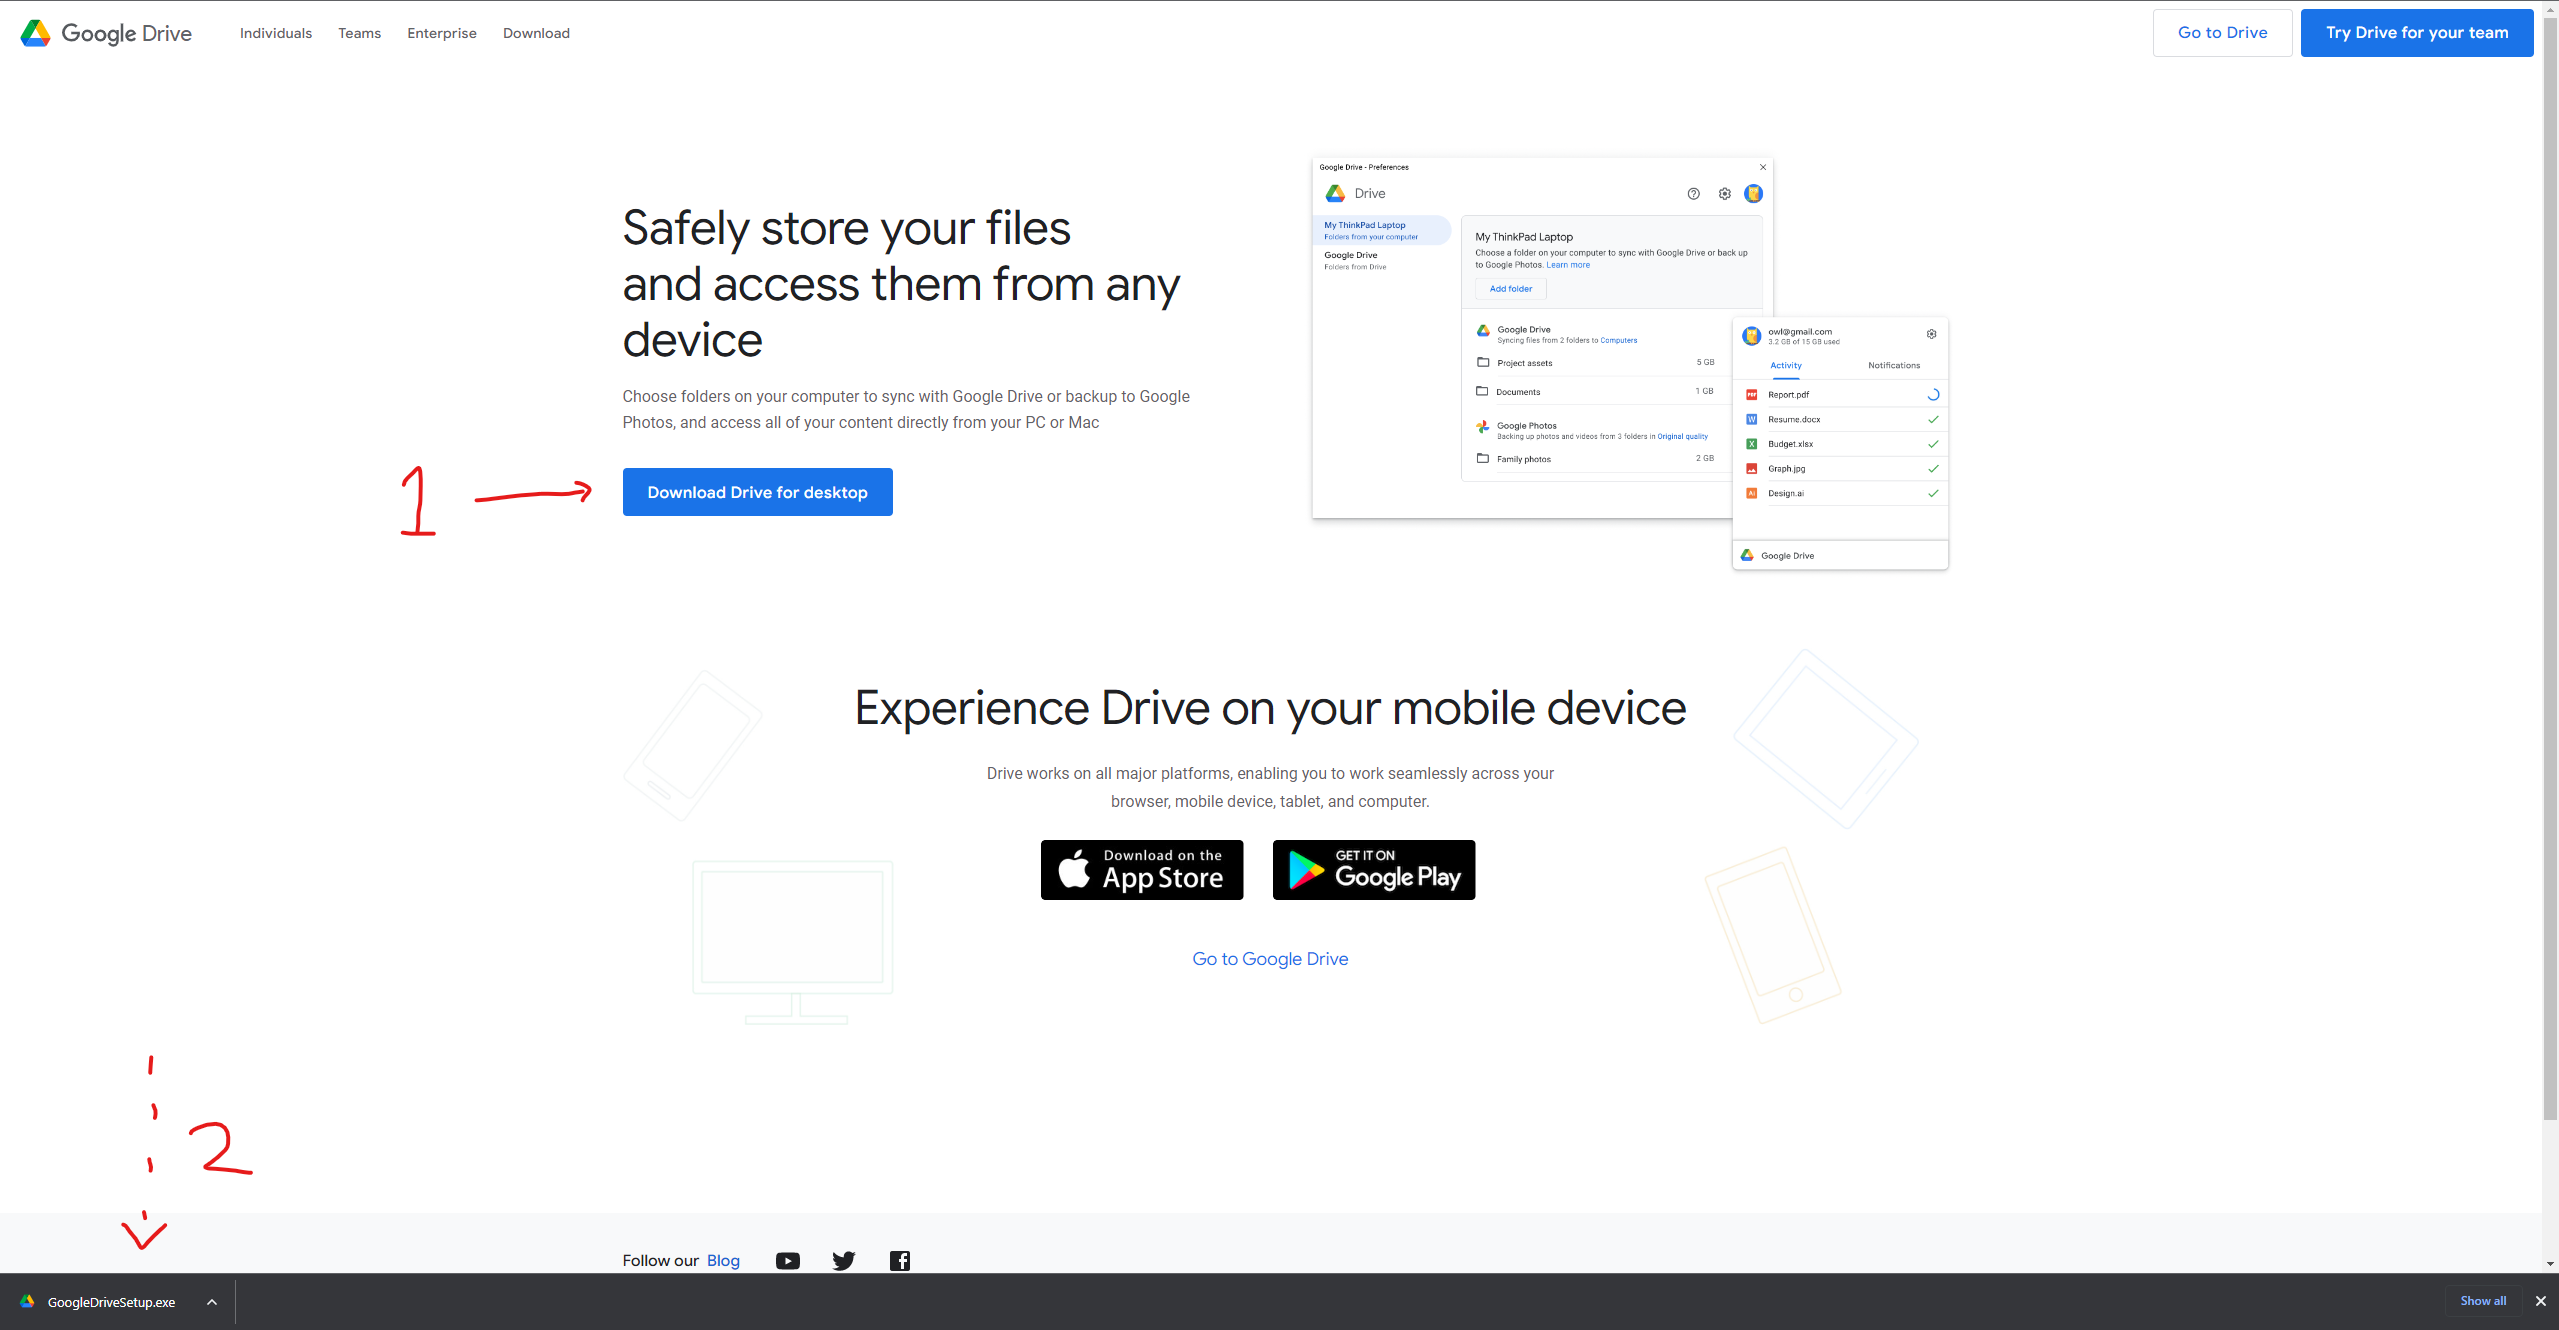
- Run GoogleDriveSetup.exe. Setup is essentially a single click.
- Next, there will be another popup window for you to log into your Google account.
- That will take you to a web browser-based sign-in portal, which you’ll complete the steps for.
- Once you have, you’ll see the
Success!screen. Close the setup app.
- First, you’ll head to this link or just search for “google drive for desktop” and follow the first link.
Windows
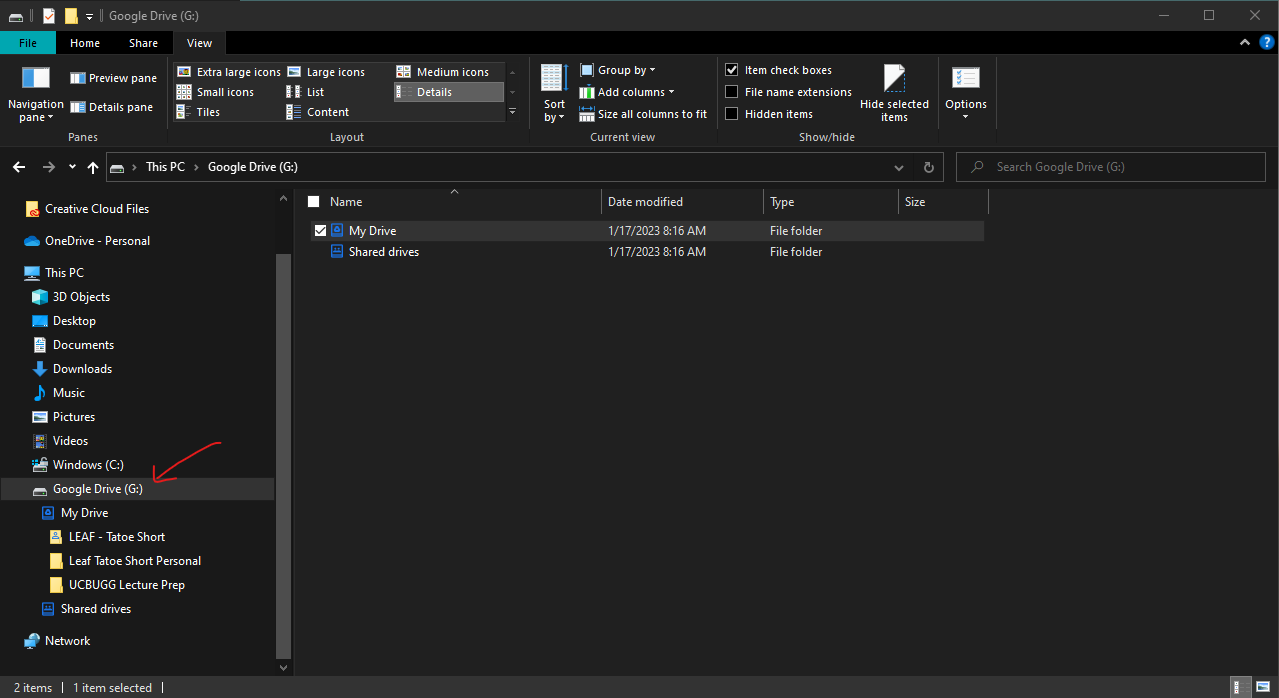
Open a new File Explorer Window and look at the Navigation Pane on the left-hand side. Toward the bottom, you should see a file repository called Google Drive (G:).
MAC
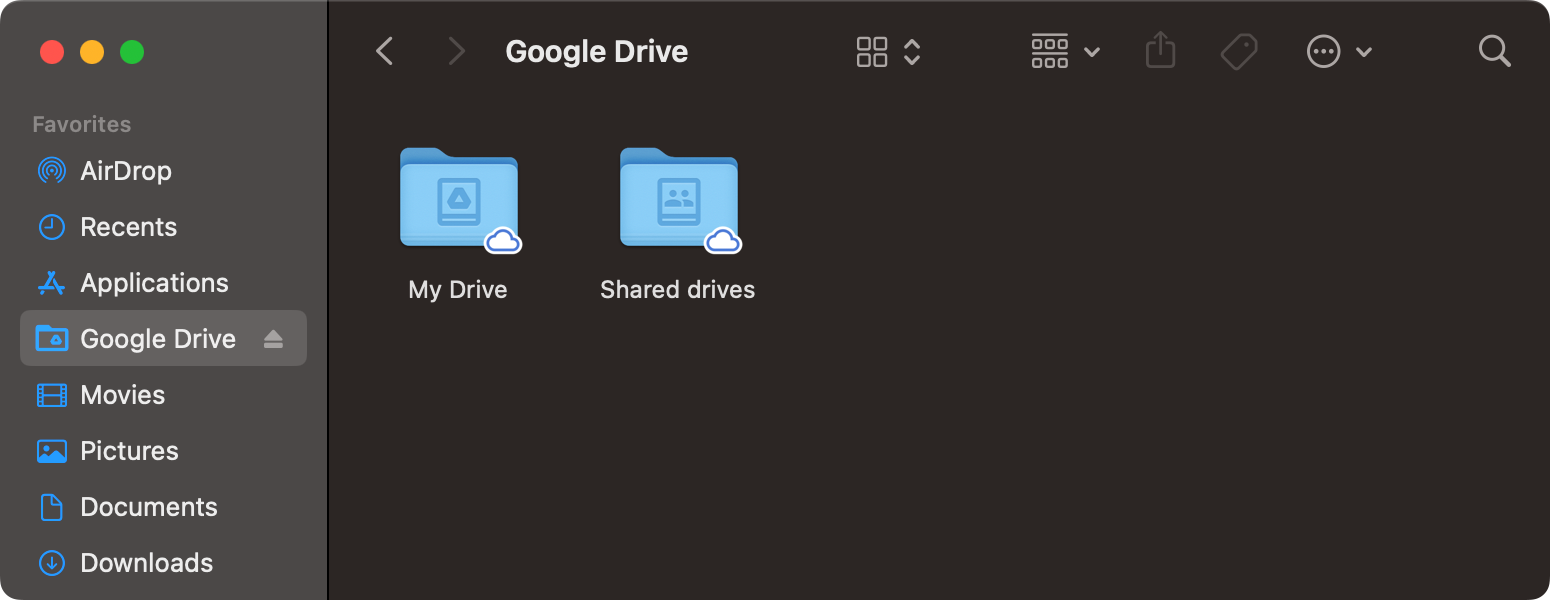
Open Finder. You should see a Google Drive folder inside your favorites.
If you see folders in there, you’ve done it! Download Complete!
- Access your team’s shared Google Drive project folder.
- Now that your Google Drive is synced to your machine, open Google Drive in your web browser. Double-check that all the files on your web browser match those in your local
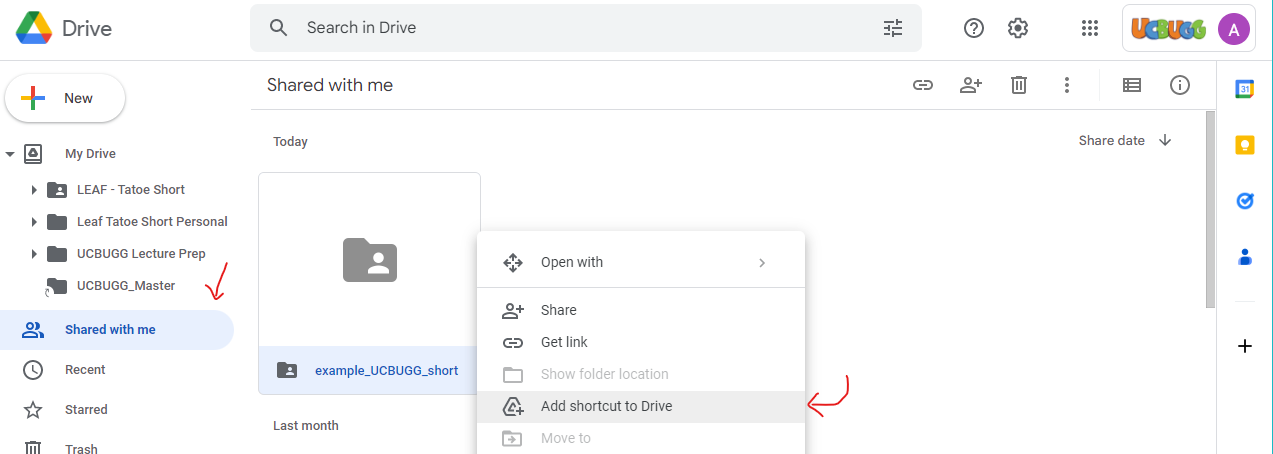
Google Drive (G:)folder on your computer. - One of your team’s Facilitators has created a Google Drive Folder for your team to store your project in and shared it with the Berkeley Gmail you’ve provided. Find that folder in the shared with me tab and save it as a shortcut to your Google Drive at the top of your directory.
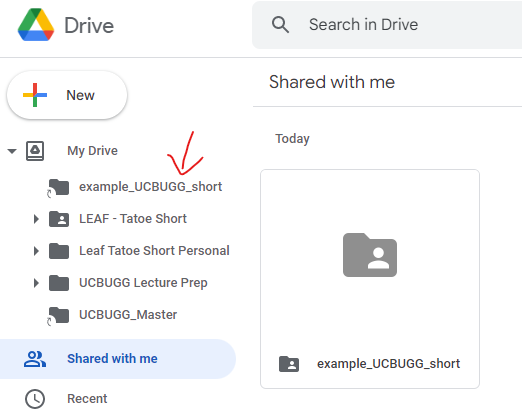
- Now you should see it appear in the Navigation Pane in Google Drive Browser.
- Now that your Google Drive is synced to your machine, open Google Drive in your web browser. Double-check that all the files on your web browser match those in your local
Windows
Open your local
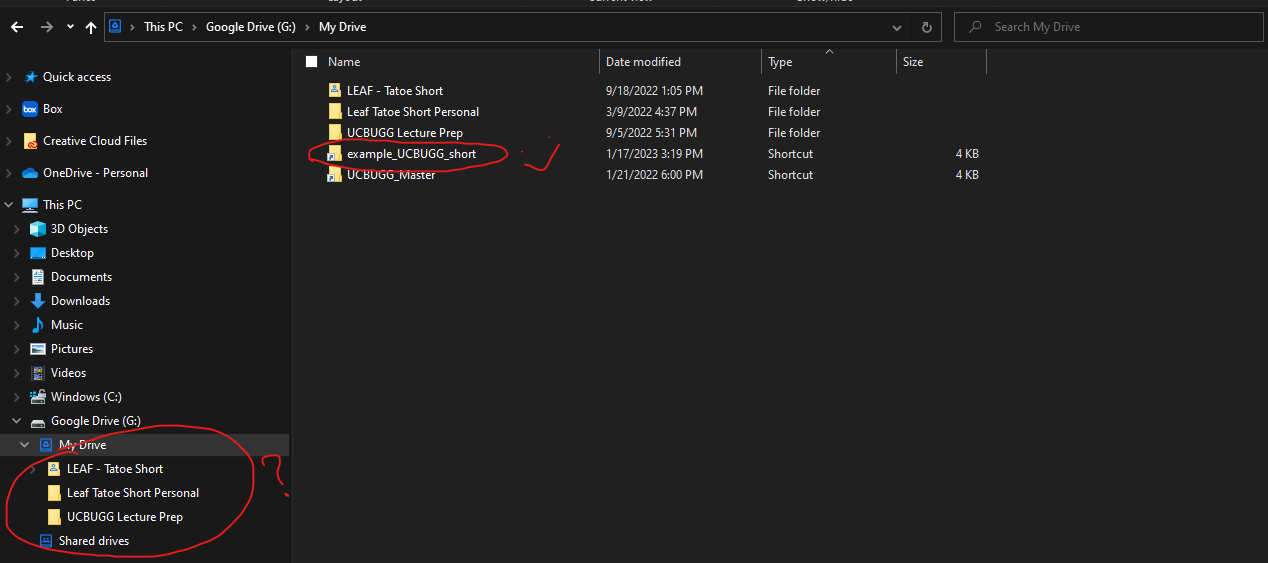
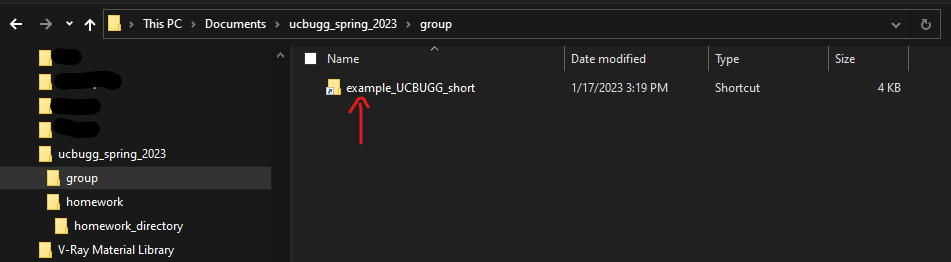
Google Drive (G:)folder on your computer’s file explorer and observe that the new shortcut is not visible in the Navigation Pane. What happened? What you’ve added to your Google Drive is a Shortcut and not a proper Folder, so it doesn’t show up in the Navigation Pane. But, when you open the top-levelGoogle Drive (G:)in the main viewing window on File Explorer, you’ll see the shortcut!
Now, you need to copy this shortcut somewhere easily accessible on your computer. We recommend copying it into the
ucbugg_spring_2023folder we set up earlier, or you can place it on your Desktop if you are an agent of chaos. All that matters is that you place the shortcut in a place on your computer where you can easily access it!
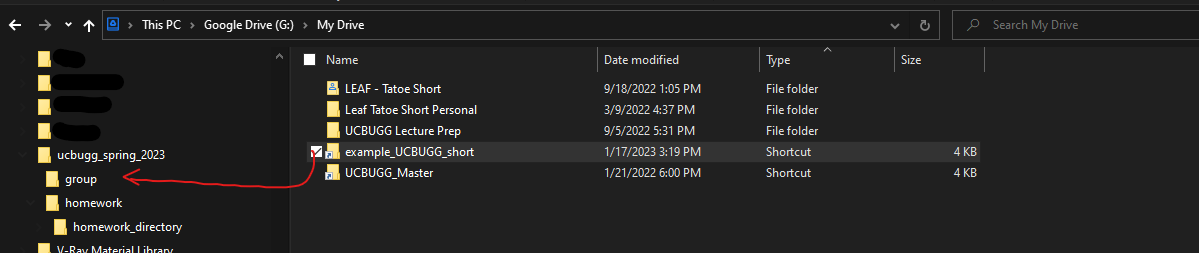
Copy by dragging and dropping the shortcut from the
Google Drive (G:)folder and into the destination of your choice. For our example, that will be down the file path\Documents\ucbugg_spring_2023\group, and you should be able to see the folder when you open thegroupfolder.
The next steps need only be completed by your group’s Project Manager, as they only need to be completed one time. But it’s important that you understand what’s going on, so please look over these instructions even if you’re not your team’s Project Manager.
Project Manager Only
Double-click on your group’s shared folder shortcut (in this example, titled
example_UCBUGG_short). Take a look at the file path at the top of your File Explorer tab. You’ll see a scary looking file path that doesn’t match the file path you’d expect, but it’s ok! This is because the folder is a shortcut, but even so, you’ll be able to create a Maya project directory for your team that you’ll all be able to access.Open another Maya file, and once again navigate to File → Project Window.
Click the New button.
In the
Current Projectfield, change the name to ‘your short’s name with no spaces_group’In the
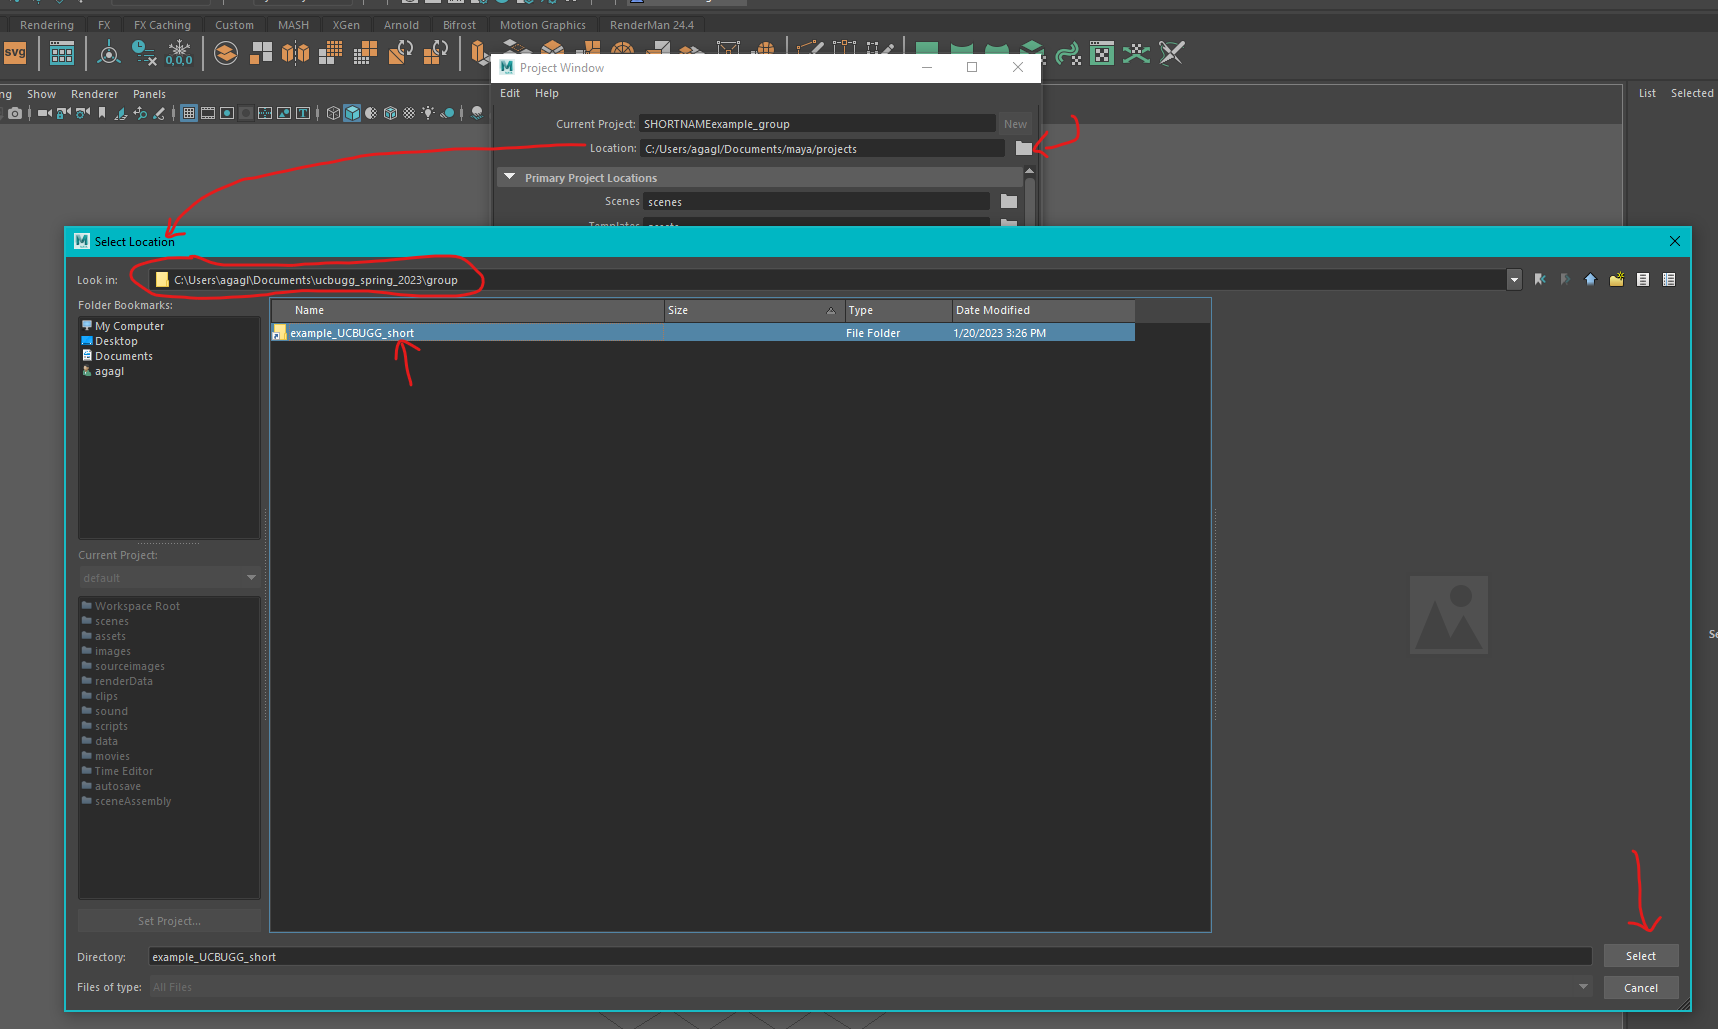
Locationfield, set the directory location to the foldergroupand into the group folder we set up earlier. This is on the file path from the group project folder we set up earlier, and it should readDocuments/ucbugg_spring_2023/groupif you’re following along on Windows.Select the shortcut we placed in the
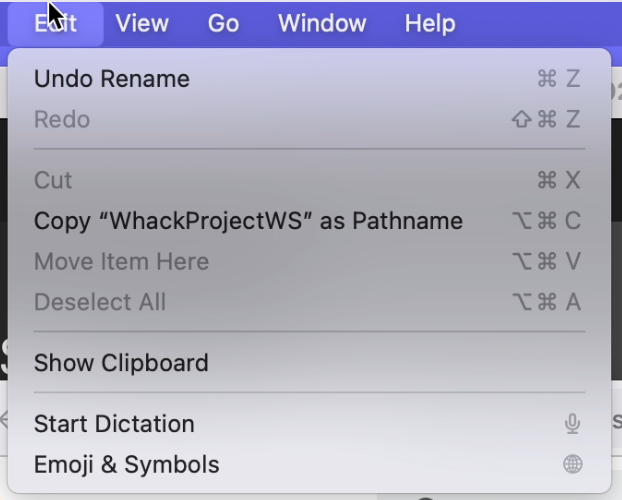
groupfolder earlier so that it’s highlighted in blue. Then click Select to save the location.The shortcuts do not show up on MacOS. To figure out the location of the workspace on your computer, navigate to the folder then open the Edit menu while holding down the ⌥ Option key. There will be an option to copy as pathname.
Don’t change anything else in this window and click on Accept at the bottom.
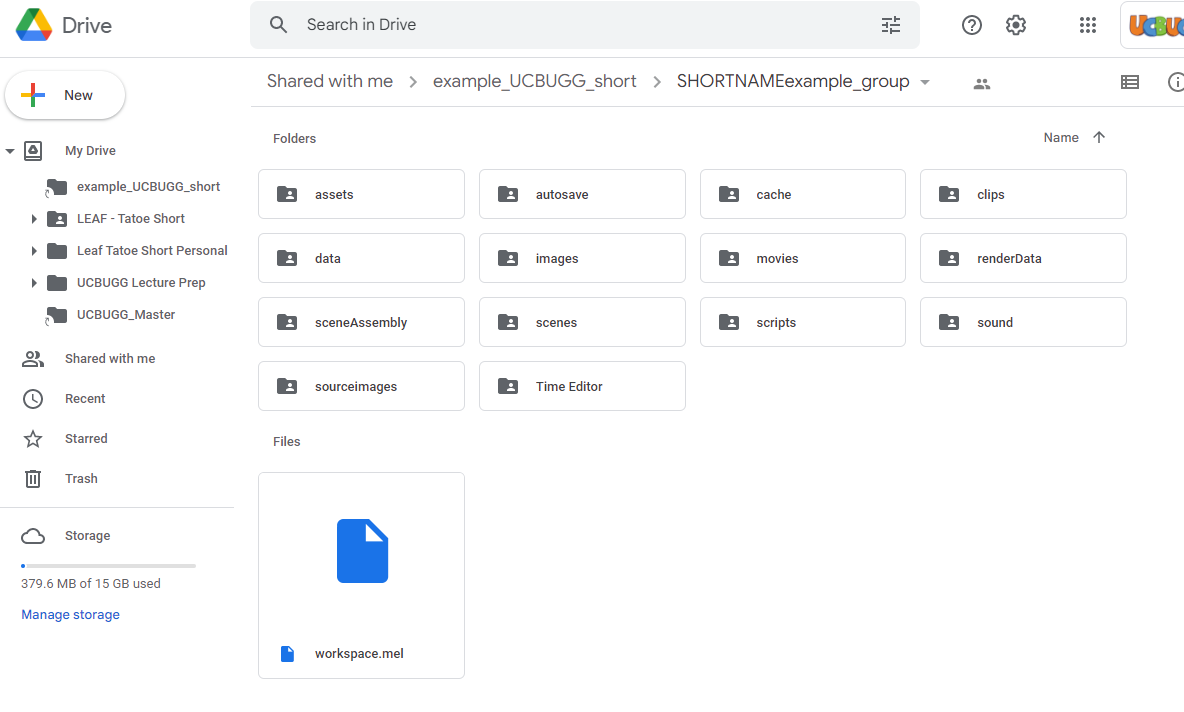
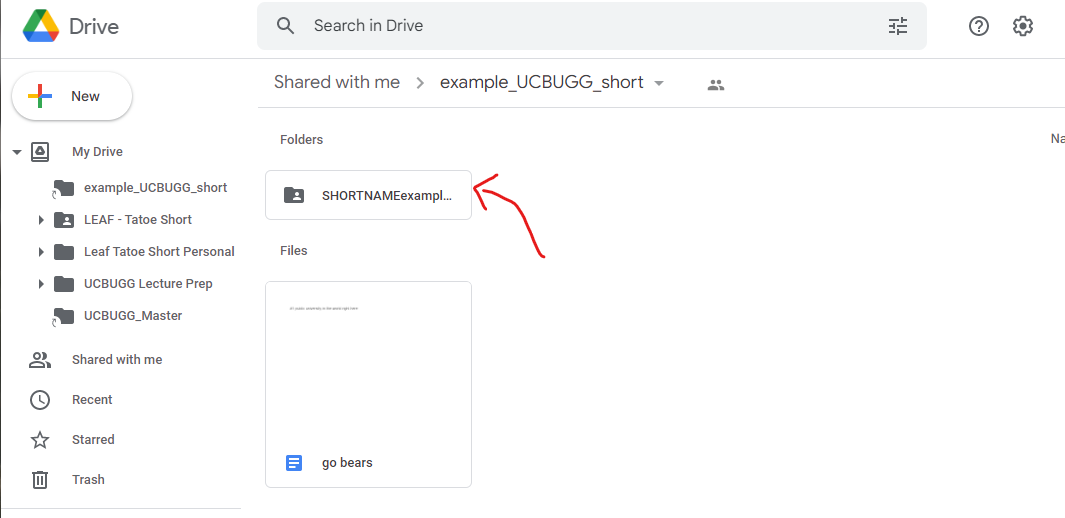
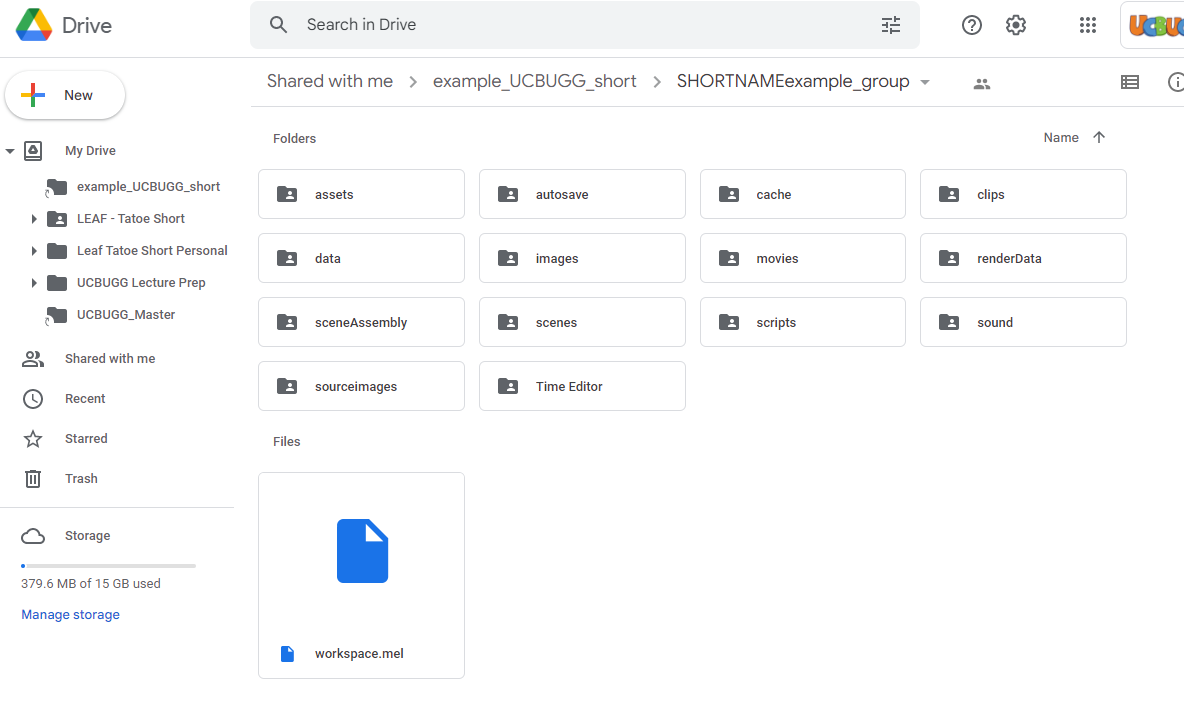
Now, open up Open in Google Drive in your web browser to double-check that it worked. In your group’s folder on Google Drive web, you should see a folder by the name you set in the last step and within that a bunch of folders.
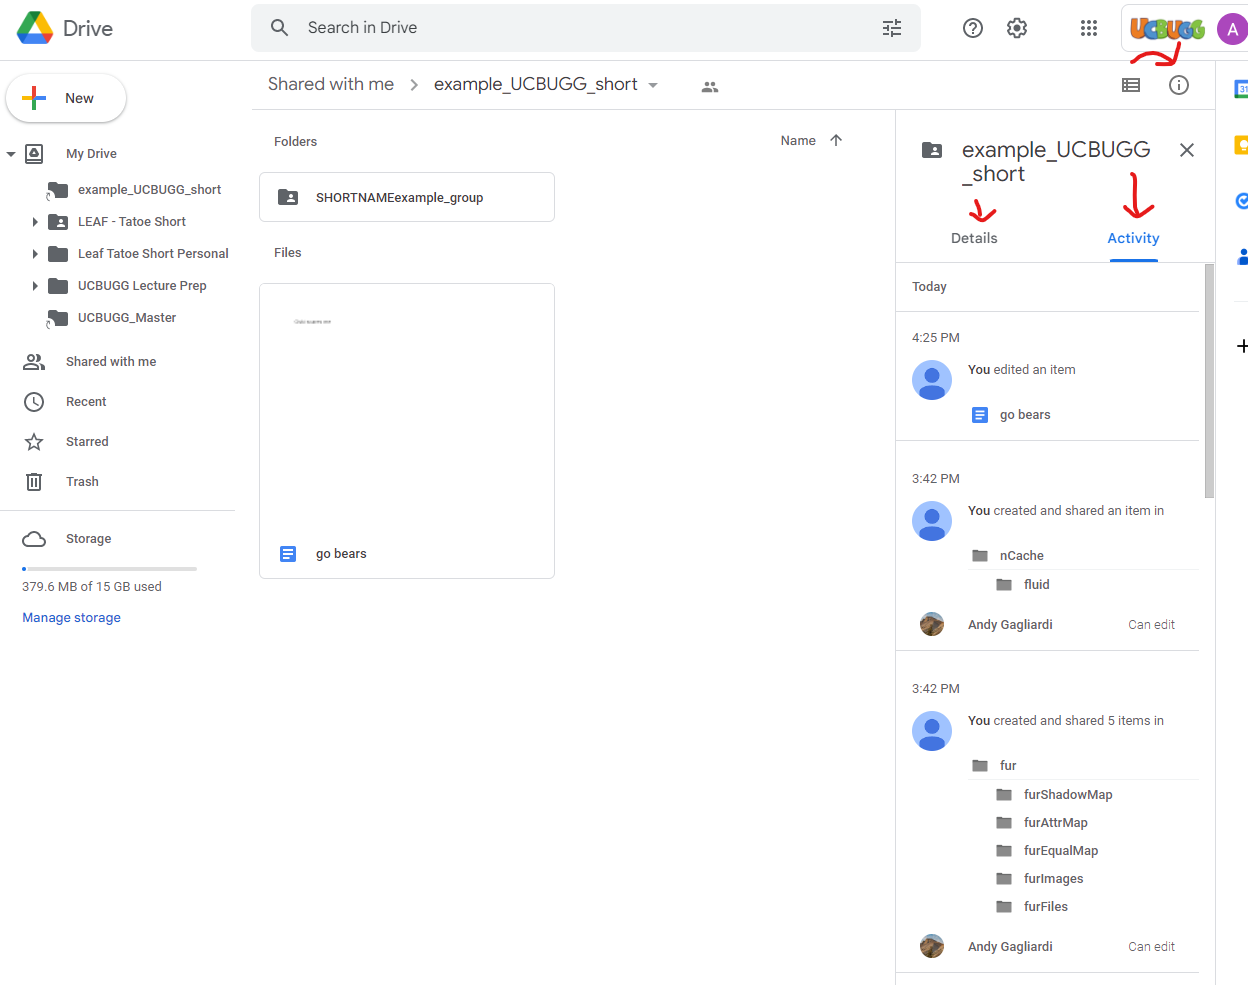
Now, click on the Information icon in the upper right corner of the opened group folder. This will have two tabs, Details and Activity. Use Details to manage team member access and use Activity to monitor changes made to the project and to revert to previous version of files if necessary.
That should do it! Run a few tests of basic actions (creating/saving a file) and make sure you can see the file appear on the Google Drive web browser.
All Group Members
Make sure to set your project! You’ll be switching between two project directories, your personal directory in your
homeworkfolder for individual lab work, and your team’s directory which you created a shortcut to access from your ‘group’ folder. Don’t forget to do this every time you open Maya!
If you have any questions, please ask the course staff! We are more than happy to help you in figuring out each aspect of animation, including project management.
Slide Deck
Review is one of the most important parts of animation. Collaboration and showing your work is how you and your team will generate new ideas, figure out what is and isn’t working, and generally find a creative rhythm. The slide deck is the setting for these reviews.
Project Manager Only
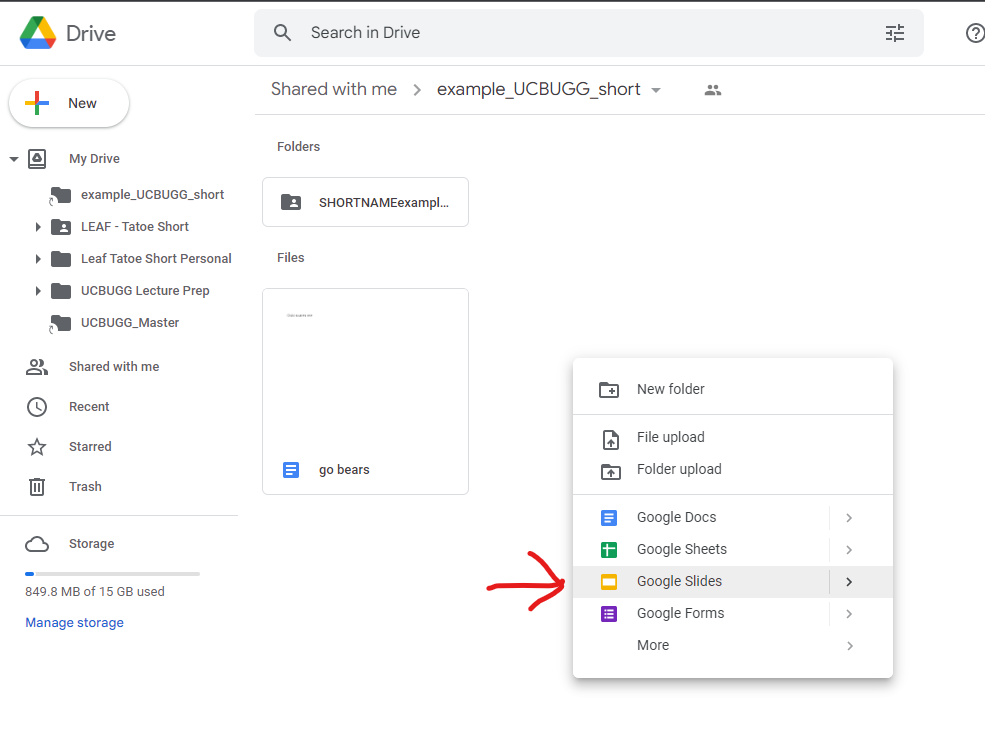
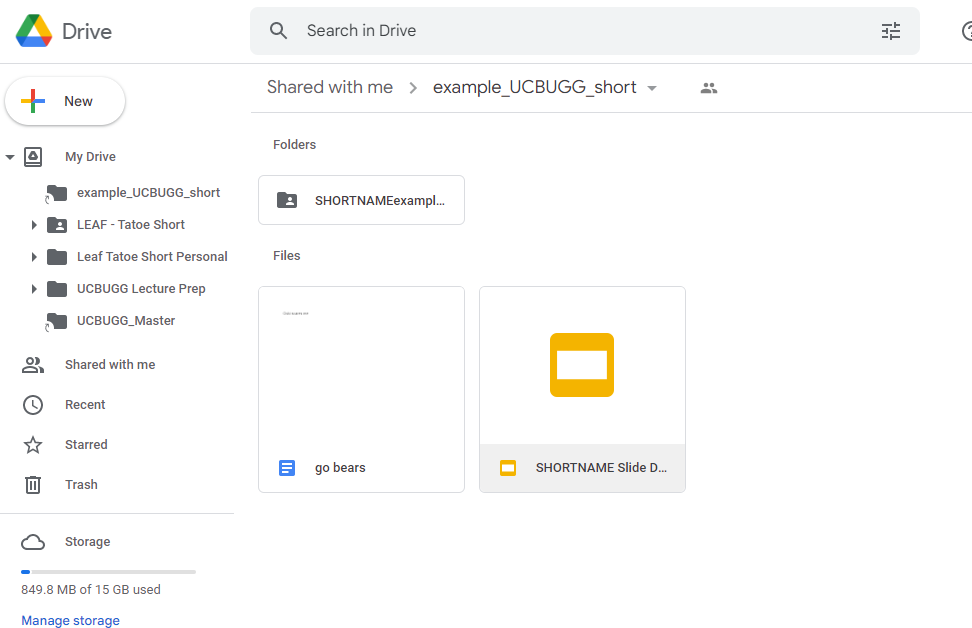
Project Managers, this part is super simple. Inside your group’s shared Google Drive (one layer above your team’s Maya directory), create a Google Slides presentation. Name it “group name Slide Deck” or something comparably clear and unmissable.
And you’re done! Feel free to make it as fancy as you like—and who doesn’t like pretty slides?
All Team Members
Confirm that all group members can see the slide deck on their own machines. It should look like this in each member’s drive:
Each week, you’ll upload screenshots of the work you do for the short. Make sure to include your name, the date you finished your work, and any notes or caveats (industry term for things you plan to fix later) you want to include in a caption below your screenshots. This will make group time much more efficient and easier, giving you more time to focus on the story, art direction, and any technical challenges you face as the semester goes on.
Homework Submission
Once you’ve followed the instructions on this lab, you should be able to easily access your group’s Google Drive folder.
Take the following screenshots for your homework submission:
- Your individual lab/homework directory open in your computer’s hard drive location (File Explorer (Windows) or Finder (Mac)).
- Your group Google Drive folder open in your computer’s hard drive location.
- Your group Google Drive folder open on your web browser (Google Chrome, Safari, Firefox, etc.)
- Your individual Project Window in Maya (File → Project Window).
- Your team’s Google Slides presentation for group time progress reviews.
You did it! Now, you’ll be ready to keep track of all your files this semester! Go eat some ice cream, boba (do you eat boba?), or something else to celebrate.