INTRODUCTION
WHAT IS SKINNING?
Skinning is the process of apportioning parts of the mesh/geometry of a model to a rig. When you have “skinned” a model, it means that you have defined what part of the mesh each joint controls.
This is also referred to as painting skin weights because it is literally what you are going to be doing: painting the areas influenced by each joint. Throughout this lab, “skinning,” “painting influences,” and “painting skin weights” will all be used interchangeably.
The process around this part of the pipeline is the following:
- Finish the rig (specifically the placement/orientation of all joints)
- Attach the rig to the model/mesh
- Blendshapes (refer to the blendshapes lab if you haven’t done blendshapes already)
- Skinning
One way to communicate the importance of skinning is to show you a situation where you skip skinning:
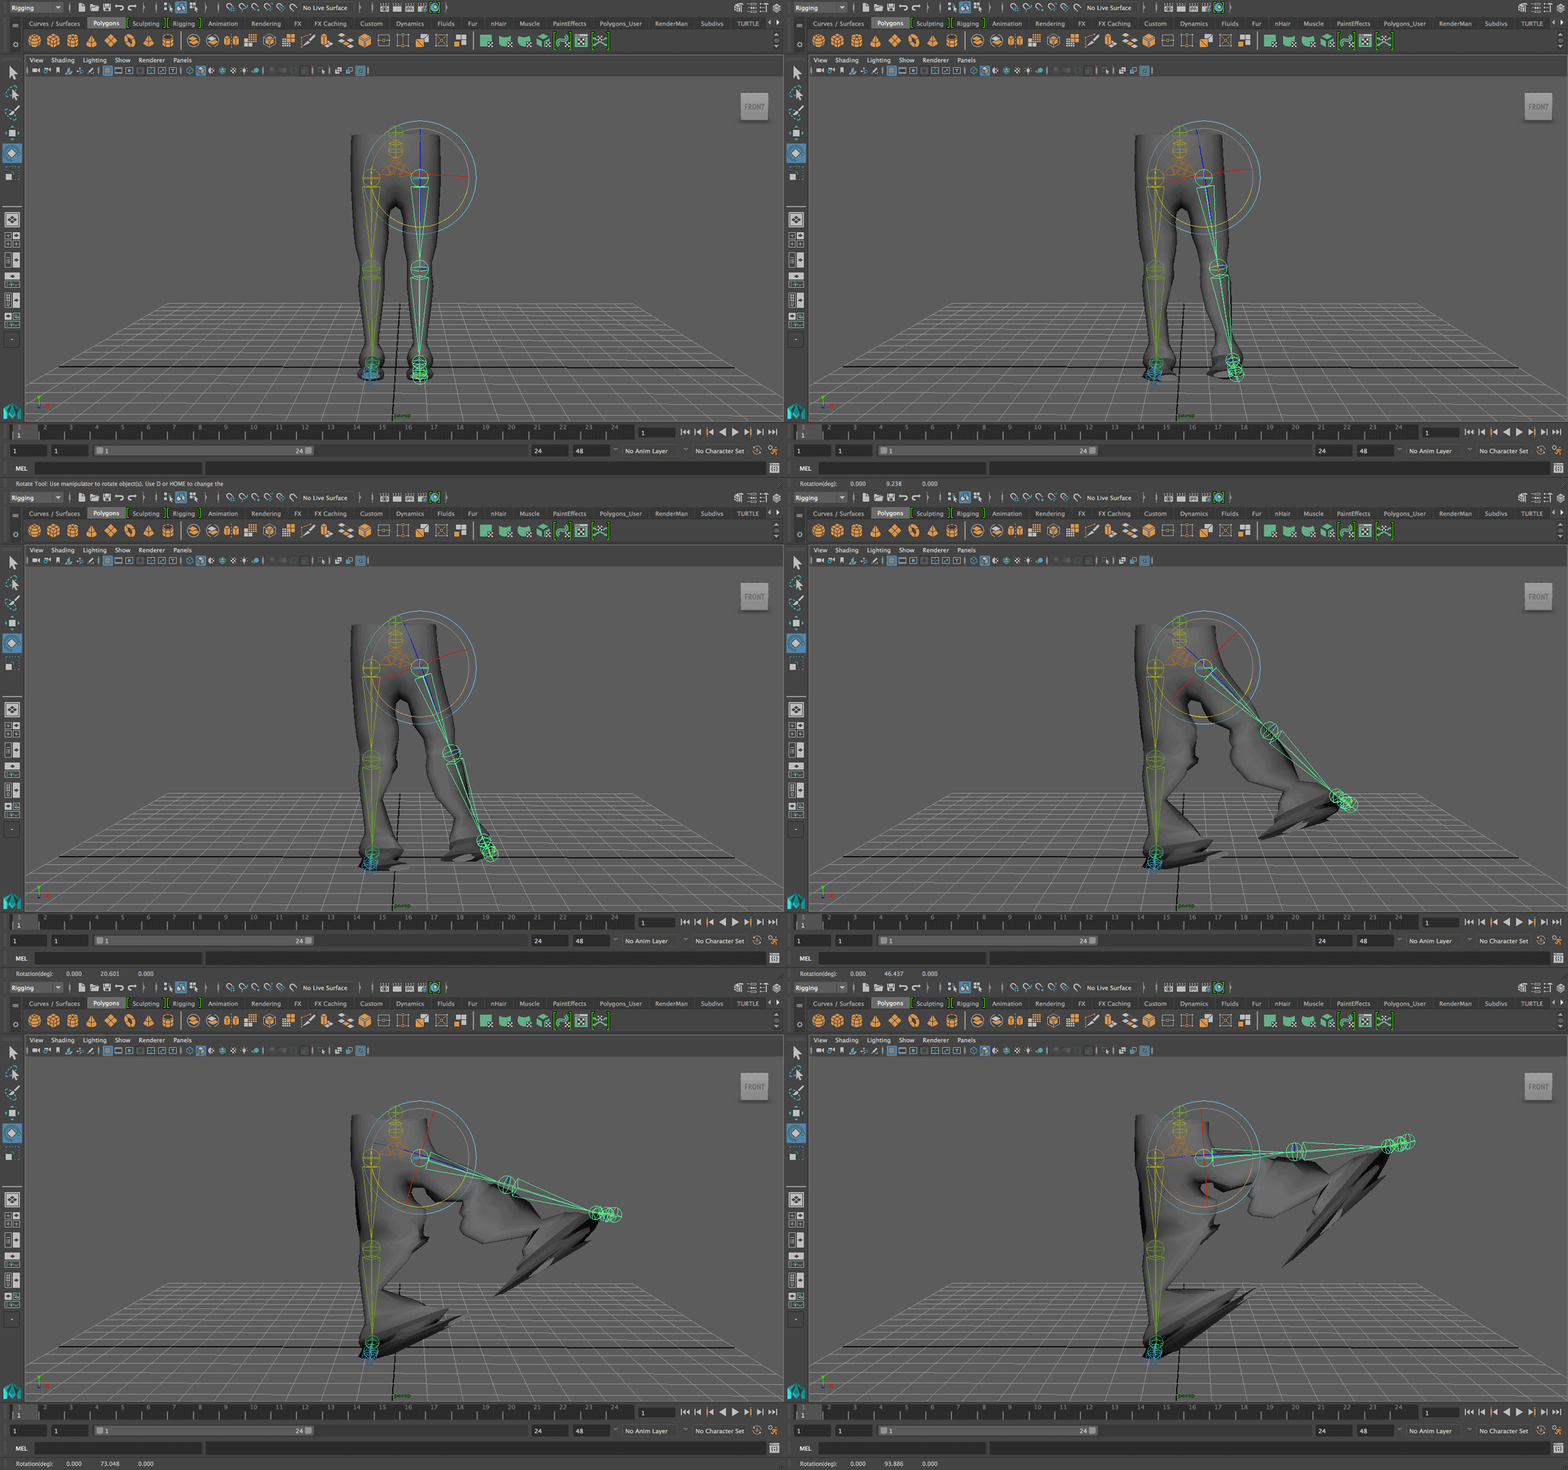
Another example:
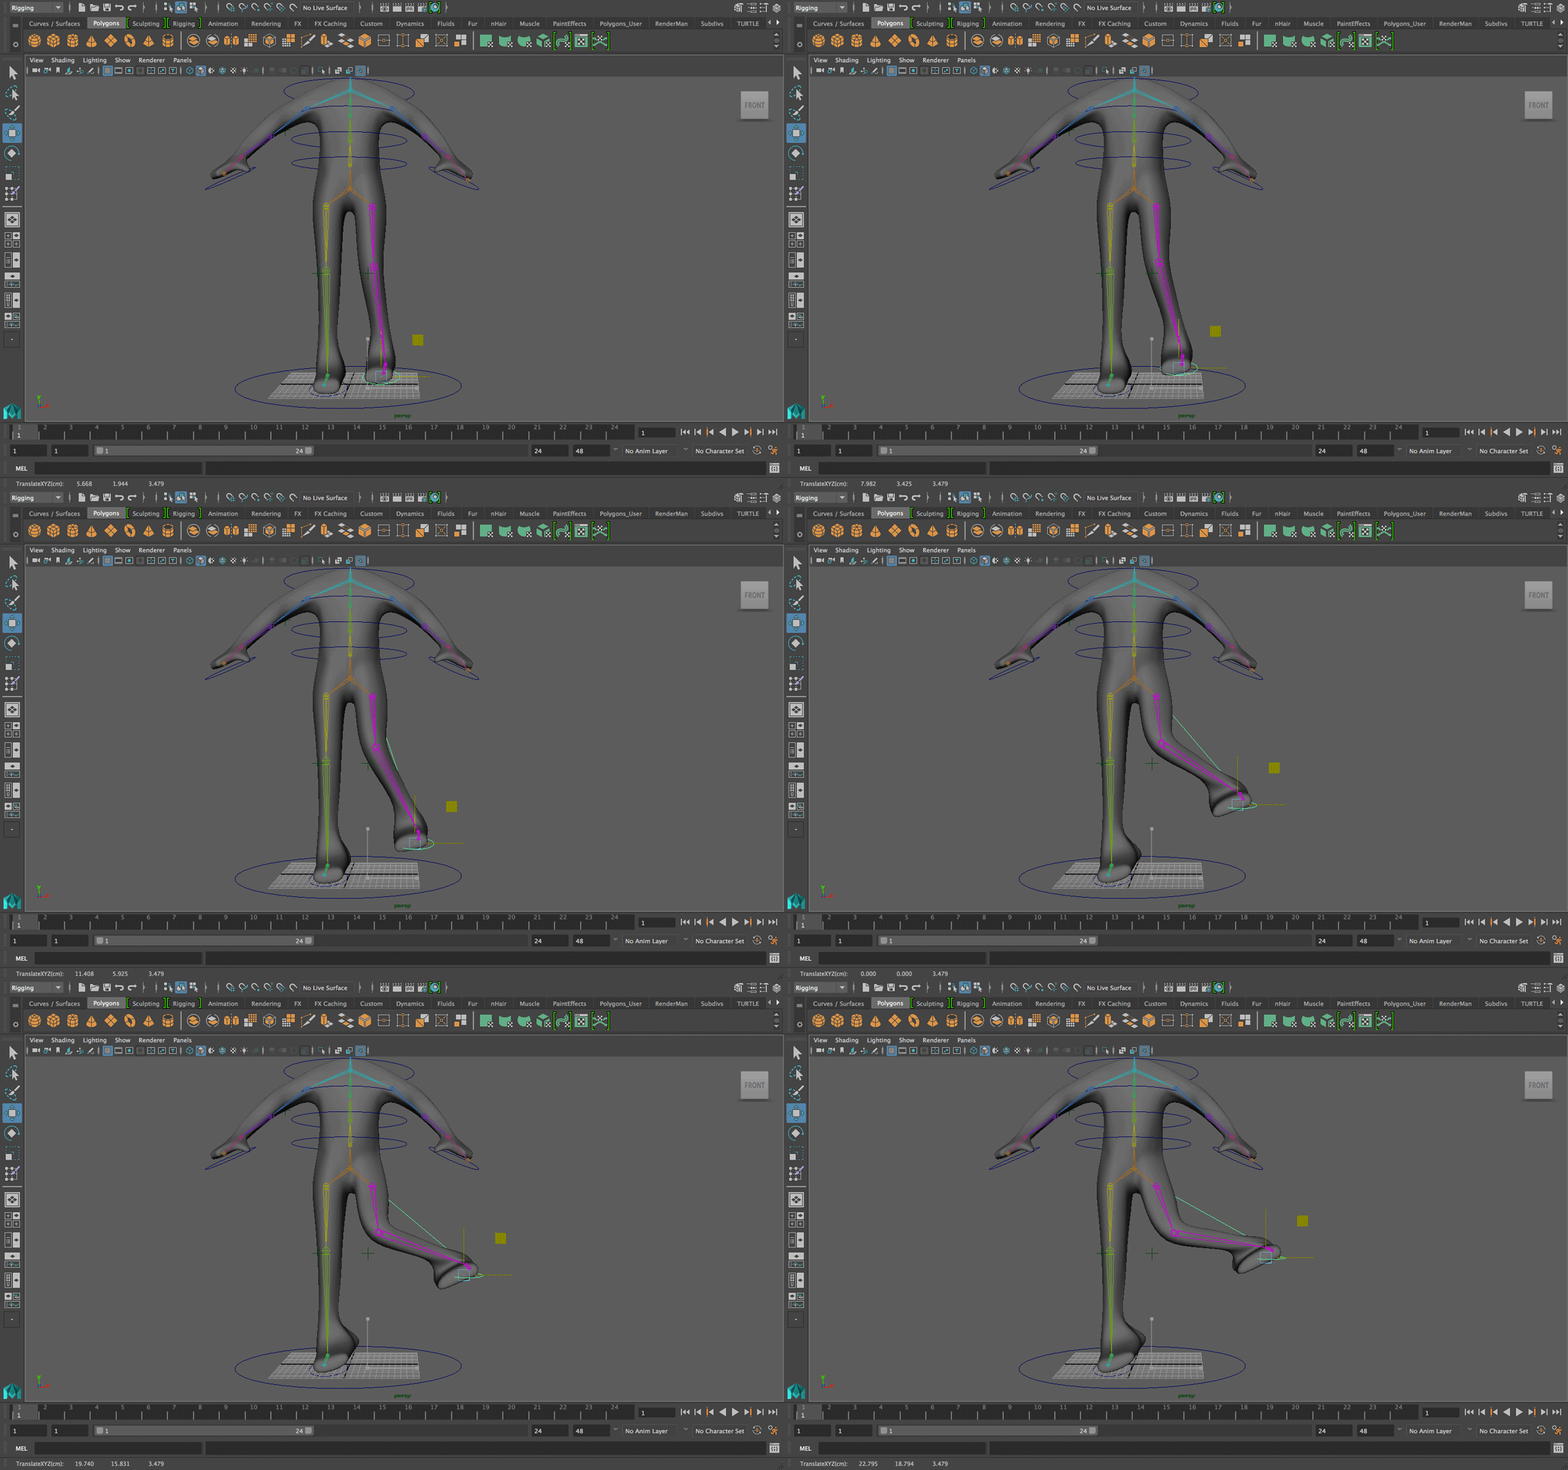
WHY DOES THIS HAPPEN?
Maya, by default, used to “approximate” skinning by figuring out which vertices were closest to a joint, and then deciding that this joint should then affect these nearby vertices. Intuitively, this is called the “Closest Distance” method (the first gif with the legs uses this method whereas the second gif uses the new method). This is extremely problematic when there are gaps in the model: i.e. vertices on the right side of your left foot are close to the vertices on the left side of your right foot. Therefore, you end up with a default skin map where the right foot joint actually deforms the left foot as well, which is definitely not the way a real skeletal system works.
However, you do not need to worry about the “closest distance” method anymore. Geodesic Voxel Binding has come to the rescue.
How does Geodesic Voxel Binding help?
The Closest Distance method produces an extremely faulty default skin map to the point that it was normal practice to just attach the skeleton to the body, assign every part of the mesh to be controlled by the root joint, and then paint everything yourself for every single joint (this was a procedure called flooding).
Geodesic Voxel Binding basically produces a much, much, much better default skin map. It will likely still need editing though, but not nearly the same amount as skinning everything yourself.
If you’re interested in finding out more about how this massive improvement in skinning occurred, here’s the link to the website of the paper, accompanied by a video showing off video game characters skinned using this method:
http://www.dgp.toronto.edu/~mdelasa/voxelization/
So now that we’ve established that Geodesic Voxel Binding is amazing and Closest Distance is outdated, let’s get started.
Download this file to follow along with the lab:
rigged_blobber.ma
CHECKLIST/IMPORTANT NOTES BEFORE YOU BEGIN
The rig/joint positions have to be absolutely 100% done! If you add a joint later, it won’t be “seen” as part of the same skeleton in the skin map you’ve made, and you’ll have to redo the skinning.
Your rig should be symmetrical unless there’s a really good reason for it not to be. Take the time to make sure that your rig is symmetrical because like many other parts of the pipeline, you can skin one half of the character and just mirror that skinning across. This doesn’t work as nicely if your rig is less symmetrical.
Make your blendshapes first! If you skin and then create new blendshapes after (specifically if you apply a blendshape deformer), your blendshapes will override your skinning, completely canceling your skinning. (Don’t freak out if this has already happened, there’s a bit of a long solution, see the “considerations after skinning” section at the end of the lab). If you don’t know what blendshapes are, refer to the blendshapes lab.
Do NOT delete history on the mesh at any point after you’ve started skinning! If you followed the point right above this one, then you should already have your blendshapes. Unfortunately, Maya considers blendshapes and skinning to be history nodes, so if you delete history on the character, you’ll lose both your blendshapes and skinning.
Although it is not preferable, it’s okay to start skinning with just the skeleton (specifically meaning all joints) in place. Controllers affect how the joints behave relative to each other and so it doesn’t add or remove joints. As long as your joint count is the same, and you don’t move joint positions as you’re skinning, you should be fine. Controllers can be added, removed, and edited freely at any point because skinning depends on joints only, not controllers. However, as you’re skinning, you’re going to want to be constantly testing your rig, which is much easier if the controllers are already available and ready.
Freeze transform your controllers before binding the rig to the mesh. Freeze transforming will reset the controllers’ coordinates to 0. The purpose of this is that if you move a controller away from the body to see how a limb stretches, you want to have a way to bring that controller back to exactly where it was without just eyeballing it. If its transformations were frozen at its origin, then you can just type “0” in all its coordinates and it’ll snap back to where it was. This is absolutely essential when you come to animate—it’s like an established default position for the rig.
It generally helps to keep your mesh unsmoothed (click on it and type “1”). When you test parts of the rig as you skin (which you should do a lot!) you can smooth it again (by clicking on the mesh and typing “3”) to test it. When you go back to editing the weights though, make sure to unsmooth it again.
This is a process! It will take several tries per joint to get the skinning just right, which is why you’ll be testing your rig as you go along.
BINDING THE RIG TO YOUR MESH
- Grab the root joint of your rig. This is the joint that, if you click on, will also show that every other joint is selected/highlighted.
- Shift+click the mesh.
- Go to the “Rigging” menu.
- Go to Skin —> Bind Skin and click the option box.
- Make sure these are your options (shown in the image below) and then click “Bind Skin.”
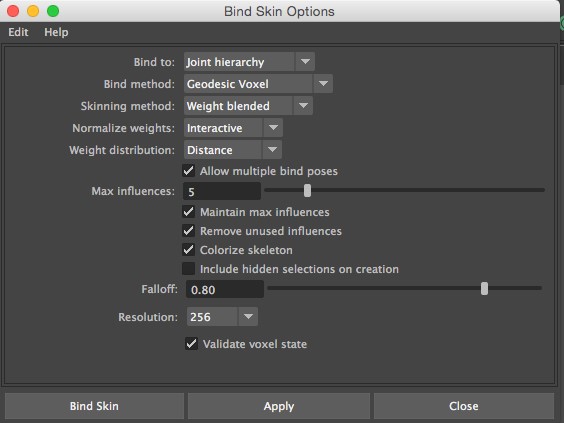
Explanation of why to choose these options:
Bind to: Joint Hierarchy
- This option ensures that you’re using the preexisting joint hierarchy to apply to the selected mesh.
Bind method: Geodesic Voxel
- This is the new method mentioned above. This produces a significantly better first pass of a skin map that will save you hours off of the time you spend editing your characters’ skin weights.
Skinning method: Weight Blended
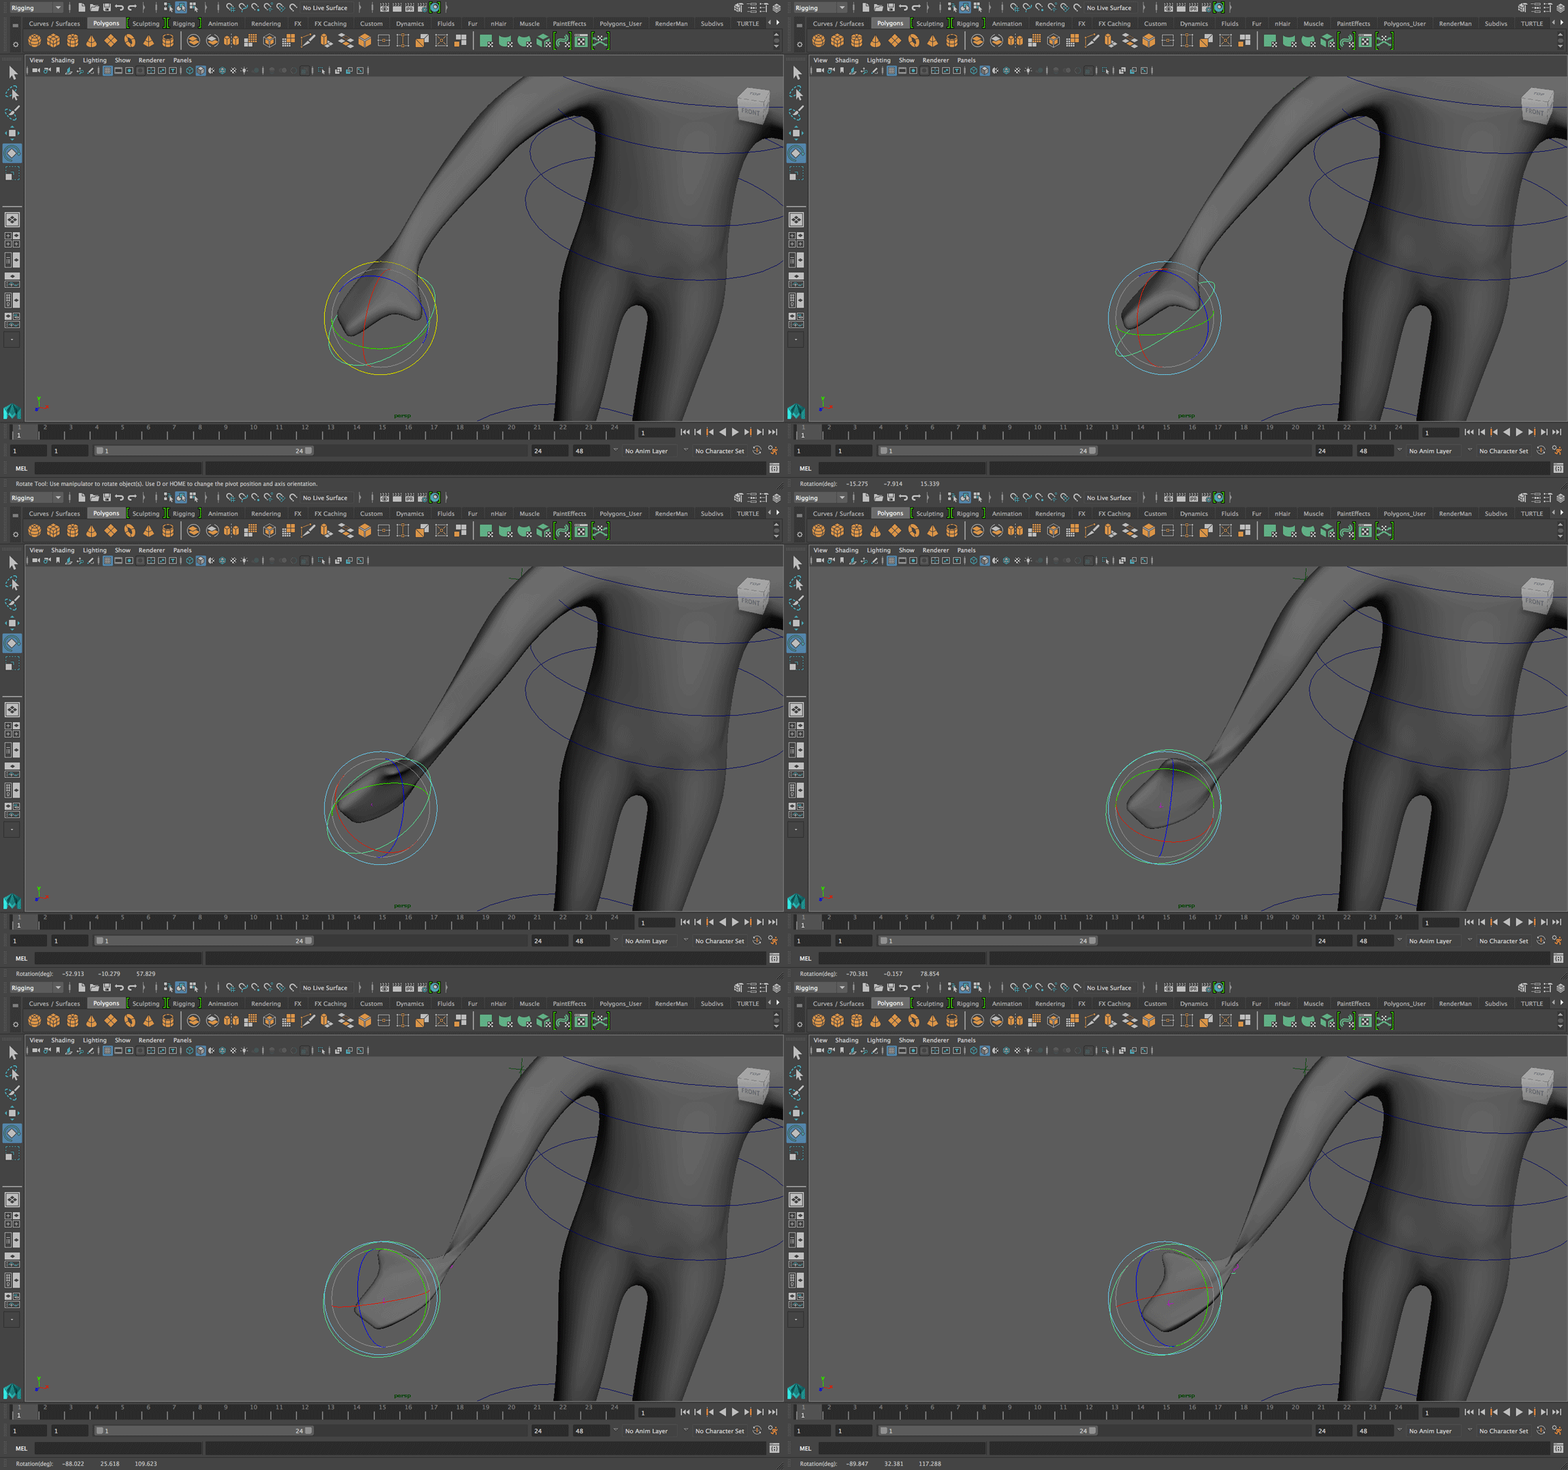
- This option is actually a blend of the other two (classic linear and dual quaternion). In the old “classic linear” option, when you turn a character’s wrist, their arm wouldn’t turn with it and it would result in a candy wrapper effect as seen below:
One way to get by this is to use the Dual Quaternion method of skinning, which spreads that turn between the two joints, resulting in a much smoother twist that avoids the candy wrapper effect. Proof:
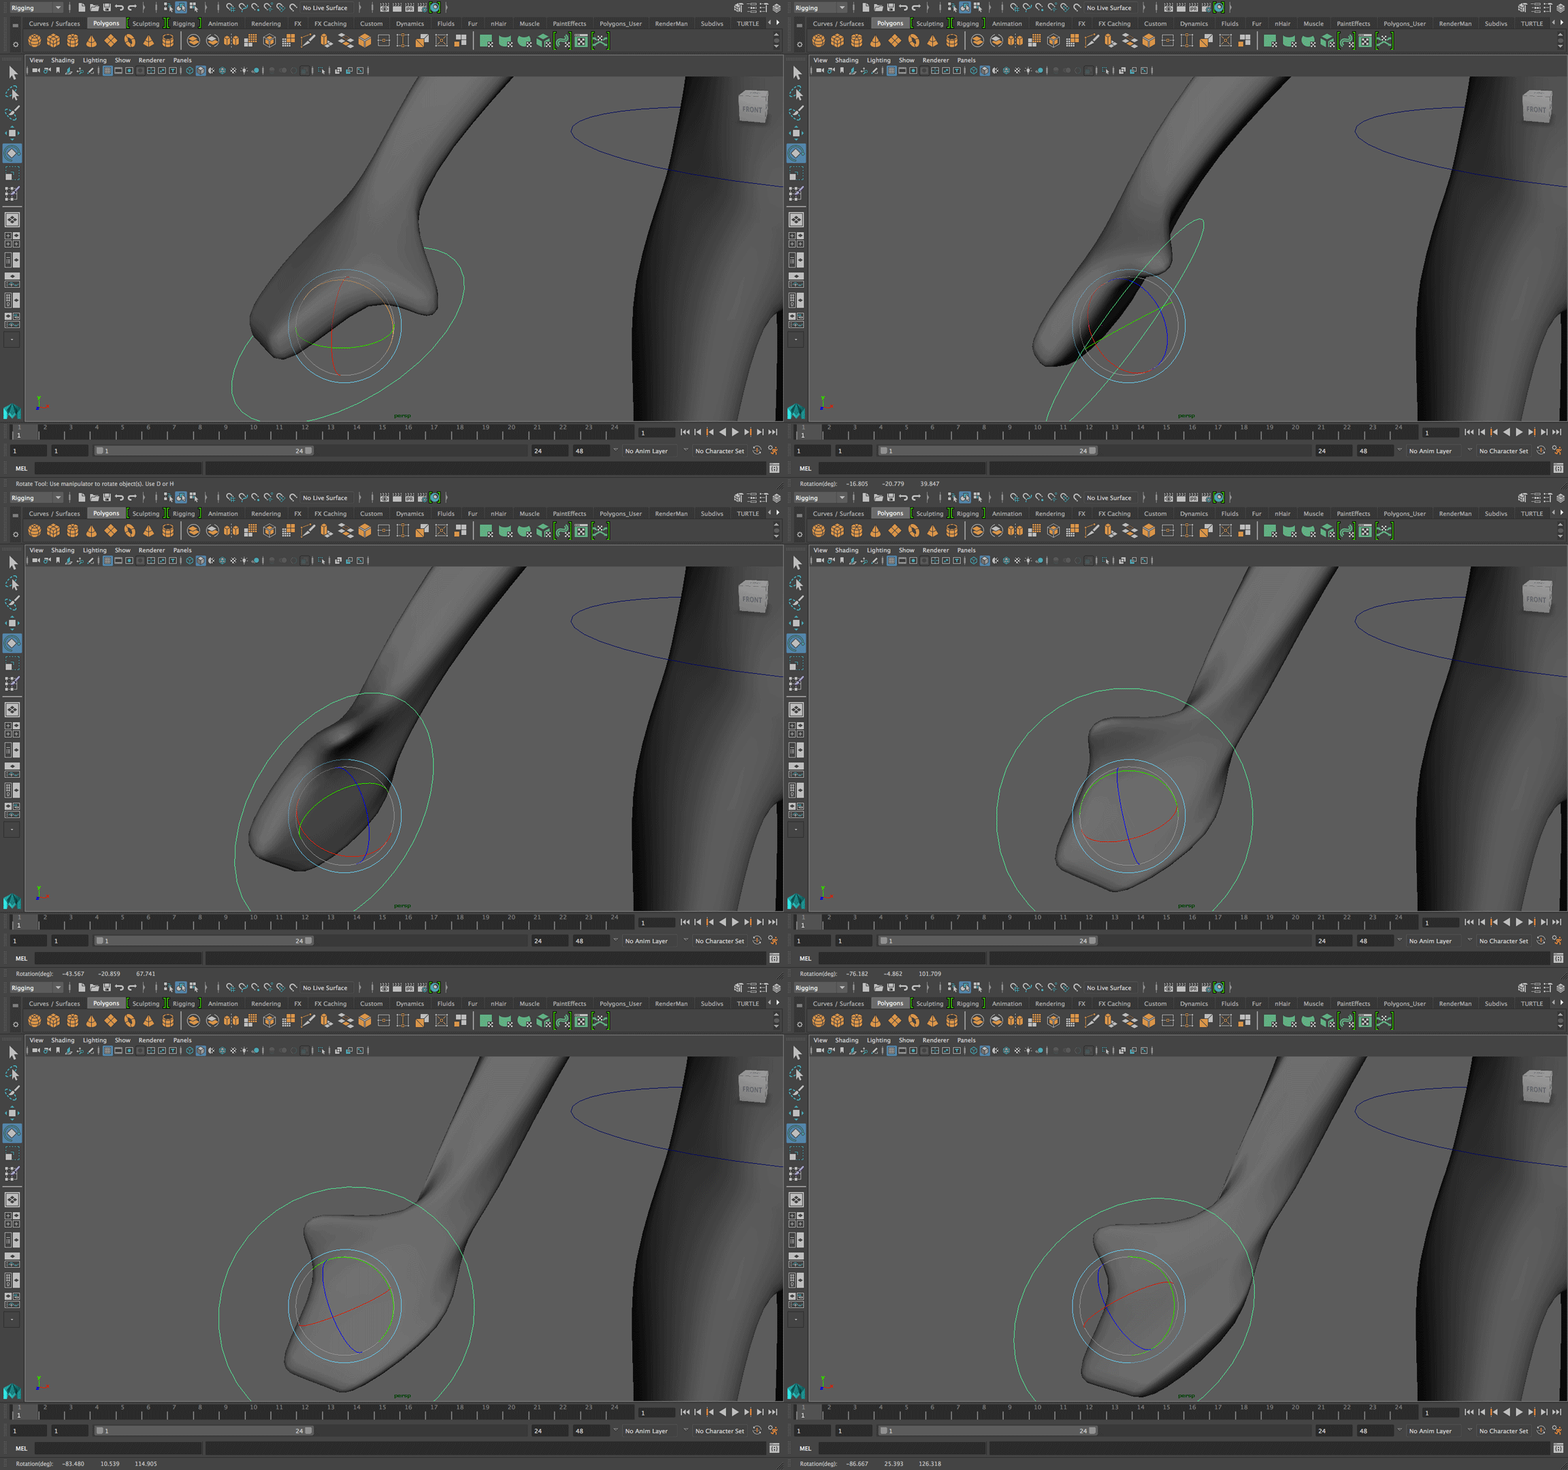
However, even though I have never encountered this issue myself, there have been a few problems reported online about the Dual Quaternion method interfering with some animation situations. To make sure these problems can be avoided we use “Weight Blended” instead of just “Dual Quaternion”. This enables you to actually paint which parts of the mesh you want to be affected using the “Dual Quaternion” method or the “Classic Linear” method. This will be explained in detail further down. Just keep in mind that painting areas to be controlled by the Dual Quaternion method is different from painting skin weights.
Normalize weights: Interactive
- This will normalize the weights after every edit you make in the skinning (as opposed to “post” which will only do it upon deformation). Make sure you leave it on interactive to be able to see your edited skin weights and be able to go in any order you like.
Weight distribution: Distance
- Setting it to distance means that when Maya decides to apportion weights away from a joint to somewhere else, that “somewhere else” could be anywhere on the mesh. The other option is “neighbors” in which Maya will prioritize giving these skin weights to nearby, neighboring joints. Either way, most of your time will be spent editing adjacent joints while keeping the rest of the joints locked (so that their influences aren’t inadvertently affected by your editing), which means that “distance” as opposed to “neighbors” won’t matter too much.
Falloff: 0.80
- 0.80 is generally a good number to start with. The closer to 1 it is, the more rigid the bind will be. This is because the influence of every joint will decay quicker as you move away from the center of the joint. As you get closer to a value of 0, the softer the bind will be. This is because the influence of every joint covers a bigger distance before decaying, resulting in bigger areas of influences per joint.
TEST YOUR RIG
This one really depends on your model and rig. After attaching the rig to the mesh, you should test the rig. Grab your controllers/end joints of the limbs and move/rotate them within reasonable limits. Do you see anything that deforms unnaturally? Most likely, you’ll end up with several joints affecting a larger area than they should.
A good idea is to follow your character’s positions in the storyboards. Look for the character’s poses and try to emulate them with your rig. Are there any positions in which a part of the mesh moves in a way that it shouldn’t, or isn’t moving when it should be moving? Make note of all of these inconsistencies.
There’ll be higher priority issues and lower priority ones in your model’s skin map. For example, if your character is a quadruped (walks on all fours) don’t worry too much if they don’t deform as well as they should when you get them standing on two feet. If they’re not going to be on two feet at any point during your short, then you should fix this only near the end.
EDIT THE INCONSISTENCIES OUT OF THE SKINNING MAP
This is where the actual painting takes place.
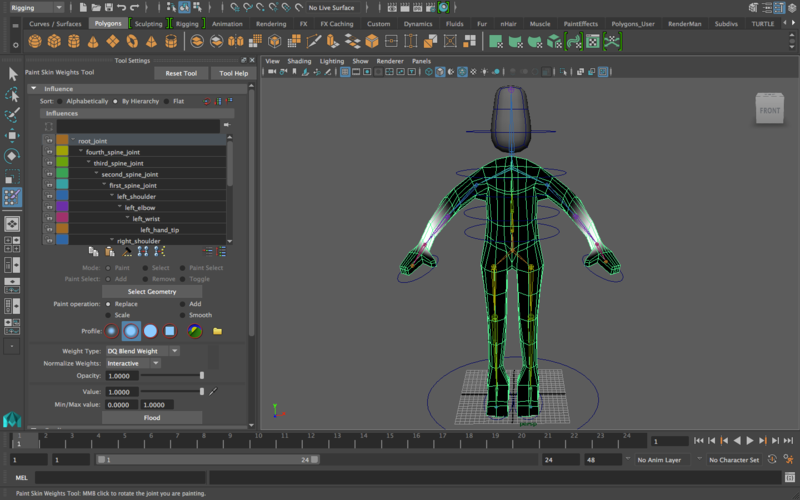
Go to SkinàPaint Skin Weights and click the option box. A menu on the left should open. This is what it would look like:
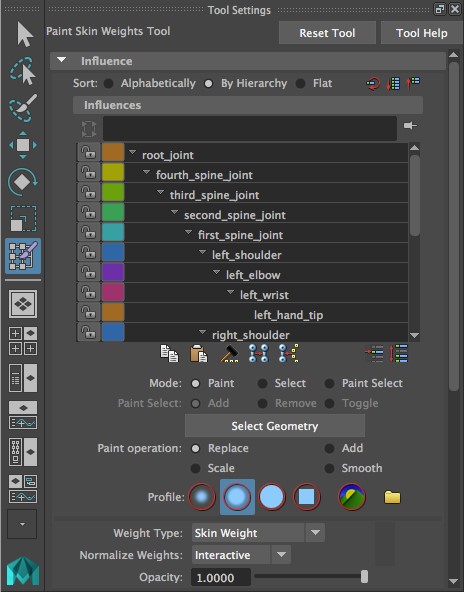
WHAT AM I LOOKING AT?
Under “Influences” it shows a list of the joints in your rig. They are arranged by hierarchy, as is indicated in the tab right above “influences.” This should be the same hierarchy as the one in your outliner, except that it doesn’t consider controllers because skinning depends on joints, not controllers.
Notice the lock sign beside every joint. This is essential to skinning:

You can click this lock icon to lock a joint. Click it again to unlock a joint. A locked joint is one whose influences can’t be edited whether you want to increase or decrease its area of influence—it’ll just remove what you did and preserve its latest state. An unlocked joint, however, is one whose influences can be edited. So if you’re done with painting a joint’s influence and you’re happy with it, lock it! Do not forget to unlock a joint before painting its influences, or else you will lose all your painting when click away!
Painting with only one joint unlocked will change nothing. Then you’re not affecting any other joint and therefore you can’t balance influence between two joints.
Locking joints is very important because of the following fact: skinning is apportioning parts of the mesh to certain joints. Therefore, there’s only a finite amount of mesh to go around for all joints. You’re basically defining how big of a share each joint gets in terms of its control of the mesh. Therefore, most of your time will be spent with all joints locked except for two because you’ll be removing influence from one joint and adding it to the other joints, and you don’t want other joints to have their influences increased/decreased during this transaction.
HOW DO I SKIN?
First off, select a joint and notice what you see on the mesh. In this example, if you click on “left_hip” you see the left hip joint highlighted in the viewport, and you also see a white color painted around that area. This white color is this joint’s influence over the mesh. This means that the dark parts of the mesh are parts that it doesn’t affect, and the brightest parts are the parts that it affects the most.
If you scroll down the skinning menu below the joint list, you’ll see a tab labeled “gradient.” If you expand that, there should be a “color ramp” checkbox. This will actually change the way influences are represented: instead of a black/white binary system, it’ll show a color gradient where the skin weight value corresponds to color: the warmer the color, the stronger the effect of the selected joint on that area of influence. This is useful if you want really specific information on the influence distribution, but it is often just too much information that can be distracting. For the purposes of this tutorial, keep the “color ramp” option unchecked.
If you click through the joints to see their areas of influence, you’ll notice that no two joints can control the same spot on the mesh. You can smooth the borders between the areas of influence using the smooth tool, but two joints cannot control the same spot with a value of 1 each. (If you get really advanced into this there will be exceptions to this rule but for the purposes of this class, you can safely assume this rule is true.)
Skinning is the process of painting these areas of influences yourself to get your model to deform the way you want it.
You can paint skin weights by using the paint operations below.
PAINT OPERATIONS
These are located below the list of joints. Beside “paint operation” there’s four options: Replace; Add; Scale; and Smooth. For the purpose of this class, you’re going to be mostly using replace and smooth.
To be able to use any paint operations, you have to have a joint selected. You cannot select two joints at the same time, you’ll just end up affecting only the latest joint you’ve clicked. It goes back to the fact mentioned above: no two joints can control the same spot on the mesh.
In any of these modes, just click and drag on the model to paint/actually apply them. You can control the brush size by holding “b” and left click and drag toward the right to make it bigger, and toward the left to make it smaller.
REPLACE
Replace will add influence to the joint you currently have selected, but it will also remove that influence from whichever joints had it before this one.
- Be mindful of this concept: if you have the “left_ankle” joint selected and all the other joints are unlocked, and in replace mode you paint a line of influence all along the left leg, then you’ve taken influence from the left knee and left hip. Obviously, you don’t want this to happen because the ankle shouldn’t be controlling parts of the knee and the hip.
This also depends on “value” but for the needs of this class, leave the “value” at 1 unless you want to “remove” skinning from a part, then you can set it to 0 and paint there. Be careful with this though, since “removing” influence and not apportioning it to another joint means that no joint will affect this part of the mesh. Result: no movement of the character whatsoever can cause this part to deform.
SMOOTH
Smooth will create a gradient of influence along where you paint, effectively smoothing weights along vertices in a relatively intuitive way. This is used for making adjacent joint deformations less sharp. Technically, it reduces value from 1 to decimals, but don’t worry about the number values too much.
ADD
Same as replace, but doesn’t depend on value.
SCALE
Think of this in terms of scaling something numerically, not physically. If you put “0.50” in the “value” and paint on an area, it will effectively reduce the influence on that area by 0.50. This can be helpful when there’s an intersection between three joints (e.g. legs of a quadruped and the tail joint all converge at one point) and you want to even out the weight distribution in that area. In that situation, you would want to have all three joints unlocked, and the rest of the joints locked so that they aren’t affected in this process.
SKIN LAYER 1: ASSIGNING DQ (DUAL QUATERNION) WEIGHTS.
Before we get to actually painting weights, we need to decide on an option we applied earlier: remember using the “Weight Blended” option when attaching the skeleton to the mesh? That option, as explained, is a combination of Dual Quaternion and Classic Linear methods. Before painting skin weights, you need to paint which parts of the mesh will be controlled by the Dual Quaternion method (anything not painted will be controlled by the Classic Linear method).
- Remember: Dark/unpainted = Classic Linear;
- Bright/painted = Dual Quaternion
In the paint skin weights menu on the left, click on “weight type” and select “DQ blend weight” as seen below:
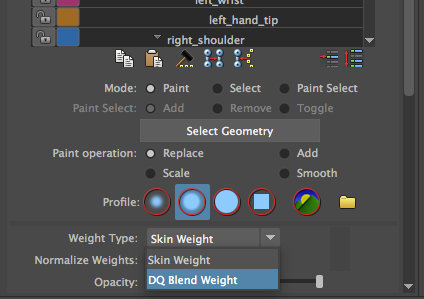
You’ll see that the mesh is now entirely dark with no painted areas. This means that everything is currently going to deform using the “classic linear” method. As mentioned before, this means that when you rotate the hands to a certain degree, the joint before it won’t deform, resulting in a candy wrapper effect in which the wrists will collapse on themselves. These are fixed with the Dual Quaternion method.
Now that the DQ Blend Weights is selected, you’ll see that there’s no joints highlighted. This is because assigning DQ Blend Weights is unrelated to joints, it only relates to the mesh.
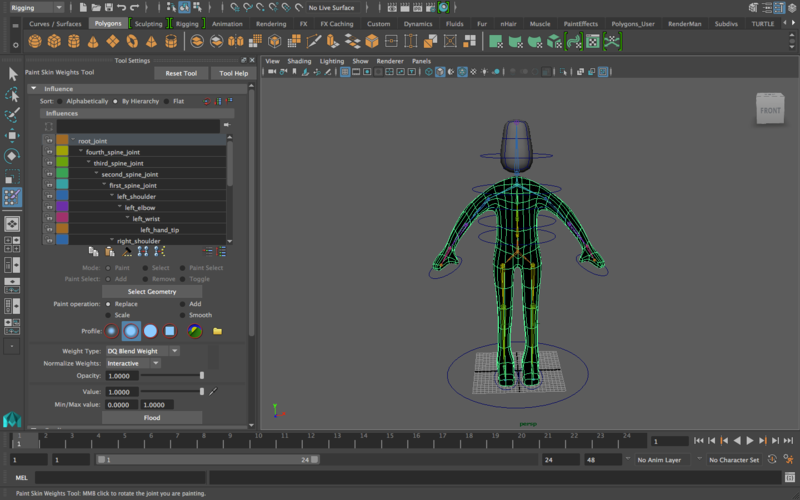
Now paint the areas around the wrists on both arms. These are the two main parts where Dual Quaternion is needed the most:
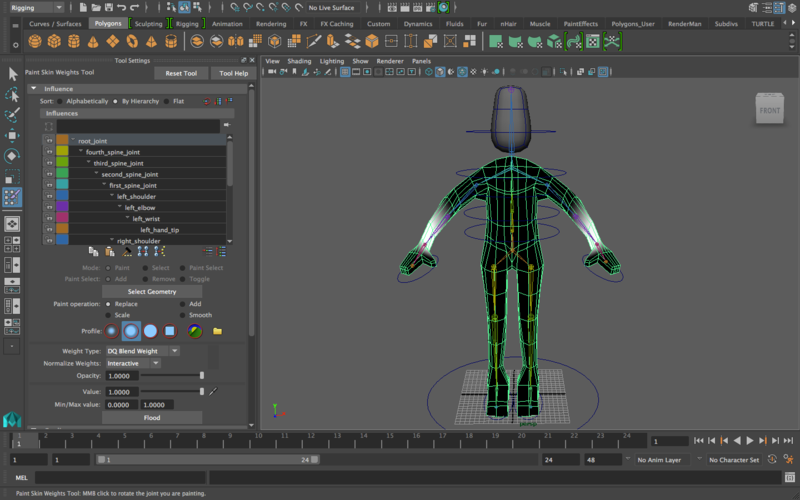
This depends on your model, but for this one we probably will not need DQ Blend Weights applied anywhere else. In SOME models, the neck sometimes pinches in on itself when the head turns 90 degrees to either direction. In that situation, you would want to paint DQ blend weights near there too.
When you’re done, switch the weight type to “skin weight” then you’re ready to paint influences to joints.
This will be another layer of paint—totally unrelated to the first layer of assigning which parts of the mesh Dual Quaternion should affect.
PAINTING SKIN WEIGHTS – UNPOSED RIG
Finally, you’re here! For this section we’ll edit the skin on a problematic part of this rig: the way the elbows bend with the shoulders.
As you can see below, when you move the wrist, the arm generally behaves logically, but there’s a few problems: the elbow compresses too much when the hand gets closer to the body, and the left side of the body/below the armpit is affected too much by this motion.
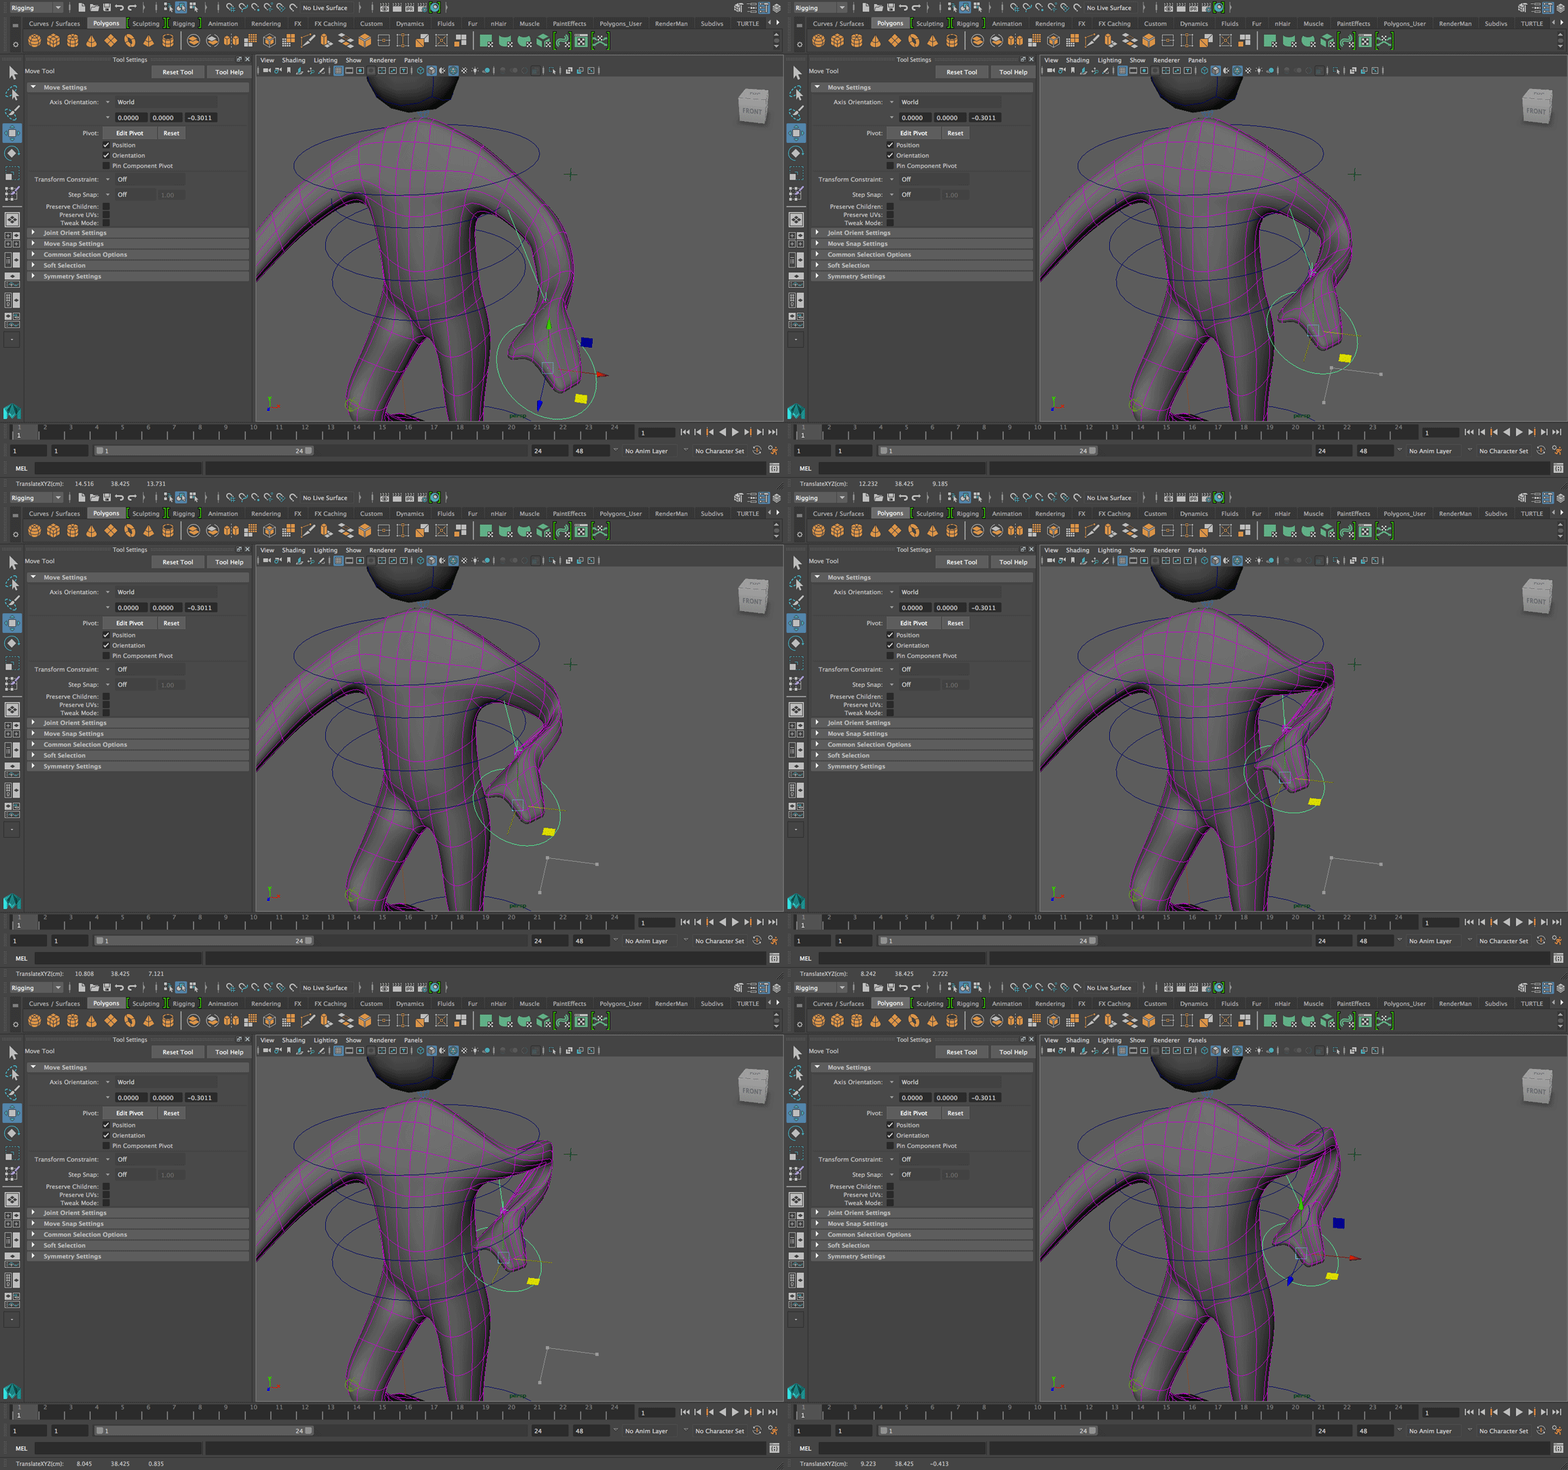
Let’s tackle them one at a time. We’ll start with the elbow/shoulder problem:
Step 1: Lock all joints.
Reason: we’re only editing the elbow/shoulder and we don’t want anything else affected by what we edit here.
Step 2: Unlock the left_shoulder joint and the left_elbow joint.
Reason: these are the ones we’re editing, so they need to be unlocked.
Step 3: Select the left_shoulder joint and take note of two things:
(1) there’s a patch of influence near the armpit, which explains why the armpit area moves when the shoulder is affected by the motion of the hand controller. (2) The shoulder’s influence trespasses quite a bit onto the elbow’s area.
Reason: this part is important, you need to know what needs to be fixed/edited before painting so that you know if you fixed the problem or not.
Step 4: Select the left_elbow, and make sure the paint operation “replace” is selected. Paint around the upper and lower edges of the elbow.
Note (1): a face gets painted when you paint its edges, not when you paint the middle of the face. So keep in mind that you should be clicking and dragging along edges, not along the middle of the faces in order to cover exactly what you want.
Note (2): jump back and forth between the left_shoulder joint and the left_elbow joint: does the influence make sense? If there’s a bit of the elbow that’s still affected by the shoulder, then go into the elbow joint and paint those areas with the “replace” operation selected.
Step 5: Test what you’ve done so far.
In this example, you would want to grab the hand controller and move that around and see how the elbow/shoulder intersection has changed.
As you notice, the elbow itself doesn’t collapse as it used to, it retains its shape a lot better now. However, when it deforms too much around the shoulder, the bend is too harsh and doesn’t look natural.
Step 6: Smooth the influence area’s borders.
Select the left_elbow joint, and instead of selecting the “replace” paint operation, select the “smooth” operation.
Click and drag from the edges of the elbow closest to the shoulder further toward the shoulder. You’ll notice that the influence you’re spreading toward the shoulder isn’t as bright, that’s because you’re not “adding” new influences, you’re taking what is currently assigned to the elbow and spreading some of it toward the shoulder just so that the bend doesn’t become very harsh.
Then when you’re done doing that on the elbow side, you’ll also want to do the same on the shoulder side. So select left_shoulder and with the smooth tool, click and drag from the edges toward the elbow.
Step 7: Test the smoothness of the borders.
Use the hand controller to test how the elbow bend deformers. Still too harsh? Go back to smoothing and smooth larger areas. Too smooth of a bend? You can undo your changes and go for less smoothing, or use the “replace” tool to redefine the area between the elbow and the shoulder and start smoothing again.
Step 8: If you’re completely done with both joints, lock them, and proceed to whichever next part of the skin map needs editing.
For this example you would then want to tackle the influence under the arm by assigning that area to the closest spine joint, taking that influence away from the shoulder so that the shoulder doesn’t affect it as much.
PAINTING SKIN WEIGHTS – POSED RIG
For particularly bothersome problems, you actually might want to skin some areas with the rig posed in the position that shows that particular problem. In this example, I’ll repeat the same process above but instead of leaving the rig in its default position, I’ll start skinning with the arm already moved.
Step 1: Put the rig in a position that highlights a weird/problematic deformation on the mesh.
Note: don’t go overboard when posing the rig—don’t let the mesh intersect with itself otherwise it’ll be too difficult to solve the skinning problems here. Push it just enough so that you can still tell which part of the mesh belongs to which joint. If you can’t tell what you’re painting then something’s wrong.
Step 2: Edit the skin weights.
You can watch the mesh actually change as you’re editing! If it’s starting to look better, then you’re on the right track. If it’s looking worse, then you’re probably doing something wrong.
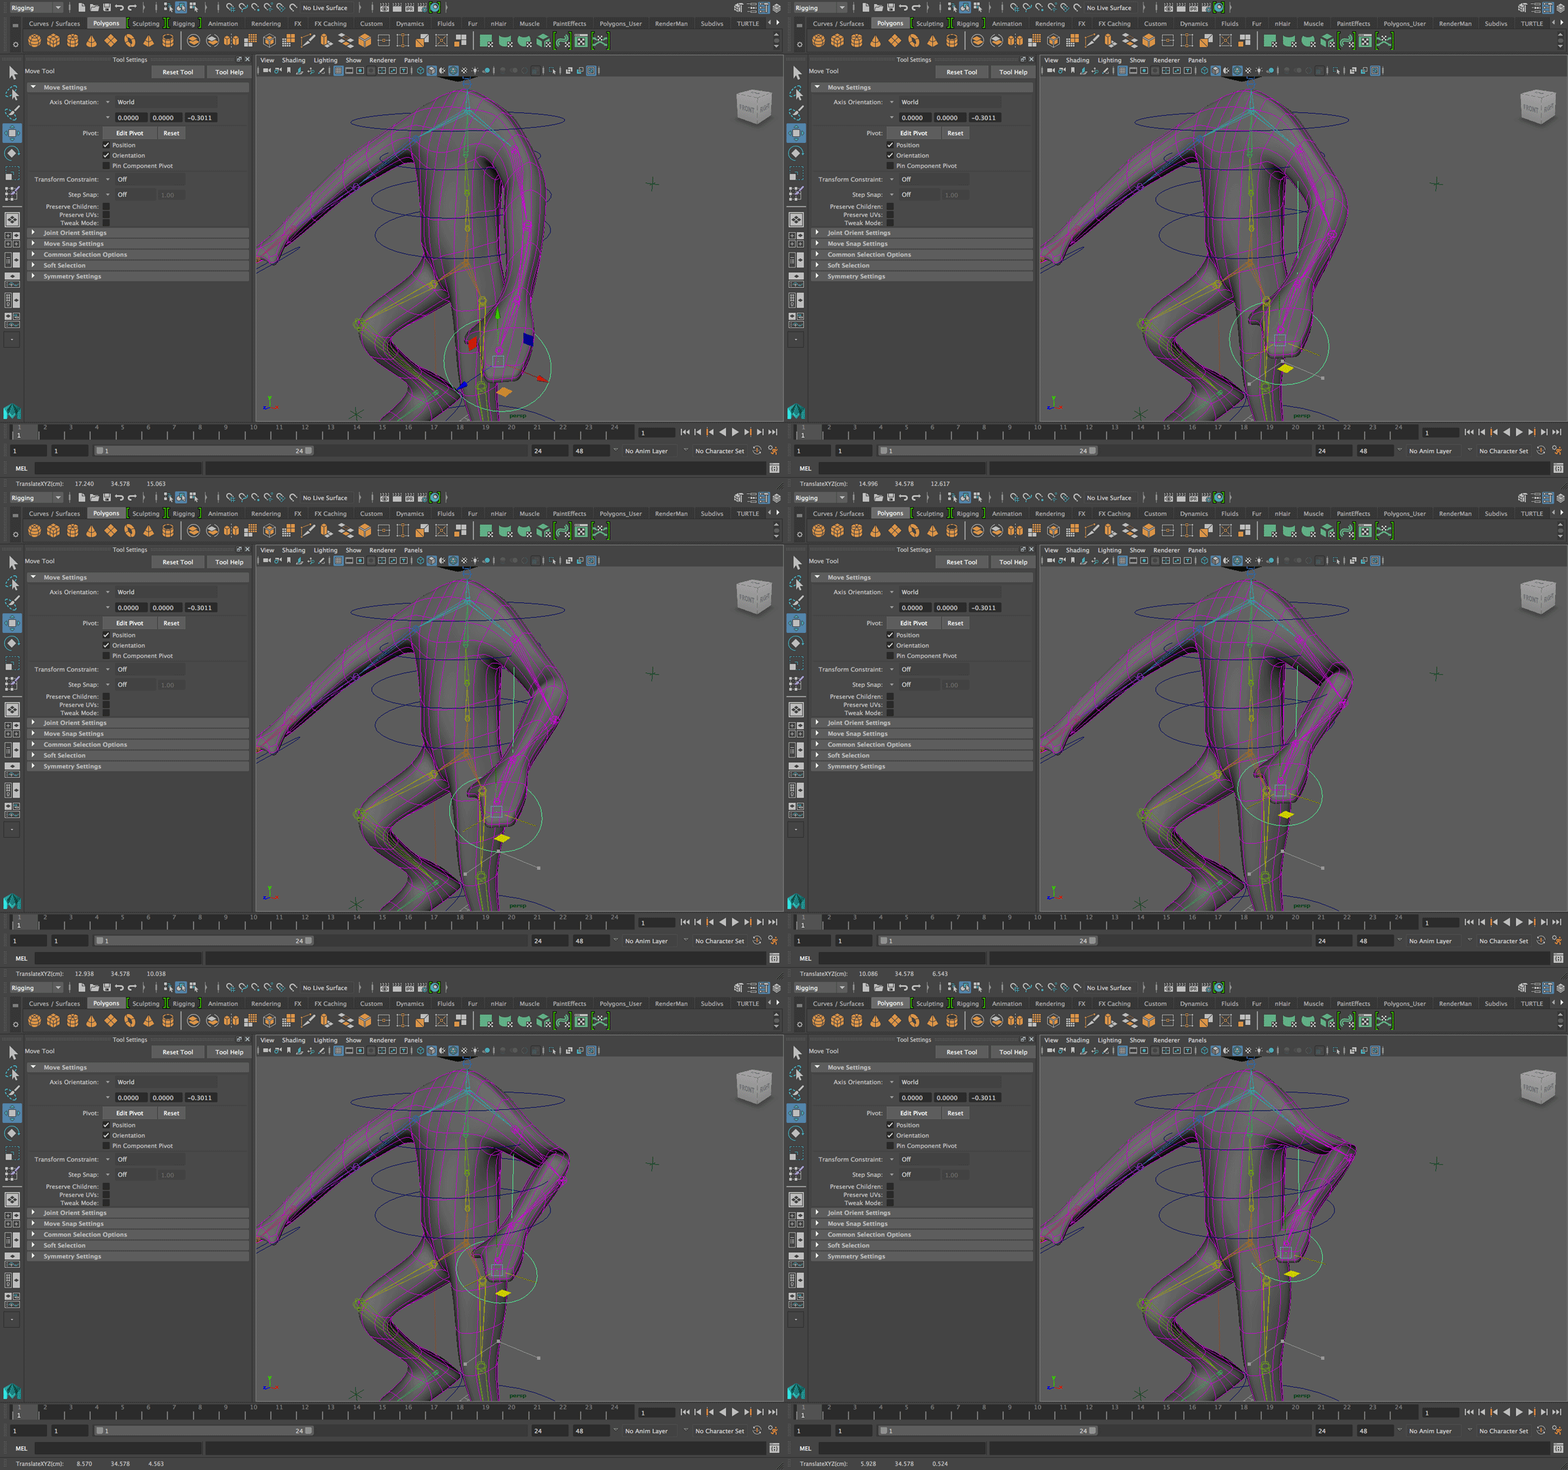
For this example, I’ve chosen to do the smoothing process we did above but with the hand already moved. This is what it would look like:
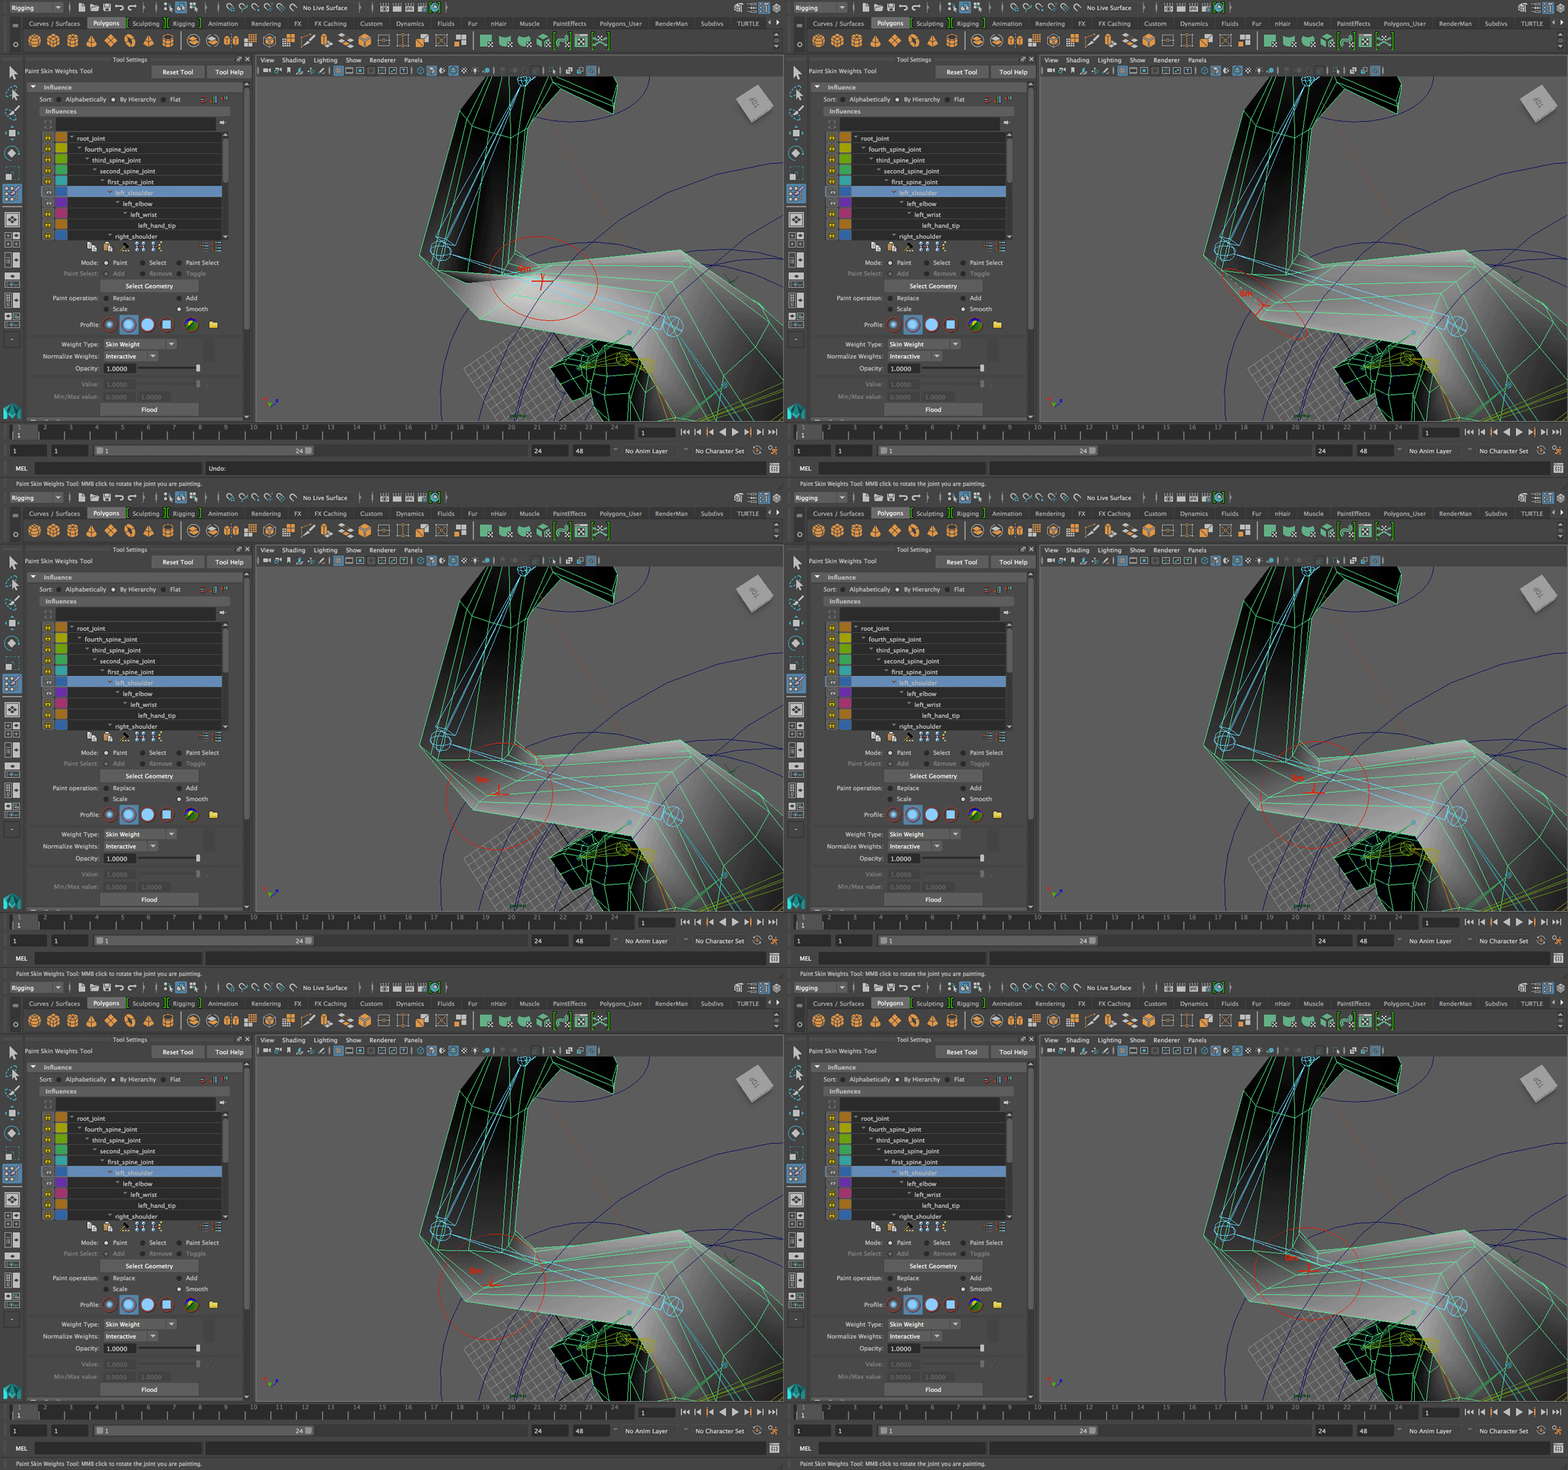
Do you see how the harsh bend is improving as the influence is being smoothed? That’s the advantage of skinning with the rig already posed rather than being in a default position.
Step 3: Whenever you’re done with one part, select the controller, put “0” in all translate and rotate slots in the channel box. Then move on to the next problematic area and do the same.
Note: this is why freeze transform is important! Putting “0” in the controller coordinates should put it back where it was. If putting “0” has moved the controller off of where it should be, you haven’t frozen transformations for the controller!
MIRRORING SKIN WEIGHTS
Done with editing the skin on one side of your model? Is your model and rig symmetrical? Then you can use the mirror skin weight tool to save yourself half the work!
Go to Skin —> Mirror Skin Weights and select the option box
Be mindful of the options here, there are many different situations and mirroring your skin weights successfully depends on your situation:
Make sure you select the correct axis (in most cases it’ll be the YZ one)
Positive to negative depends on which side you skinned. Maya is asking: should I take the right side and mirror it to the left or the other way around?
Surface association: “closest point on surface” finds the closest points on both halves of your mesh and interpolates the skin. This is the option you’ll want.
Influence Association 1:
-
If your rig has minor differences between the sides, you’ll want to select the “closest joint”. Then Maya will guess (and usually does a good job) which joint should take which part of the mirrored skin.
-
If your rig hierarchy is identical on both sides, use the “one to one” option. This will mirror your skin weights exactly from one half to the corresponding joints on the other half. Use this for highest accuracy in mirroring the skinning on your character.
-
In the “label” option, Maya will find corresponding joints based on names. If you select a joint and go to the attribute editor, scroll down and you’ll see a “joint labeling” section. Select the left_hip joint normally in the viewport, go to the “joint labeling” section in the attribute editor, and then on “side” select “left” and in “type” select “hip.” Then select the right_hip joint, and on “side” select “right” and on “type” select “hip.” Then Maya will understand that these correspond. You’ll have to do this for every joint pair for Maya to understand this, which is why I just recommend using “one to one” instead of “label.”
Influence Association 2:
Maya is asking: if option 1 fails, what should I do? Select the second best option here.
The “normalize” makes sure that no weight value exceeds 1, so have this selected.
Test your mirrored skin weights by moving the controllers around in the targeted half and carefully observing the deformations. If something is wrong, consider changing the mirroring method.
Once you’ve tested all controllers of your rig and everything behaves as expected, you’re done!! Now you can safely move on to animating your character without unexpected deformations.
MISC. NOTES
Do not, do not, do not delete history on the character from this point forward! You will lose all your skinning!
Finished skinning but didn’t apply blendshapes yet? Don’t want to lose your skinning but still want your blendshapes? Here’s how:
Make a copy of your file with the complete skin map. Don’t apply blendshapes yet.
In one file, unbind the skin (blendshapes will make it screw up anyway.) Then apply the blendshapes. You can actually edit the blendshape duplicates any time you want, but what upsets the skinning is clicking the “blendshape” option in the deform menu. Once the deformer has been applied, you can edit your blendshapes duplicates at any time and the expressions will update without affecting the skinning.
Attach the skin to the mesh using the same options you used in skinning it the first time.
Import the other copy you made earlier of the file. Now you have two copies of your character inside one scene: one of them has blendshapes applied and another has the skinning you made. Make your characters stand on the exact same spot (if their root controller had its transformations frozen, just make sure the coordinates are all “0”).
Select the skinned character, then the unskinned/blendshaped character. Then go to skinàcopy skin weights and click the option box.
This is very similar to the mirror skin weights option box covered in detail above with the difference being that the source is a copy of your character and the target is the other copy of your character. You’ll want to have the influence association set to “one-to-one” since your rigs and models are identical.
Voila! One of the copies of your characters in the scene has blendshapes and correct skinning! Feel free to delete the other character from the scene and keep the correct one.
Skinning can be edited at any time from this point forward. If you animate and realize that there’s a weird deformation, you can edit parts of the skin map and the animation will automatically update.